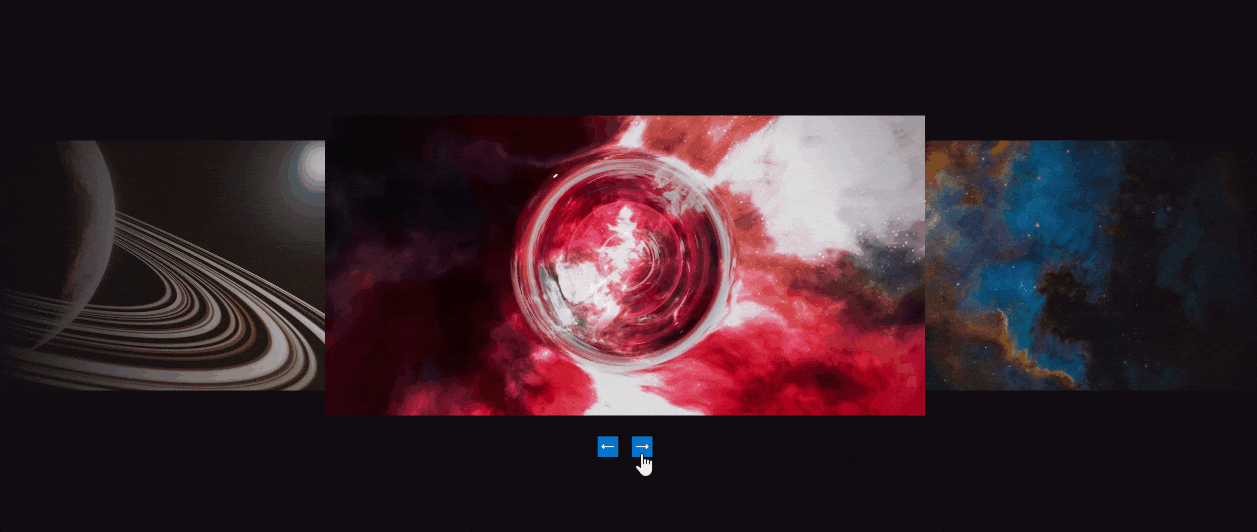
How to Smoothly Zoom Images In and Out in JavaScript
Zooming in and out of images in JavaScript is a great way to save space, but still allow your users to view the full-sized image. In this tutorial, we are going to take a look at how you can zoom in and out on images in JavaScript. But to make this project more practical, we are going to do it as part of implementing a carousel. This project is also hosted on GitHub.
We are going to achieve this in vanilla JavaScript with some CSS animations, without any frameworks. Explaining the implementation of the carousel will take some time, so if you are looking for a short answer on how to zoom images in JavaScript, here it is.
In order to zoom images in and out in JavaScript, you need to either change the width and height properties of the img element, or you need to use transform: scale(). The easiest way to do this is to apply a class to the element with JavaScript. This can happen either on click or on hover.

Set up the Project
First, we are going to need to set up the project, however. If you are only interested in the implementation part, you can grab the full source code from GitHub, or you can jump right to the point of interest using the links below:
For everyone else, you will need to set up a placeholder in your HTML for the carousel, and include a new script file as well as some styles. Here is the entire document that we are going to work with:
<!DOCTYPE html>
<html lang="en">
    <head>
        <meta charset="UTF-8" />
        <meta http-equiv="X-UA-Compatible" content="IE=edge" />
        <meta name="viewport" content="width=device-width, initial-scale=1.0" />
        <title>🎠 Carousel in JavaScript</title>
        <link rel="stylesheet" href="./styles.css" />
    </head>
    <body>
        <div class="carousel"></div>
        <script src="./carousel.js"></script>
    </body>
</html>Building the Carousel
That is all the HTML we need, the rest will be added with JavaScript. Create a carousel.js file next to your index.html if you haven't already, and create the following function:
const createCarousel = config => { ... }

const images = [{
    src: 'path/to/image.png',
    alt: 'Alt tag for image'
}]

createCarousel({
    selector: '.carousel',
    trigger: 'click',
    images
})To make this carousel a little bit more configurable, we will allow some configurations to be passed. Namely:
selector: A CSS selector that will be used by ourcreateCarouselfunction to grab the right container.trigger: Eitherclickorhoverto define how the carousel should be triggered.images: An array of image objects, containing asrcand analtproperty. This way, you can create carousels from remote data sources.
To create the HTML for the carousel itself, add the following to your createCarousel function:
const createCarousel = config => {
const {
selector,
images,
trigger
} = config
const even = images.length % 2 === 0
const activeImageIndex = Math.floor(images.length / 2)
const container = document.querySelector(selector)
const html = `
<ul${even ? ' class="even"' : ''}>
${images.map((image, index) => `
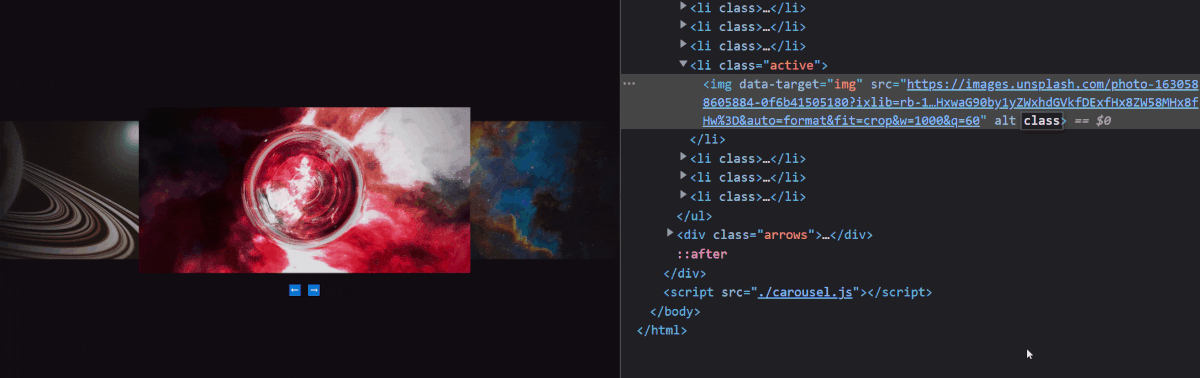
<li${index === activeImageIndex ? ' class="active"' : ''}>
<img
data-target="img"
src="${image.src}"
alt="${image.alt}"
/>
</li$>
`).join('')}
</ul>
<div class="arrows">
<span class="left" data-target="left">⬅️</span>
<span class="right" data-target="right">➡️</span>
</div>
`
container.innerHTML = html
}This may seem like a lot to take at first, but let's break it down. First, we want to grab everything from the configuration object. We can do this with destructuring. Then we have two variables, even and activeImageIndex which will be used by CSS.
even can be used to tell whether the number of images is even, in which case, we want to align the carousel accordingly to make the active image always appear in the center of the screen, while activeImageIndex will be used to grab the middle element from the images.
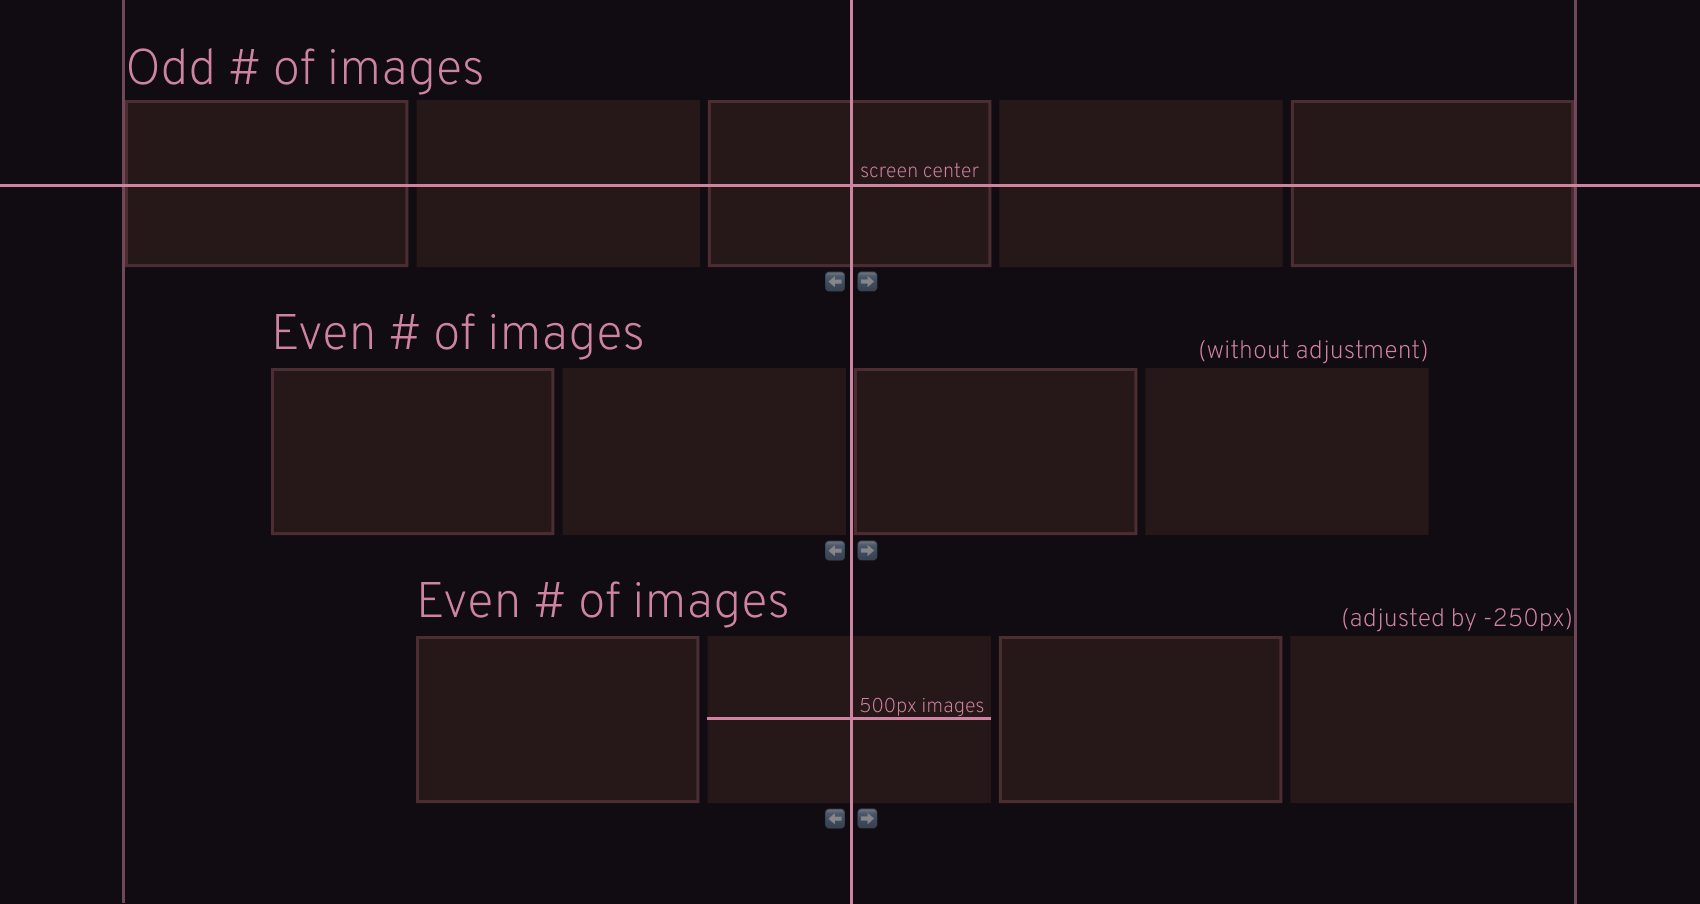
We can use the remainder (modulo) operator to calculate if there are even number of images and to grab the image in the middle of the array, we can use its length, divided by two.
The rest is just building up the HTML with a template literal and assigning it to the innerHTML of the passed element, that we can grab with a querySelector.
Notice that we have data-target values on the elements. We will use these in JavaScript to grab the right DOM elements.

Styling the Carousel
Now that we have the necessary DOM elements for the carousel, we need to style it accordingly so it actually looks and behaves like a carousel. For the carousel container, we will need the following rules:
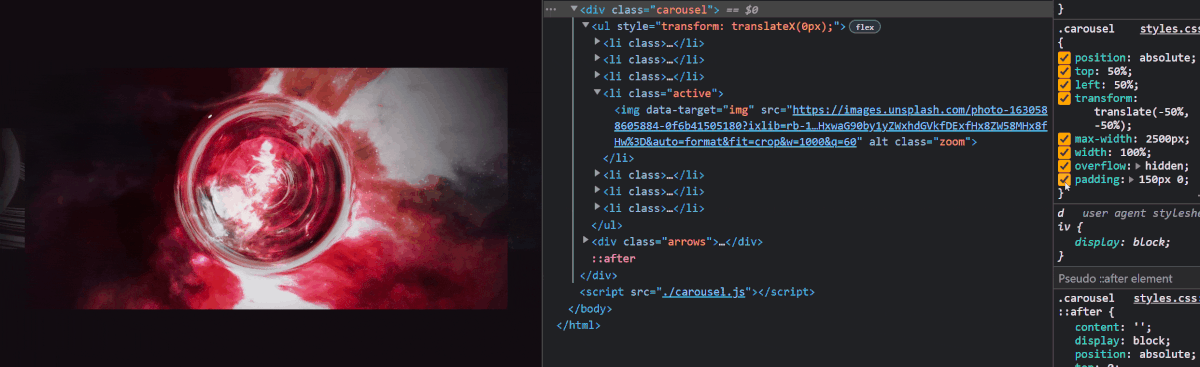
.carousel {
    max-width: 2500px;
    width: 100%;
    overflow: hidden;
    padding: 150px 0;
}We need overflow: hidden to ensure the width of the carousel doesn't exceed 100% of the screen. Also, note that we added a quite large padding. We need this to avoid clipping. Without this, zoomed-in images would be clipped.
Optionally, we can also add an ::after element to create a fade-out effect for the furthest images from the center. This can be achieved with a radial gradient:
.carousel::after {
    content: '';
    display: block;
    position: absolute;
    top: 0;
    left: 0;
    width: 100%;
    height: 100%;
    pointer-events: none;
    background: radial-gradient(circle, rgba(17,12,17,0) 30%, rgba(17,12,17,1) 90%);
}If you do so, make sure you include pointer-events: none to allow the images to receive click events. Otherwise, they will be masked out by the element. Moving forward, the list is displayed as a flex, centered on the screen. If you want to animate the zoom effects, this is where you also want to add a transition.
.carousel ul {
    margin: 0;
    padding: 0;
    display: flex;
    list-style-type: none;
    justify-content: center;
    transition: transform .6s cubic-bezier(0.075, 0.82, 0.165, 1);
}

.carousel ul.even {
    transform: translateX(-250px);
}This is where we also want to adjust the carousel for an even number of images. Since each image will have a width of 500px, we want to use half of that for the adjustment. Lastly, we have the image. We will use a transform: scale for zooming the images in and out.
/* For an initial zoomed-in effect */
.carousel ul li.active img {
    transform: scale(1.2);
}

/* For zooming even further on click */
.carousel ul li.active img.zoom {
    transform: scale(2);
}

/* For disabling click event on images that are not in the middle */
.carousel ul li:not(.active) img {
    pointer-events: none;
}

.carousel img {
    width: 500px;
    height: 250px;
    object-fit: cover;
    display: block;
    cursor: pointer;
    transition: transform .6s cubic-bezier(0.075, 0.82, 0.165, 1);
}Since the dimensions are fixed, you also want to add object-fit: cover to avoid distorting the aspect ratio of the images. If you want your zoom effects to be animated, this is where you need to add a transition again.
How to Zoom Image Onclick
Now that we have everything sorted for CSS, we can jump back into coding actual interactivity. First, let's have a look at how you can zoom images in JavaScript using a click event. We will need to add a click event listener on the carousel itself, and then we can toggle a zoom class that will add a transform property on the image:
let transform = even ? -250 : 0
let index = activeImageIndex

container.addEventListener('click', event => {
    const target = event.target
    const carousel = container.querySelector('ul')
    const activeElement = container.querySelector('.active')

    switch (target.dataset.target) {
        case 'img':
            if (trigger !== 'hover') {
                target.classList.toggle('zoom')
            }
        break
        case 'left':
            if (index !== 0) {
                index--
                transform += 500
                carousel.style.transform = `translateX(${transform}px)`

                activeElement.classList.remove('active')
                activeElement.previousElementSibling.classList.add('active')
            }
        break
        case 'right':
            if (index !== images.length - 1) {
                index++
                transform -= 500
                carousel.style.transform = `translateX(${transform}px)`

                activeElement.classList.remove('active')
                activeElement.nextElementSibling.classList.add('active')
            }
        break
    }
})For the zoom effect itself, we only need the first case from the switch. This toggles the necessary class. The left and right case on the other hand handles the navigation.
We need to transform the entire carousel by the width of an image (500px) either to the left or right, and also switch the classes of the active image. Make sure you check if we are on the first or last image to prevent the user to navigate in one direction indefinitely. For these checks, we can store an index just above the event listener.
Notice that in case the number of images is even, we want the initial value of the transform variable to be -250px.
How to Zoom Image Onmouseover
For triggering zooms on mouse over, we need to add two more event listeners: mouseover for the hover in, and mouseout for the hover-out events:
if (trigger === 'hover') {
    container.addEventListener('mouseover', event => {
        if (event.target.dataset.target === 'img') {
            event.target.classList.add('zoom')
        }
    })

    container.addEventListener('mouseout', event => {
        if (event.target.dataset.target === 'img') {
            event.target.classList.remove('zoom')
        }
    })
}This does the same thing as the click event listener. Either add (on hover) or removes the zoom class (on blur).
Summary
Congratulations, you have just finished creating your very first carousel in JavaScript with zoom-in and out functionality! As mentioned in the beginning, the full source code is available on GitHub.
Want to take this one step further? Here are some ideas on how to make this carousel more configurable:
- Introduce infinite scrolling
- Allow navigation with swipes and the keyboard
- Display dots instead of arrows
- Allow links to be placed on the images
Are you looking for more JavaScript projects? Check out the article below to find 100 JavaScript project ideas. Thank you for reading through, happy coding! 🎠


Rocket Launch Your Career
Speed up your learning progress with our mentorship program. Join as a mentee to unlock the full potential of Webtips and get a personalized learning experience by experts to master the following frontend technologies:
Courses


Recommended
SolidJS vs React: Should You Make the Switch?
How to Get Up and Running With Vitest
