Writing Your Very First Neural Network in JavaScript
In the last couple of years, we’ve seen a number of machine learning libraries popping up in the JavaScript community, allowing front-end developers to bring AI to the web and solve complex problems with easy-to-use APIs.
TensorFlow is one of the most popular open-source platform for machine learning, mainly used with Python. In 2018 Google announced the first version of TensorFlow for JavaScript, called TensorFlow.js. This is what we are going to explore in this tutorial.
We are going to build an image classifier. At the end of the tutorial, our classifier will be able to distinguish images between Santa and an everyday old man. But to get started, we first need to understand what are neural networks.

How Neural Networks Work
Before diving into coding, there are a couple of concepts we need to understand. If you are already familiar with neural networks, then you can skip this part and jump straight into coding. Otherwise, keep on reading as I’m going to refer to things mentioned here throughout the tutorial. Let’s see first what are neural networks?
Neural networks
There are a lot of technicalities involved, but to give you a brief overview, neural networks are machine learning algorithms inspired by biological neural networks found in our brains. They are used for pattern recognition and consist of nodes, called neurons connected together by synaptic weights.
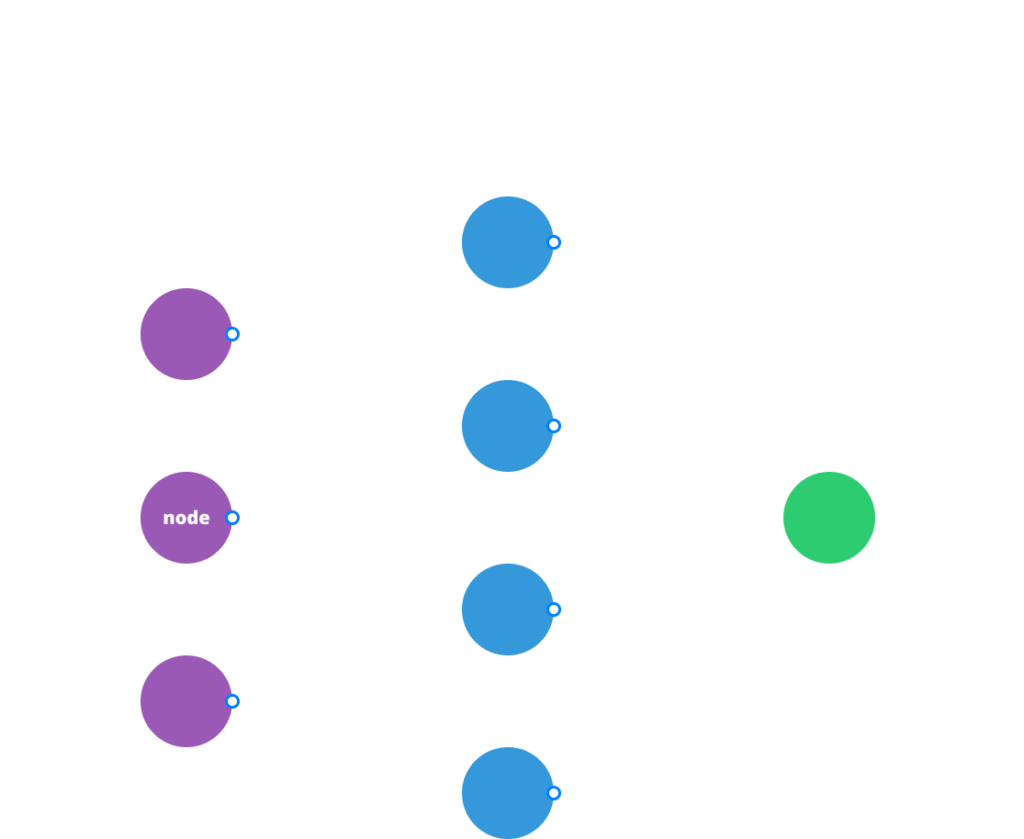
Model
When these machine learning algorithms are trained with data, we get a model as an output. It is a representation of the training process. Models can be used for future predictions.
Features and labels
The data that you feed into the model usually consists of features and labels. Features are attributes associated with each sample in your data set. A classical example is the classification of Iris flowers based on features such as the width of sepals and petals.
Labels represent how would you classify each sample. Staying with the example, based on the features you categorize the entry into one of the free species. It either gets a label of “Iris setosa”, “Iris virginica” or “Iris versicolor”.
Now that we have everything out of the way, let’s see what we will have in the end.
The Final Output of This Tutorial
At the end of the tutorial, we will have an app that you can train on two different sets of images: Santa and the elderly. Once you have enough data, the app will be able to predict what the image is about, without ever seeing it.
I will make the whole project available on codesandbox so you can tweak around with it. You’ll find a link to it at the end of the tutorial. And a nice gif about how our app will work:
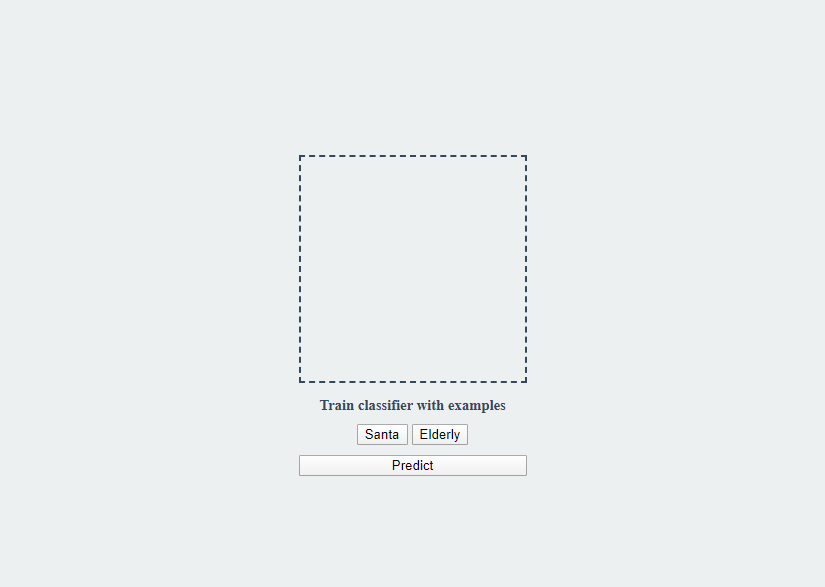
You can drag images onto a canvas element and train the classifier by clicking on one of the buttons below. Once you have sufficient data, you can drag a new image in and predict what’s on it.

Pulling in Dependencies
Our very first step is to pull in everything we need. We’re going to use TensorFlow.js and a popular pre-trained model called MobileNet for image classification. We will then use a technique called transfer learning, where we will extend the pre-trained model with our own custom training set. For that, we are going to need a classifier. We will be using the K-nearest neighbor module. It will allow us to categorize images and once we use prediction, it will choose the category most suitable for the image.
This means we will have 3 dependencies: TensorFlow, MobileNet and the KNN classifier module. Here is the whole document we’re going to work with:
<!DOCTYPE html>
<html lang="en">
    <head>
        <meta charset="UTF-8" />
        <meta name="viewport" content="width=device-width, initial-scale=1.0" />
        <title>Image classification with Tensorflow.js</title>
        <script src="https://unpkg.com/@tensorflow/tfjs"></script>
        <script src="https://unpkg.com/@tensorflow-models/mobilenet"></script>
        <script src="https://unpkg.com/@tensorflow-models/knn-classifier"></script>
        <link rel="stylesheet" href="styles.css" />
    </head>

    <body>
        <main class="app">
            <span class="loading">Loading Model...</span>

            <canvas width="224" height="224"></canvas>

            <div class="actions">
                <span class="info">Train classifier with examples</span>
                <button class="santa">Santa</button>
                <button class="elderly">Elderly</button>
            </div>

            <button class="predict">Predict</button>
        </main>

        <script src="classifier.js"></script>
        <script src="ui.js"></script>
    </body>
</html>
Before the closing of the body, we will have two different scripts. One for the classifier and one for dealing with UI events.
You may also notice that the canvas element has a really specific width and height. This is because the pre-trained model has been trained with 224x224px images. To match the format of the data, we have to use the same size. You can still work with larger images, you’ll just have to resize the data before feeding it into the classifier.
Before starting to work on the classifier, let’s quickly put the UI together.
Creating the UI
Create a new file called ui.js. We’re going to make the canvas accept images by drag-and-drop. First, get the canvas and its context and attach some event listeners to it:
const canvas = document.querySelector('canvas');
const context = canvas.getContext('2d');

canvas.addEventListener('dragover', e => e.preventDefault(), false);
canvas.addEventListener('drop', onDrop, false);We need to handle two events: dragover and drop.onDrop will draw the image onto the canvas, while dragover only prevents the default action from happening. This is needed because without it, the image would be opened on the same tab.
Let’s see what’s inside the onDrop function.
const onDrop = (e) => {
    e.preventDefault();

    const file = e.dataTransfer.files[0];
    const reader = new FileReader();

    reader.onload = file => {
        const img = new Image;

        img.onload = () => {
            context.drawImage(img, 0, 0, 224, 224);
        }

        img.src = file.target.result;
    }

    reader.readAsDataURL(file);
}The very first thing is to prevent the default action just like we did for dragover. Next, we want to get the data from the file we dropped onto the canvas. We can get it using e.dataTransfer.files[0]. Then we want to create a new FileReader object and read the file as a data URL. We also want to create a function for its onload event. When the reader finished reading the file, we create a new Image object and set its source to file.target.result. This will hold a base64 encoded image data. And once the image has been created, we draw it on the canvas. Remember, we need to scale it to 224×244.
While also here, let’s quickly add the event listeners to the buttons, and then we can start creating the classifier. We have 3 buttons and 3 event listeners:
const santaButton = document.querySelector('.santa');
const elderlyButton = document.querySelector('.elderly');

santaButton.addEventListener('click', () => addExample('santa'));
elderlyButton.addEventListener('click', () => addExample('elderly'));

document.querySelector('.predict').addEventListener('click', predict);We will have an addExample function that will take in one parameter: a label for the category. And we will have a predict function.
Building the Classifier
We will create both functions inside a new file called classifier.js. But first, we need to create a classifier and load in MobileNet. To do that, add the following function to classifier.js and call it:
let classifier;
let net;

const loadClassifier = async () => {
    classifier = knnClassifier.create();
    net = await mobilenet.load();

    document.querySelector('.loading').classList.add('hidden');
}

loadClassifier();Both classifiers and the model will be used later on. So I created two variables for them outside the function. It takes some time for the model to load in and it does it asynchronously, hence we use async / await. Once it’s loaded, we can hide the loading message.

To extend the model with our own custom data set, we have to add our own examples. To do that, anytime the user clicks on “Santa” or “Elderly”, we call the addExample function.
Adding examples
The function will do the following:
- Get the image data from the canvas
- use MobileNet to get the features of the retrieved data
- Train the classifier by adding an example using the features and an associated label to it
let trainingSets = [0, 0];

const addExample = label => {
    const image = tf.browser.fromPixels(canvas);
    const feature = net.infer(image, 'conv_preds');

    classifier.addExample(feature, label);

    context.clearRect(0, 0, canvas.width, canvas.height);

    label === 'santa' ?
        santaButton.innerText = `Santa (${++trainingSets[0]})` :
	elderlyButton.innerText = `Elderly (${++trainingSets[1]})`;

    document.querySelector('.info').innerText = `Trained classifier with ${label}`;

    image.dispose();
}First we get the pixel values from the canvas using ft.browser.fromPixels. Next, we get the features using the infer method of MobileNet. After that, to add examples, we can simply call addExample on the classifier with the feature and the label.
Then we need to update the DOM elements. We clear the canvas, so we can add a new example. We also need to update the buttons to tell the user how many examples have been added to each set. For this, I’ve created a new array which counts the number of examples.
Lastly, we can call dispose on the image to free up memory.
Predicting
Once we have the necessary data, we can test the model. By clicking on “Predict”, the predict function will be called which is very similar to addExample:
const predict = async () => {
    if (classifier.getNumClasses() > 0) {
        const image = tf.browser.fromPixels(canvas);
        const feature = net.infer(image, 'conv_preds');

        const result = await classifier.predictClass(feature);

        context.clearRect(0, 0, canvas.width, canvas.height);

        document.querySelector('.info').innerText = `Predicted to be ${result.label}`;

        image.dispose();
    }
}The very first thing is to test whether we have examples in our data set. If we haven’t added any examples, there’s no way it’s going to predict us anything. This is what classifier.getNumClasses checks.
Just like for addExample, we need the features of the image, which we can get the same way. We then need to call classifier.predictClass passing in the features to get a prediction about the image. Once we get a result, we clear the canvas, print out the prediction, and dispose the image object.
Summary
And now our image classifier works as expected. After training the model with a couple of images for both sets, we can predict the next image with confidence.
To get the full source code and tweak around with the project, visit codesandbox.io. You can also clone it from GitHub. This is my last tutorial for this year, but I will be back with new topics in the next decade. Thank you for reading through!
As a last word, I would like to wish you a Merry Christmas and a Happy New Year! 🎄 🎉
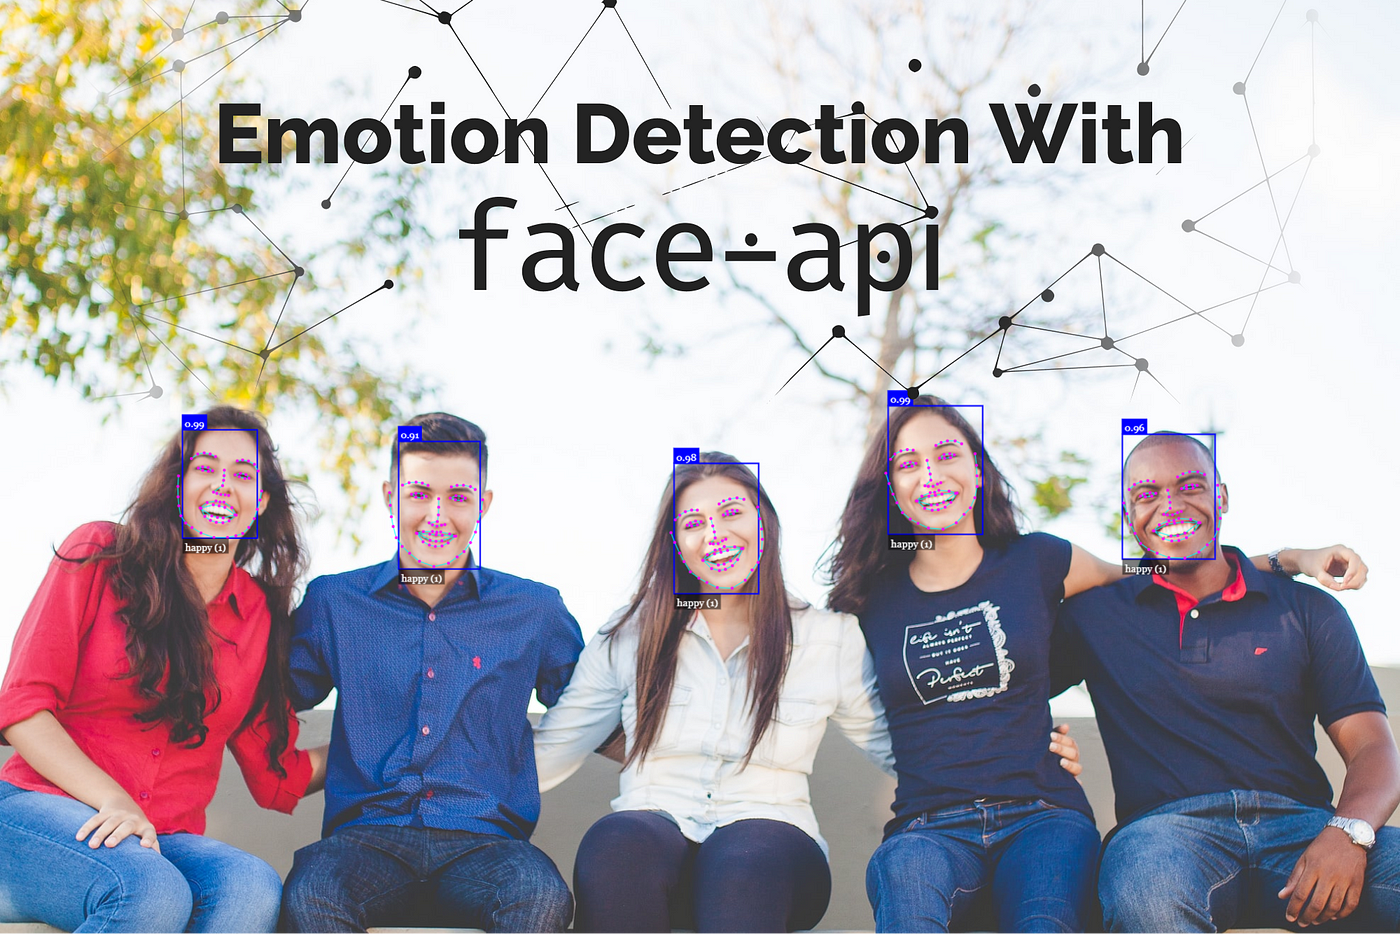
Learn how you can build upon classifications and also add emotion detection:

Rocket Launch Your Career
Speed up your learning progress with our mentorship program. Join as a mentee to unlock the full potential of Webtips and get a personalized learning experience by experts to master the following frontend technologies:
Courses


Recommended
How to Easily Add Emotion Detection to Your App With face-api.js

Getting Into Three.js