Writing a Server Starter CLI for CS:GO With JavaScript
CS:GO is one of the most popular games out there and recently it has been made completely free. How many of you have tried out the game at least once? How many of you have been actively playing with the game? I guess we can all relate.
I’ve been one of those few people who don’t really dig the world of FPS, especially when it comes to Counter-Strike. But when Valve announced that CS:GO is going free, my friends have tried to persuade me harder than ever before.
Since then, we often play and so the idea came to write a script that starts a server so we don’t have to do it manually each time we want to go for a round. Can you imagine how many hours of time we were able to save by investing in this tool? Well probably not hours but maybe minutes.
Anyway, I managed to do it and this is the story about the challenges and the final success that follows.

The Concept
The main concept was that the user starts a batch file from which they can select the game mode and a map and click on run. The game starts with the defined params and everybody is happy. — This was the concept. It was easier to conceptualize than to implement. And I haven’t even know by then what have I gotten into.
It seems it is much harder to start a game and automate keyboard input at the same time than I first thought. The biggest challenge was to know when the game finally booted up. I had a couple of ideas to go with.
- The first and most obvious was to see if there’s an API that can handle all of that. There wasn’t.
- What if there is a process event emitted when the game starts? — I couldn’t rely on processes since the start of the process doesn’t mean the game is already in the main menu.
- What if I create a screenshot about the main menu and compare pixels to check if the main menu is displayed? — That won’t work in case they change the main menu. Not to mention it’s unnecessarily complex.
Seemed like every solution I came up with had a flaw. I was even thinking about trying out image recognition to spot fixed parts of the game that rarely change and do a match check against them. This would have been an overkill.
The solution was much more simpler but probably the hackiest of all.
The Dependencies
Since I’m a web developer, it was obvious for me to go with JavaScript. And since I only wanted a CLI, node was the obvious choice. We all know node is all about dependencies. To make my concept work, I needed 4.
First I needed a package that hides the underlying mystical layers of interacting with the command line. I initially wanted to go with inquirer, but from the docs, it seemed like it doesn’t support tables. Displaying the options in one single column was less user friendly than doing the same in a table, especially if the player has thousands of workshop maps. So terminal-kit was the better choice.
I also needed robotjs which exposes some nice API to interact with user input devices such as a keyboard or a mouse. It is required to eventually write out the command inside the game.
Since we are working from node, we don’t have the same API we have inside the browser. To copy the params into the clipboard I needed copy-paste therefore, which adds the functionality for that.
Last but not least, to ease the process of reading maps, path is also among the list of dependencies
This is the final package.json file I’m using:
{
    "name": "cs-server",
    "version": "2.0.0",
    "description": "",
    "main": "CSScript.js",
    "author": "",
    "license": "ISC",
    "dependencies": {
        "copy-paste": "1.3.0",
        "path": "0.12.7",
        "robotjs": "0.5.1",
        "terminal-kit": "1.27.0"
    }
}
Creating The Configuration File
To declutter the starting script, I moved out some options into a config.js file which holds all changeable parameters. Such as the path to the CS root folder, the shortcut key for opening the console in game, and an array holding all parameters that are usually set by the players. These will be copied into the clipboard to later be pasted into the console.
/**
 * Modify the rootPath and consoleShortcut to match your settings.
 * If you wish to add additional params to the game, you can do so in optionalParams, these will be copied to your clipboard
 */
module.exports = {
    rootPath: 'C:\\Program Files (x86)\\Steam\\steamapps\\common\\Counter-Strike Global Offensive', // Your CS:GO root path
    consoleShortcut: 'f2', // Set this to the button that you use to open the console in CS:GO

    // params to set in CS:GO
    optionalParams: [
        'mp_friendlyfire 1',
        'mp_solid_teammates 2',
        'mp_freezetime 5',
        'mp_autoteambalance 0'
    ]
};Creating The Menu File
I also moved some constants into another file called menu.js, again for removing some noise from the main script file. This file holds the menu options the user can choose from as well as information on the selected game mode and map:
const selectedMenuItem = {
    gameMode: {
        name: 'Competitive',
        type: 0,
        mode: 0
    },
    map: {
        mapName: '',
        mapPath: ''
    }
};

const menuOptions = [
    'Let\'s teach these dogs a lesson',
    'Game Mode',
    'Classic maps',
    'Workshop maps',
    'Exit'
];

module.exports = {
    selectedMenuItem,
    menuOptions
};Writing The CS-Script
The main script file is responsible for creating the CLI, collecting available maps, and starting the game. To create an executable version for it, I also created a .bat file which holds one single line:
node CSScript
Tells node to run CSScript.js.
Setting everything up
To set everything up, I pulled in all the dependencies as well as two additional built in packages:
spawnwhich will be responsible for starting the process for CSfsis the file system which is used to read in maps
const spawn     = require('child_process').spawn;
const robot     = require('robotjs');
const ncp       = require('copy-paste');
const fs        = require('fs');
const path      = require('path');
const terminal  = require('terminal-kit').terminal;
const settings  = require('./config.js');
const {
    selectedMenuItem,
    menuOptions
} = require('./menu.js');

const gameModes = [
    'Casual',
    'Competitive',
    'Arms Race',
    'DeathMatch',
    'Demolition',
    'Wingman'
];

const maps = {
    classic: [],
    workshop: []
};

const defaults = {};

const isMap = (file) => path.extname(file) === '.bsp';

let gameStartedBooting = false;
let gameInterval;Apart from importing the config and menu files —
- I also defined the list of available game modes from which the player can choose from
- A constant for
mapsthat will hold all classic and workshop maps - A
defaultsobject which will hold paths to game files and the size of our screen (this will be needed for checking if the game booted) - And I also added a helper function for checking if a file is a map.
I also added a flag to check if the game has started booting as well as an interval that will set up a setInterval which will do the hackiest checks I’ve ever created.
Setting up the defaults
First things first: we need to collect some information from the player, such as the route for the maps, the executable file’s path, and the screensize. This is what this function is supposed to do:
function setDefaults() {
    defaults.mapPath = `${settings.rootPath}\\csgo\\maps`;
    defaults.workshopMapPath = `${settings.rootPath}\\csgo\\maps\\workshop\\`;
    defaults.executablePath = `${settings.rootPath}\\csgo.exe`;
    defaults.screenSize = robot.getScreenSize();
}I’m assigning it to defaults since I will make use of them later on. Getting the screen size is easy with robotjs, I just had to call robot.getScreenSize.
Getting the maps
To let the user select a map, we first need to know what maps they have. To do so, I defined two functions after setting the defaults: getMaps and getWorkshopMaps.
function getMaps() {
    fs.readdirSync(defaults.mapPath).forEach(file => {
        if (isMap(file)) {
            const mapName = path.basename(file, '.bsp');

            maps.classic.push({
                mapName,
                mapPath: mapName
            });
        }
    });
}For getting the maps, the function reads the directory which is set by the setDefaults function. To be on the safe side, it checks if the file in the loop is a map and populates maps.classic with it. The mapName property will be displayed in the CLI while the mapPath will be inserted into the console. For classic maps, there’s no difference between the map name and map path, but for workshop maps, there is:
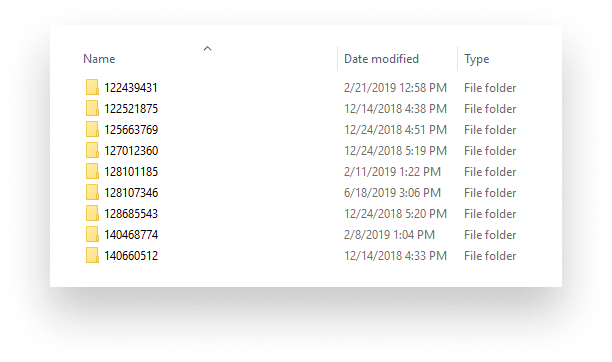
function getWorkshopMaps() {
    fs.readdirSync(defaults.workshopMapPath).forEach(file => {
        fs.readdirSync(defaults.workshopMapPath + file).forEach(internal => {
            if (isMap(internal)) {
                const mapName = path.basename(internal, '.bsp');
                const mapPath =  `workshop\/${file}\/${mapName}`;

                maps.workshop.push({
                    mapName,
                    mapPath
                });

                maps.workshop.sort((a, b) => a.mapName > b.mapName ? 1 : -1);
            }
        });
    });
}The same goes for the workshop maps, but here, each map is inside a sub-folder. This is the reason we need nested loops and that’s why we have different values for the map name and the path.
Creating the main menu
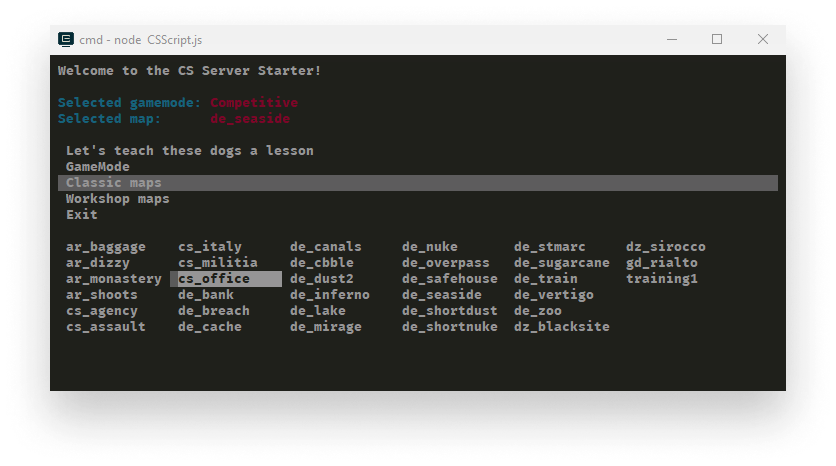
The next step was to finally get something on the CLI, just some basic information first: showing the selected game mode and the map. Thanks to terminal-kit, this was fairly easy:
terminal.white('Welcome to the CS Server Starter!\n\n');

terminal.cyan('Selected gamemode: ');
terminal.red(selectedMenuItem.gameMode.name + '\n');
terminal.cyan('Selected map:\t   ');
terminal.red(selectedMenuItem.map.mapName + '\n');It is also time to put the menu in place with the help of terminal.singleColumnMenu. I get the menu options from the menu file and based on the selected menu’s name, I execute a given function:
terminal.singleColumnMenu(menuOptions, (error, response) => {
    const selectedMenuItem = menuOptions[response.selectedIndex];

    switch (selectedMenuItem) {
        case 'Let\'s teach these dogs a lesson': letsTeachTheseDogsALesson(); break;
        case 'Game Mode': selectGameModeMenu(); break;
        case 'Classic maps': selectMap(false); break;
        case 'Workshop maps': selectMap(true); break;
        case 'Exit': process.exit(); break;

        default:
            terminal.red('Something wrong has happened... oh boy 😔')
            process.exit();

        break;
    }
});To keep things separated, I’ve put everything inside a mainMenu function and added a start function at the bottom of the file which will call it. I also call the setDefault, getMaps and getWorkshopMaps functions here so we have every variable set up.
function start() {
    setDefaults();
    getMaps();
    getWorkshopMaps();
    mainMenu();
}

start();From here on, we can take a look at each function’s implementation called for the menu items, apart from the exit menu as its only purpose is to kill the running task.
Selecting game mode
Selecting game mode is all about assigning a value to selectedMenuItem.gameMode. It is made up of three different functions:
function selectGameModeMenu() {
    terminal.singleColumnMenu(gameModes, { cancelable: true }, (error, response) => {
	selectGameMode(response.selectedText);
        mainMenu();
    });
};

function selectGameMode(gamemode) {
    switch (gamemode) {
        case 'Casual':      setMenuGameMode('Casual', 0, 0);      break;
        case 'Competitive': setMenuGameMode('Competitive', 1, 0); break;
        case 'Arms Race':   setMenuGameMode('Arms Race', 0, 1);   break;
        case 'DeathMatch':  setMenuGameMode('DeathMatch', 2, 1);  break;
        case 'Demolition':  setMenuGameMode('Demolition', 1, 1);  break;
        case 'Wingman':     setMenuGameMode('Wingman', 2, 0);     break;
        default:            setMenuGameMode('Competitive', 1, 0); break;
    }
};

function setMenuGameMode(name, mode, type) {
    selectedMenuItem.gameMode = {
        name,
        mode,
        type
    };
};selectGameModeMenu is called from the mainMenu function when the game mode menu is selected. It then displays a single list created from the gameModes array defined at the top of the file. When an option is selected, it calls through to selectGameMode, which holds a switch case to set the correct mode and type. These values will be placed inside the game’s console. You can get the list of game mode commands from here.
When the game mode is selected, we call mainMenu to return.
Selecting maps
Selecting a map is also about setting the proper value to selectedMenuItem.map which can later be used for typing the map into the game’s console. You’ve probably noticed I call the selectMap function from the mainMenu with a flag. This is for deciding if the player wants to select classic or workshop maps:
function selectMap(isWorkShopMap) {
    const menuItems = [];

    if (isWorkShopMap) {
        maps.workshop.forEach(map => menuItems.push(map.mapName));
    } else {
        maps.classic.forEach(map => menuItems.push(map.mapName));
    }

    terminal.gridMenu(menuItems, {cancelable: true}, (error, response) => {
        if (isWorkShopMap) {
            selectedMenuItem.map = maps.workshop[response.selectedIndex];
        } else {
            selectedMenuItem.map = maps.classic[response.selectedIndex];
        }

        mainMenu();
    });
};I create the menu items from the list of maps generated by getpMaps and getWorkshopMaps and display a menu using terminal.gridMenu. Once an option is selected, I set the value of selectedMenuItem.map to be the selected option’s value and then we can return to the main menu.
Selecting a default game
Before looking into how I’ve managed to launch the game, test if it is booted and put everything inside the console to start it, I added a small function to start to select a default game mode and type:
function selectMapAndGameMode() {
    selectGameMode('Competitive');
    selectedMenuItem.map = maps.classic[21];
}

function start() {
    setDefaults();
    getMaps();
    getWorkshopMaps();
    selectMapAndGameMode();
    mainMenu();
}Creating The Heart — Booting The Game
To start the game, we can get it done relatively easily. The hard part will be to tell if we are in the main menu; before that, we can’t open the console in the game.
function letsTeachTheseDogsALesson() {
    ncp.copy(settings.optionalParams.join(';'));

    spawn(defaults.executablePath, ['-steam']);
    gameInterval = setInterval(checkGameState, 1000);

    terminal.white('\nUsing additional params:\n');
    terminal.cyan(` - ${settings.optionalParams.join('\n - ')}`);
    terminal.white('\n\ncopied additional params to clipboard\n\n');
}This is where I used the copy-paste npm package to copy the parameters defined in config.js and log it out to the player. The game can be started with the spawn function, we need to set the -steam flag, otherwise it will say you ran the game in “insecure mode”.
And the magic happens inside the checkGameState function. The interval executes it each second to check if the game has started. This is the code for the function:
function checkGameState() {
    const hex = robot.getPixelColor(0, defaults.screenSize.height / 2);

    const onLoadingScreen = hex === '000000' && mouse.x === 0;
    const onMainMenu      = hex !== '000000' && mouse.x === 0;

    if (!gameStartedBooting && onLoadingScreen) {
        terminal.white('Game booting up\n');
        gameStartedBooting = true;
    }

    if (gameStartedBooting && onMainMenu) {
        const mode = selectedMenuItem.gameMode.mode;
        const type = selectedMenuItem.gameMode.type;
        const map = selectedMenuItem.map.mapPath;

        terminal.green('Game loaded, starting server...');

        robot.setKeyboardDelay(500);
        robot.keyTap(settings.consoleShortcut);

        robot.typeString(`game_mode ${mode}`);
        robot.keyTap('enter');

        robot.typeString(`game_type ${type}`);
        robot.keyTap('enter');

        robot.typeString(`map ${map}`);
        robot.keyTap('enter');

        clearInterval(gameInterval);
    }
}The solution:
The solution was the following. Start the game and get the pixel color of the screen from the middle left-hand side. If it is pure black (#000), the game has PROBABLY started booting up. If it is no more black then the game has loaded. If we’re in the main menu, we can start typing in commands and press enter then clear the interval.
I’m saying probably because what if your background screen color is exactly black at that point? Probably not a problem as it keeps waiting until it turns into something else. Probably. What if the main menu changes in a way that makes that single pixel black? — The script will come to a halt and the interval will never be cleared. What if you open the game in windowed mode? Not a bulletproof solution but it gets things done. Most of the time.

Limitations
There are some limitations to it, which you will soon find out if you want to start a local server with it, such as:
- You need to press shift in-game to make sure the console works again.
- If you exit the game, you have to close the console before starting the game again, you can’t restart a new game from the same console.
- If you close the cmd, it will also terminate the game, since it is a child process started from the console.
I haven’t found any other issues with it so this is just a small price to pay for salvation. If you’re interested in the script or want to use it yourself, you can clone it from GitHub. Now let’s go and teach these dogs a lesson. 🎮

Rocket Launch Your Career
Speed up your learning progress with our mentorship program. Join as a mentee to unlock the full potential of Webtips and get a personalized learning experience by experts to master the following frontend technologies:
Courses


Recommended

Recreating Spotify’s Floating pop-ups
How to Build Plugins for Figma
