How to Remake Mario in PhaserJS: Part II.
Ferenc Almasi •This is the second part of the Remake Mario in PhaserJS tutorial. If you missed out the first part, you can reach it here.
In the previous part, we generated a world in Tiled and imported it into Phaser, and also added Mario into the scene and made him able to freely move around. You can get the code from the GitHub repository. The tilemap I'm using throughout this tutorial is also included. In this part, we will continue populating the world with game objects that the user can interact with. This part will cover the following topics:

Table of Contents
Collecting Coins
Let's start by adding some coins to the world the player can collect. Create an empty Coin class in your gameObjects folder and call it in your create method inside your Game scene:
class Coin {
    constructor(scene) {
        this.scene = scene;
    }
}

export default Coin;

// In your Game.js create method:
this.coins = new Coin(this);Just like the Player class, this should take the scene as its argument. To generate the coins, we can use a group this time. Groups in Phaser are useful for grouping similar game objects together. Now when you create the group, make sure you disable gravity for them and set them to immovable:
constructor(scene) {
    this.scene = scene;
    this.coins = this.scene.physics.add.group({
        immovable: true,
        allowGravity: false
    });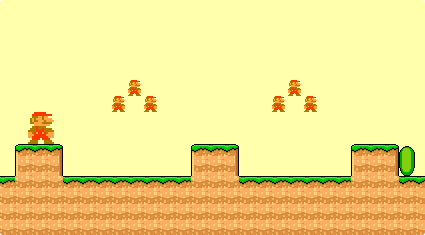
}Otherwise, you may get the following behavior and Mario will be cast into depression:
Alternatively, you can use a staticGroup which is created for this purpose. Static groups are immovable by default and they are not affected by gravity. To get the coins from the map, you want to access the coin layer in Tiled. This can be done by using the getObjectLayer method of the map we've created in the previous tutorial.
const coinObjects = this.scene.map.getObjectLayer('coin').objects;

for (const coin of coinObjects) {
    this.coins.create(coin.x, coin.y, 'atlas')
        .setOrigin(0)
        .setDepth(-1);
}This will get every object from the "coin" layer in Tiled, and create a coin inside the group, based on their x and y position. Make sure you set their depth to keep Mario on top of the coins. Again, this can be achieved in other ways as well. For example, there's a handy createFromObjects method that you can use to create the sprites right away:
const coinSprites = this.scene.map.createFromObjects('coin');
for (const coin of coinSprites) {
coin.setTexture('atlas')
.setScale(1) // setTexture resets the scale to .5 so this is needed
.setOrigin(0)
.setDepth(-1);
this.coins.add(coin);
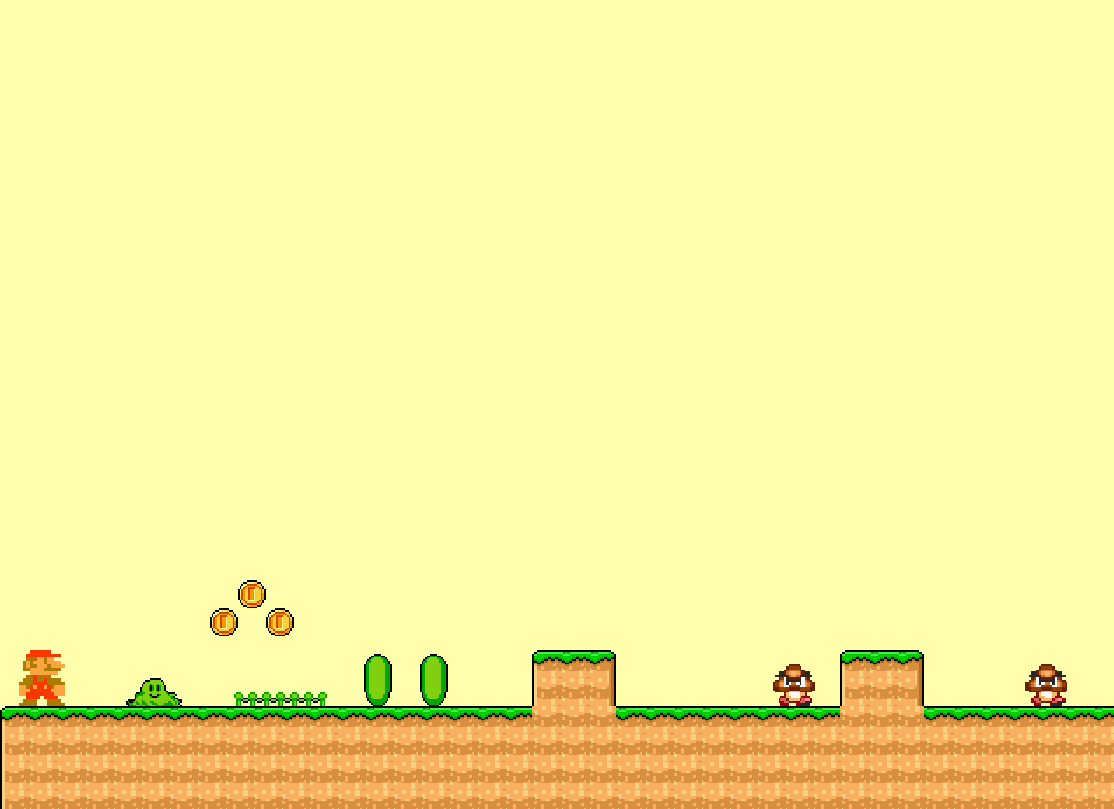
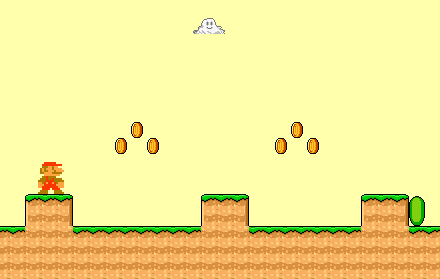
}The end result is the same. Now we have the coins but they are rather looking like little Marios than coins.
This happens because we have specified that we want to use the atlas for the texture of the coins, but we haven't specified which frame to use. Therefore, it uses the very first frame, which happens to be Mario standing still, so let's change that. Just like we did for the Player class, add an update method for the Coin class as well and call it in your scene's update method:
update() {
    for (const coin of this.coins.children.entries) {
        coin.play('rotate', true);
    }
}

// Inside your Game.js update method:
this.coins.update();This would make each coin rotate, but we haven't created the animation for it yet, so open up your animations.js file, and after the animations of Mario, add the following:
scene.anims.create({
    key: 'rotate',
    frames: scene.anims.generateFrameNames('atlas', {
        prefix: 'mario-atlas_',
        start: 6,
        end: 9,
    }),
    frameRate: 10,
    repeat: -1
});This should make things work. Now we have rotating coins in the world, but we can't interact with them so far, so let's make them collectible.
We need to add collision detection to each coin. This can be done with a simple for loop along with a new collider:
for (const coin of this.coins.children.entries) {
    coin.collider = this.scene.physics.add.overlap(coin, this.scene.player.sprite, this.collect, null, this);
}Make sure you assign the collider to a new property on each coin, as we will need to destroy it later, when Mario collides with one of them. Also, note that we are using overlap here instead of collider. They work similarly, both check for collisions between two objects, however, you would use collider where you want objects to be blocked by each other, rather than making them overlap. Also, this references this.collect as a callback function, which we haven't defined yet, so let's do that right now:
collect(coin) {
    this.scene.tweens.add({
        targets: coin,
        ease: 'Power1',
        scaleX: 0,
        scaleY: 0,
        duration: 200,
        onComplete: () => coin.destroy()
    });

    increaseScore(1);

    coin.collider.destroy();
}Luckily, overlap provides both objects as parameters. We only want to use the coin. The above code will create a tween animation. It will scale down the coin — which is the target — to 0, over 200 ms. Once the animation completes, we can call destroy to get rid of the game object. You can see an increaseScore function call after the animation. I've outsourced this function into a separate file, as we will reuse it later inside other files. This is what the file exports:
export default score => {
    const scoreElement = document.getElementsByClassName('score-amount')[0];
    const currentScore = Number(scoreElement.innerText);

    scoreElement.innerText = currentScore + score;
};This is imported into Coin.js, and we want to increase the score by 1 for every coin collected. Lastly, make sure you call destroy on coin.collider as well, otherwise, the callback function keeps running for every frame and you get more scores than you should.
As noted out by a helpful Discord user on the phaser channel, using a single collider for the whole group is also achievable and more efficient, than using one for each coin. See 53d6065 for the necessary changes.

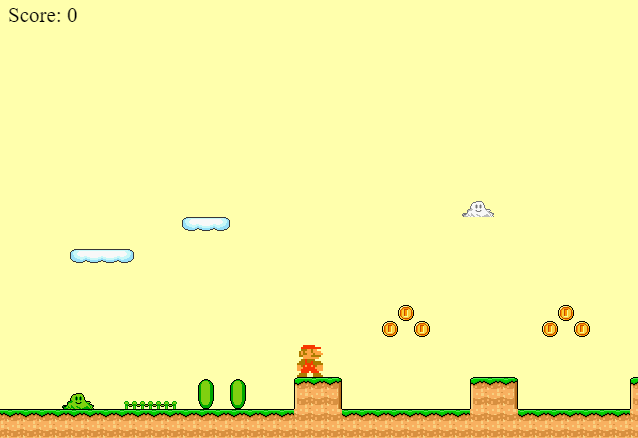
Spawning Goombas
Now that we have all the functionality that's needed for the coins, let's turn our attention to the goombas. Goombas, also known as Kuribō in Japan means "close friend". They are little, mushroom-like species, one of the most common forms of enemies in Super Mario. Fun fact: In Hungarian "gomba" means mushroom, although the two words have nothing to do with each other, their resemblance is pure coincidence. By now, you know how it goes. Create a new class called Goomba and call it in your Game scene:
class Goomba {
    constructor(scene) {
        this.scene = scene;
    }
}

export default Goomba;

// In your Game.js create method, instantiate the class:
this.goombas = new Goomba(this);

// In your Game.js update method, call update on it
this.goombas.update();No surprise, we're going to have an update here as well, so you can call it right away in your scene's update method. We're going to use a group for this too, however, they won't be immovable:
constructor(scene) {
this.scene = scene;
this.goombas = this.scene.physics.add.group();
this.collider = this.scene.physics.add.collider(this.scene.player.sprite, this.goombas, this.gameOver, null, this);
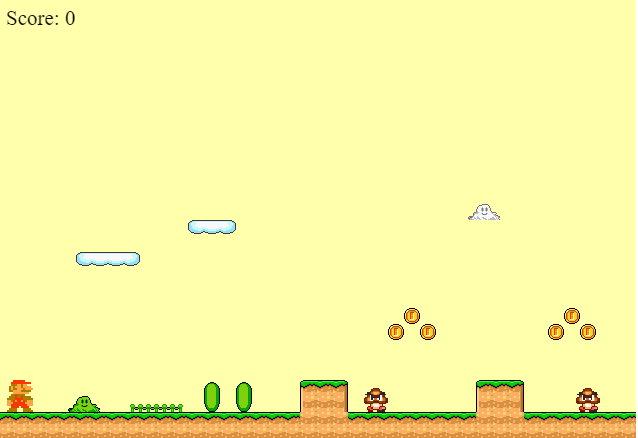
const goombaObjects = this.scene.map.getObjectLayer('goomba').objects;
for (const goomba of goombaObjects) {
this.goombas.create(goomba.x, goomba.y - goomba.height, 'atlas')
.setScale(1.5)
.setOrigin(0)
.setDepth(-1);
}
for (const goomba of this.goombas.children.entries) {
goomba.direction = 'RIGHT';
goomba.isDed = false;
}
this.scene.physics.add.collider(this.goombas, this.scene.platform);
}After their creation, we want to add some custom properties for each goomba. Their current heading direction, either RIGHT or LEFT, and a boolean flag to check if they are dead. I've also set their scale to 150% to make them a little bit bigger, and don't forget to set the depth to -1 if you want Mario to stay on top of the layers. At the end of your constructor add a collider between the goombas and the platform to make them stay on top. We have another collider for Mario and the Goombas, this will call this.gameOver. For now, let's only see what we want to happen when Mario steps on a goomba from above.
gameOver() {
    // PHEW
    if (this.scene.player.sprite.body.touching.down) {
        this.die();

        return;
    }

    // Otherwise, it's game over
}Using the sprite's body.touching object, we can determine, which side of the player is touching other game objects. If it's the bottom, called down, we've stepped on a goomba, which should be exterminated.
die() {
    for (const goomba of this.goombas.children.entries) {
        if (goomba.body.touching.up) {
            goomba.isDed = true;
            goomba.play('goombaDie', true);
            goomba.on('animationcomplete', () => goomba.destroy());

            increaseScore(.5);

            this.scene.player.sprite.setVelocity(0, -350);
            this.scene.player.sprite.play('jump');
        };
    }
}Since we are storing goombas in a group, we need to loop through the group to check which goomba has been hit by Mario. We can check again if the sprite's body is touching anything else. Here we set the goomba to be dead, and make Mario jump — essentially bouncing up from the goomba. We also want to give some score to the player and play the dying animation on the goomba, which we haven't defined yet, so make sure to do that in our animations.js:
scene.anims.create({
    key: 'goombaRun',
    frames: scene.anims.generateFrameNames('atlas', {
        prefix: 'mario-atlas_',
        start: 11,
        end: 12,
    }),
    frameRate: 15,
    repeat: -1
});

scene.anims.create({
    key: 'goombaDie',
    frames: [{ key: 'atlas', frame: 'mario-atlas_10' }],
    frameRate: 10,
    hideOnComplete: true
});Conveniently, Phaser provides a hideOnComplete flag we can use to hide the animation once it's completed. Make sure to also add the running animation. We can use this in our update method, along with some logic to keep the goomba move back and forth:
update() {
    for (const goomba of this.goombas.children.entries) {
        if (goomba.body.blocked.right) {
            goomba.direction = 'LEFT';
        }

        if (goomba.body.blocked.left) {
            goomba.direction = 'RIGHT';
        }

        if (goomba.direction === 'RIGHT') {
            goomba.setVelocityX(100);
        } else {
            goomba.setVelocityX(-100);
        }

        !goomba.isDed && goomba.play('goombaRun', true);
    }
}We can use body.blocked to check if the sprite is blocked by something else. In case it is, we simply switch directions and set the velocity to the opposite.
Summary
And that is all for this tutorial. If you've reached this far, congratulations, you've learned a lot! 🎉 You now know how to create different game objects with different functionalities based on objects defined in Tiled. This tutorial is broken down into three sections. Make sure you continue your journey with part III, where we implement the game over and winning. We will also have a look into Phaser's particle system.
Do you have experience building platform games in PhaserJS? Let us know your thoughts and opinions about it in the comments below! Thank you for reading through, happy coding! 🎮

Rocket Launch Your Career
Speed up your learning progress with our mentorship program. Join as a mentee to unlock the full potential of Webtips and get a personalized learning experience by experts to master the following frontend technologies:
Courses

Game Development in JS/TS - The Complete Guide

HTML5 Game Development