How to Remake Mario in PhaserJS: Part I.
Ferenc Almasi •In 1985, Nintendo released the very first version of Super Mario Bros. in Japan, and the rest is history. In this tutorial, we will take a look at how you can replicate the base gameplay mechanics in JavaScript, using Phaser v3, the latest version of the popular JavaScript game framework. This tutorial is broken down into three sections. In this first part, we are going to cover:

Table of Contents
- Prerequisites
- How to Create a Map With Tiled
- Loading the Tilemap into Phaser
- Adding Mario to the Game
- Summary
Prerequisites
Before jumping into generating the world for Mario, there are a couple of things you're going to need. First, we will need a couple of assets that we can use for the game. Here are the different resources I'm using:
- The Mega Tileset pack by TheCrushedJoycon on DeviantArt
- Mario is from mariomayhem.com
- Goombas are from mfgg.net
You can also get the final resources from the GitHub repository, where I've generated an atlas only containing the assets that we are going to use for animations. Alternatively, you can also download the image below.


How to Create a Map With Tiled
The next step is to generate a world for Mario based on the mega tileset pack. For this, I'm using the awesome open-source Tiled editor. Once you've downloaded it, open the app and create a new map.
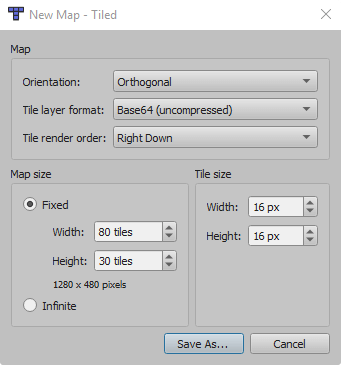
Make sure you set the tile layer format to Base64 uncompressed. Also changed the width of the tiles to be 80x30. You can keep the tile size at 16px since the assets we are working with are 16x16. Save the map into a new file, and also create a new tileset for it, that you can do so by either clicking on the new icon in the bottom right corner under the Tilesets panel, or clicking on the File menu and selecting New, New Tileset. Name the tileset as map-tileset, and also make sure you have "Embed in map" checked.
Defining a new tileset
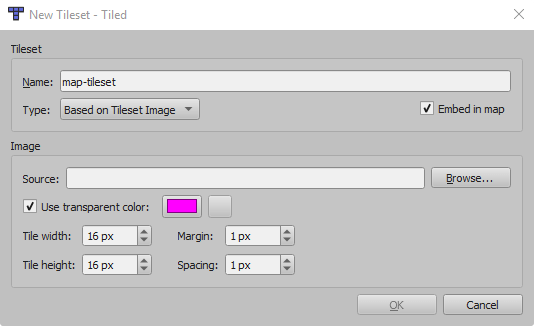
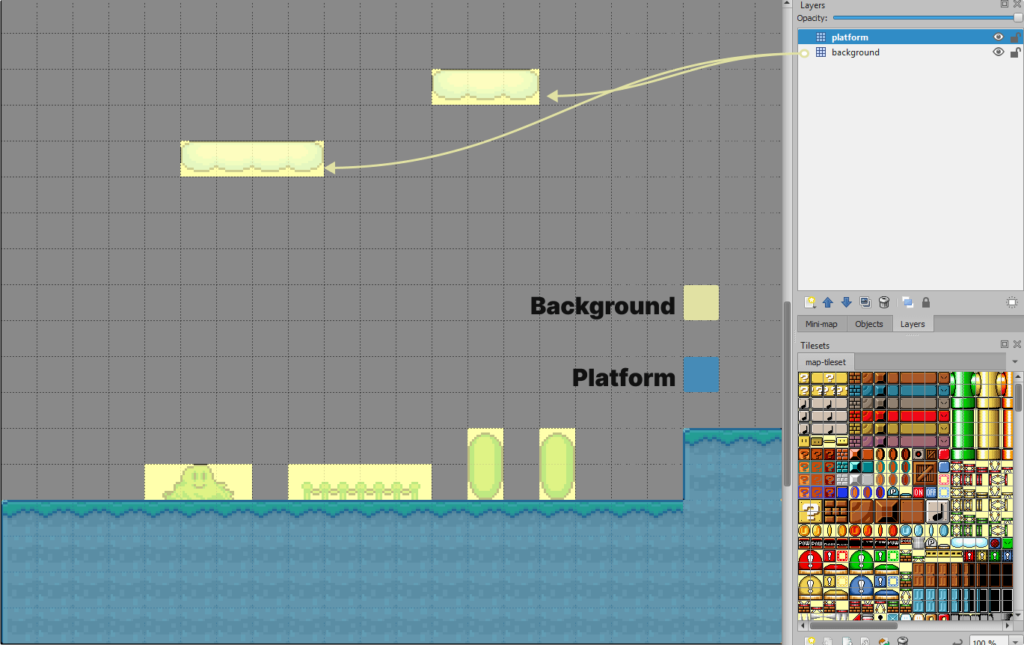
The tileset we are using has a 1px margin and spacing so make sure you set them to 1px, select the source image, and hit OK. Once you have your tilemap and tileset ready, you can start drawing on the grid. But before you do that, make sure you create two separate layers, one for the background which will have no collision, and for the platform that will have collision.
Adding objects to the map
Now we have a working map but it's pretty empty, there's nothing the user can interact with. Using objects in Tiled, you can define all kinds of game objects in your world — like coins or goombas in our example — without having to worry about hardcoding their coordinates and custom properties.
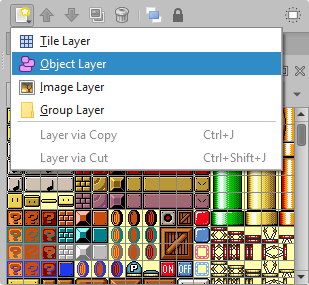
Create three new object layers; one for the coins, one for the goombas, and one for the flag that we have at the end of every map. Select one of the layers and click T on your keyboard to insert a new tile on the map, then start drawing some goombas and coins using two different tiles.
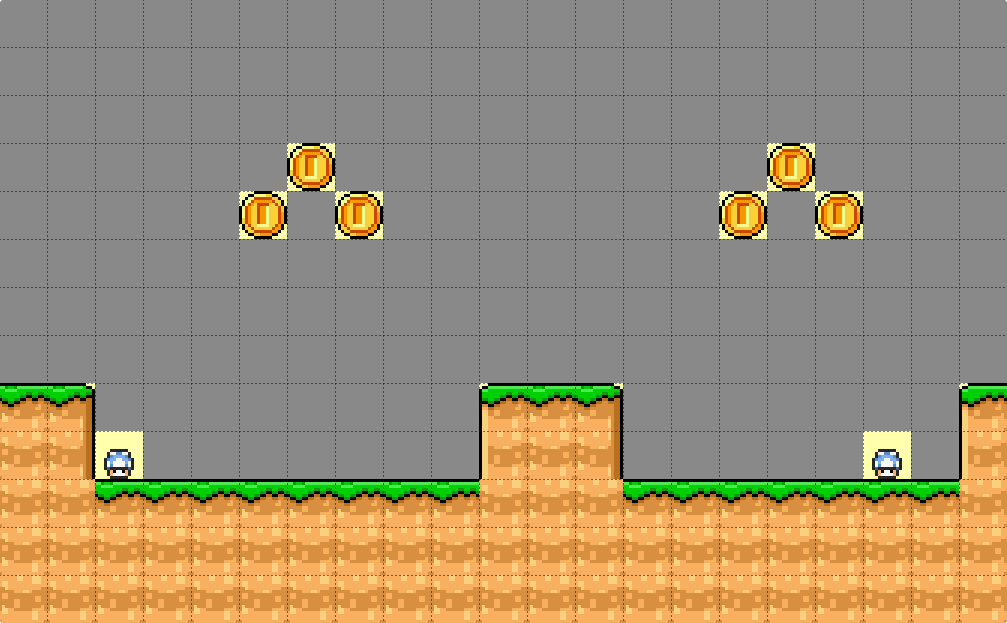
The tiles don't really matter at this stage for this tutorial, they are only used for storing information about objects. Of course, for production games, you want to use the same tiles in Tiled that you would later instantiate in your game. That way, it's clear at first glance where different objects are placed on the map, and you don't mistakenly confuse a chest for a crate. It's also worth mentioning that you could use a single object layer and add a custom property for each placed object to identify them. It's really up to you how you organize your tilemap.
Loading the Tilemap into Phaser
We're pretty much done with the map. If you want to use the same map I'm using for the tutorial, you can download it from the GitHub repository.
The next step is to load this map into Phaser. To do that, open Tiled and go to File, Export As... and export your map as a map.json file, then set up a new project. I'm using Parcel, but you can use any other bundler to bundle your assets. If you choose to use Parcel, make sure you implement a custom start script such as this one, that copies static assets from your src folder to your build folder. For your index.html file add the following markup:
<!DOCTYPE html>
<html lang="en">
    <head>
        <meta charset="UTF-8" />
        <meta name="viewport" content="width=device-width, initial-scale=1.0" />
        <title>🎮 Mario</title>
    </head>
    <body>
        <div id="mario">
            <div class="score">Score: <span class="score-amount">0</span></div>
            <div class="game-over">Game Over</div>
        </div>
        <script src="src/index.js"></script>
    </body>
</html>We will have a div called mario that will hold UI elements such as the score or the "Game Over" title. You can implement these UI elements in Phaser as well, but using plain HTML and CSS is much easier, faster, results in less JavaScript code, and this could improve performance. You are also able to try out different styles more quickly. As you can see from the template above, its also referencing an index.js file inside an src folder so make sure you create that, with the following:
import Phaser from 'Phaser'

import Game from './scenes/Game.js'

import './assets/scss/index.scss'

const config = {
    width: 640,
    height: 480,
    parent: 'mario',
    backgroundColor: '#FFFFAC',
    title: 'Tilemap',
    url: 'webtips.dev',
    pixelArt: true,
    physics: {
        default: 'arcade',
        arcade: {
            // debug: true, // Set it to true if you want debugger enabled by default
            gravity: {
                y: 1000
            }
        }
    },
    scene: [
        Game
    ]
};

new Phaser.Game(config);Set the canvas from the config file to be 640x480 and make sure you set the parent to mario. This is the id of the div we have created in our index.html file. Set a soft yellow (#FFFFAC) background, and most importantly, make sure you set pixelArt to true, otherwise you will get blurry sprites.
For the physics we are going to use arcade with a gravity of 1000. If you want collisions drawn on the canvas by default, make sure you set debug to true. For the scene, create a scenes folder with a Game.js file that is currently holding an empty Scene class.
class Game extends Phaser.Scene {

    constructor () {
        super('Game');
    }

    preload() {

    }

    create() {

    }

    update() {

    }
}
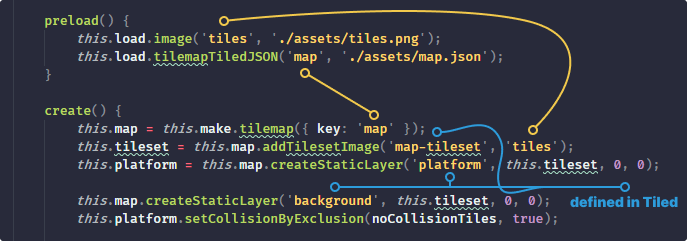
export default Game;Now that we have an empty canvas, we've got to finally load the map into Phaser. Inside your preload method, load both the tiles and the generated map.json from Tiled:
preload() {
    this.load.image('tiles', './assets/tiles.png');
    this.load.tilemapTiledJSON('map', './assets/map.json');
}The tiles can be loaded in as an image, but for the map.json file you want to use the tilemapTiledJSON method. The first parameter you pass to the functions will be a key you can reference throughout your Phaser game. The second parameter is pointing to the location of the files. Depending on your bundler setup, they may sit in a different location.
So far, nothing will happen. This will only make the assets available for Phaser to use. To actually draw them to the canvas, you want to create a new tilemap from a tileset and add the background and platform layers we've defined in Tiled. To do that, add the following five lines into your create method:
create() {
    this.map = this.make.tilemap({ key: 'map' });
    this.tileset = this.map.addTilesetImage('map-tileset', 'tiles');
    this.platform = this.map.createStaticLayer('platform', this.tileset, 0, 0);

    this.map.createStaticLayer('background', this.tileset, 0, 0);
    this.platform.setCollisionByExclusion(-1, true);
}To create a new tilemap in Phaser, you want to call this.make.tilemap with a key property passed as a parameter. The key here references the key defined in the tilemapTiledJSON call inside the preload method.
To make it use the tiles.png image, you need to call addTilesetImage on the tilemap. For the first parameter, you want to use the name of the tileset you defined in Tiled. For the second parameter, you want to use the key of the image that is loaded from the preload method.
Now you can draw the different layers. Both of them will be static. This means you can't modify and manipulate individual tiles after their creation. If you want to do that, you need to use a dynamic layer instead of static. The createStaticLayer function expects these four parameters:
keythat you defined in Tiled as the name of the layer- a
tilesetcreated withaddTilesetImage xandycoordinates to place the layer. 0,0 means the top-left corner of the canvas
To also enable collision for the platform, you can call setCollisionByExclusion which accepts a list of tile indexes to exclude from collision detection. By passing -1 you tell Phaser to add collision to all tiles which index is not set to -1, meaning we have collision for all tiles. (There's no tile which index is -1) If you open your browser, you should see an empty map now.

Adding Mario to the Game
As a next step, let's add Mario to the game. Create a new Player class in a new folder called gameObjects with a constructor that takes in a scene and an x and y coordinates:
class Player {
    constructor(scene, x, y) {
        ...
    }
}

export default Player;Then import this class in your Game.js file and call it from your create method in the Game scene:
this.player = new Player(this, 25, 400)Also, load in the Mario atlas file in your preload method by calling this.load.atlas:
preload() {
    ...
    this.load.atlas('atlas', './assets/mario-atlas.png', './assets/mario-atlas.json');
}Along with the images, you also want to load in a generated JSON file which holds a frames array with the positions and dimensions of each frame. To automatically generate this file, I've used the Atlas Packer tool. Import your image as a sprite sheet and set the width and height to 16px, then make sure you have 5 sprites per row. For the sprite name, I'm using mario-atlas. We will reference this later in our code.
Going back to our Player class, add the following code to your constructor:
this.sprite = scene.physics.add.sprite(x, y, 'atlas')
    .setScale(2);

this.sprite.setCollideWorldBounds(true);

scene.cameras.main
    .setBounds(0, 0, scene.map.widthInPixels, scene.map.heightInPixels)
.startFollow(this.sprite);This will add a new sprite into the scene, using the atlas we've just loaded in the preload method. I've also set the scale to 200% by calling setScale to make Mario bigger. Make sure you set the sprite to collide with the world bounds by calling setColldeWorldBounds.
We also need to set new bounds for the main camera, as well as make it follow Mario. It's as simple as calling startFollow and passing in a sprite object. But Mario just falls through the ground, so let's fix that. Add the following line to your Player class to make it collide with not just the world bounds, but with the platform layer as well:
this.collider = this.scene.physics.add.collider(this.sprite, this.scene.platform);Making Mario move
Right now, Mario just stands still. To make him run, create an update method that takes in an input object, and let's set some velocities when the user presses the arrow buttons:
update(input) {
    // Mario is moving to the left
    if (input.left.isDown) {
        this.sprite.setVelocityX(-200).setFlipX(true);

    // Mario is moving to the right
    } else if (input.right.isDown) {
        this.sprite.setVelocityX(200).setFlipX(false);
    } else {

    // Mario is standing still
        this.sprite.setVelocityX(0);
    }

    // Mario is jumping
    if ((input.space.isDown && this.sprite.body.onFloor())) {
        this.sprite.setVelocityY(-350);
    }
}By calling setFlipX for the left and right movement, you can simply mirror the sprite without having to draw different sprites for each side.
You want this function to be called constantly for each frame. To do this, go back to your Game.js file, and create the inputs inside the create method with:
this.inputs = this.input.keyboard.createCursorKeys();Then in your update method, you want to call player.update with the above inputs:
update() {
    this.player.update(this.inputs);
}Now you can make Mario run and jump around in the scene. However, there are three problems with this implementation.
First, there are no animations. Second, once you reach the end of the canvas, you collide with the world bounds. You can see I'm colliding with the red line after enabling debugging. Also, you can move backward in the map which is not something you can do in the original Super Mario. Let's start by fixing the animation first.
Animating Mario
To create animations in Phaser, you need to call scene.anims.create with a couple of parameters. To make things more managable, I've separated the animations out into a separate file called animations.js:
export default scene => {
    scene.anims.create({
        key: 'run',
        frames: scene.anims.generateFrameNames('atlas', {
            prefix: 'mario-atlas_',
            start: 1,
            end: 3,
        }),
        frameRate: 10,
        repeat: -1
    });

    scene.anims.create({
        key: 'idle',
        frames: [{ key: 'atlas', frame: 'mario-atlas_0' }],
        frameRate: 10
    });

    scene.anims.create({
        key: 'jump',
        frames: [{ key: 'atlas', frame: 'mario-atlas_4' }],
        frameRate: 10
    });

    scene.anims.create({
        key: 'die',
        frames: [{ key: 'atlas', frame: 'mario-atlas_5' }],
        frameRate: 10
    });
};This file will export a function that takes in the scene as a parameter. To create new animations, you need at least 3 things:
- a
key, which can be used later on throughout Phaser to play an animation by calling this key. frames: An array of objects that define the frames to use. In the code example above, for theidleanimation it calls the frame from theatlasthat is loaded through thepreloadmethod, and references themario-atlas_0frame from themario-atlas.json. Essentially, it will get the first object from theframesarray from the JSON.- A
frameRate, that defines the frequency at which the sprites are displayed. This is basically setting FPS (frames per second) for a given game object. The higher the number, the faster the animation if the amount of frames are low. Eg.: it takes 4 frames to animate a coin.
For the run animation, you may notice we are using a function call for frames. This handy function has the ability to generate an array of frames for us. It is equivalent to writing:
[
    { key: 'atlas', frame: 'mario-atlas_1' },
    { key: 'atlas', frame: 'mario-atlas_2' },
    { key: 'atlas', frame: 'mario-atlas_3' }
]It tells Phaser to start at the frame at index 1, and end at index 3, and also prefix the frames with "mario-atlas_". By adding a repeat property, you can also set how many times you want this animation to be played. By specifying it as -1, you can make it play infinitely. To register these animations into Phaser, go to your preload method in Game.js and add the following, after importing the animations into class:
preload() {
    ...
    this.load.on('complete', () => {
        generateAnimations(this);
    });
}This callback will make sure it only calls the animation function, once all assets have been loaded. Now you can call these animations inside the update method of your Player class when an input is triggered using the play method:
this.sprite.body.onFloor() && this.sprite.play('idle', true);
this.sprite.body.onFloor() && this.sprite.play('run', true);
this.sprite.play('jump', true);Make sure you check if the body of the sprite is on the floor by calling onFloor, and only play the animations if that is true. You don't need to do it for the jumping animation as it's already checked in the if statement.
This fixes the issue for the animation. Let's also fix the world bounds and stop the camera from following Mario when he is moving backward. To tell the camera to stop following Mario, you simply have to call stopFollow when the player presses the left key:
if (input.left.isDown) {
    this.sprite.setVelocityX(-200).setFlipX(true);
    this.sprite.body.onFloor() && this.sprite.play('run', true);

    this.scene.cameras.main.stopFollow(this.sprite);
} However, when the player presses the right arrow, you can't simply call startFollow again, otherwise, you will get the following behavior:
This happens because when you call startFollow, Phaser will always position the camera to make the player centered on the screen. To fix this, — as well as the bounding issue — let's introduce a new method called reFollowPlayer, that does exactly that, and call it for the right arrow key:
else if (input.right.isDown) {
    this.sprite.setVelocityX(200).setFlipX(false);
    this.sprite.body.onFloor() && this.sprite.play('run', true);

    this.reFollowPlayer();
}This method should call startFollow only when Mario is already at the center of the screen. To achieve this, add the following code to the method:
reFollowPlayer() {
    this.scene.physics.world.bounds.setPosition(this.scene.cameras.main.worldView.x, 0);

    if (this.sprite.body.position.x + this.sprite.body.width / 2 > this.scene.cameras.main.midPoint.x &&
        !this.scene.cameras.main._follow) {
        this.scene.cameras.main.startFollow(this.sprite);
    }
}
First of all, this will reset the x position of the world bounds as the player moves around. Alternatively, you could set the bounds to be the size of the whole map, — once your tilemap is ready — that way, you don't need to update the bounds for every frame.
Secondly, the if statement checks if Mario is standing in the middle of the screen. If he is, and the camera is not already following him, then we can call startFollow again. If I enabled the debugger, you can see that as soon as Mario hits the middle of the screen (the red line), the camera starts to follow him. But it won't follow him when traveling backward.
If you don't want Mario to be centered on the scene, you can also define a dead zone for the camera. Everything that falls outside the dead zone will be followed. Inside the dead zone, the camera stands still. To create a dead zone the size 1/4th of the width of the viewport, you can add the following into your constructor:
scene.cameras.main.setDeadzone(scene.game.config.width / 4, scene.game.config.height);
Summary
And that is all for this tutorial. If you've reached this far, congratulations, you've learned a lot! 🎉 You now know how to create a map and objects in Tiled, how to load it into Phaser, how to create a player you can move around, and how to animate it. This tutorial is broken down into three sections. Make sure you continue your journey with part II.
Do you have experience building platform games in PhaserJS? Let us know your thoughts and opinions about it in the comments below! Thank you for reading through, happy coding! 🎮

Rocket Launch Your Career
Speed up your learning progress with our mentorship program. Join as a mentee to unlock the full potential of Webtips and get a personalized learning experience by experts to master the following frontend technologies:
Courses

Game Development in JS/TS - The Complete Guide

HTML5 Game Development