How to Remake Chrome's Dino Game in PhaserJS: Part I.
Ferenc Almasi •In 2014, the project under the codename "Project Bolan" — more commonly known as the "Dinosaur Game" — was released as a built-in browser game. Ever since then, when you go offline, you can conquer the desert with the lonely pixel T-Rex waiting for the connection to come back.
In this tutorial, we will take a look at how you can replicate the base gameplay mechanics in JavaScript, using Phaser v3, the latest version of the popular JavaScript game framework. This tutorial is broken down into three sections. In this first part, we are going to cover:

Table of Contents
Prerequisites
Before jumping into creating the world for the dinosaur, there are a couple of things we are going to need. First, we will need some assets that we can use for the game. You can either download the assets from the GitHub repository that was created for this tutorial or download the images below.


We will also use an atlas for the game. Same as for the assets, you can download it from the GitHub repository, but you can also generate a new atlas, based on a spritesheet by using the online Atlas Packer tool.
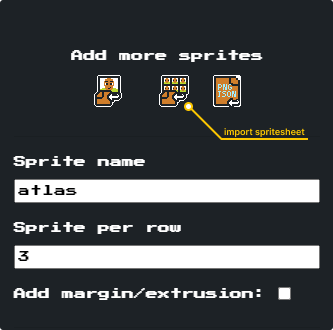
Generating atlases using the atlas packer
To generate new atlases, open the tool and import your image as a spritesheet, then set the width and height to be 16px (Make sure that everything stays in one row). For the name, I'm using "atlas". This will be generated into the JSON that you can download. We will also use this name later in our codebase.

Setting Up the Project
For this project to work, we will be using two dependencies:
npm i phaser

npm i parcel-bundler --save-dev
If you haven't set up a new NPM project yet, you can do so by running:
npm init -y
We will use Parcel to bundle our assets together into a distributable version. Once the dependencies have been installed, add a new index.html entry file at the root of your project directory:
<!DOCTYPE html>
<html lang="en">
    <head>
        <meta charset="UTF-8" />
        <meta name="viewport" content="width=device-width, initial-scale=1.0" />
        <title>🕹️ Dino</title>

        <link rel="stylesheet" href="src/assets/css/index.css" />
    </head>
    <body>
        <div id="dino">
            <span class="press-to-play">Press space to play</span>
            <div class="score hidden">
                <span class="highscore hidden">HI 00000</span>
                <span class="current-score">000000</span>
            </div>
            <div class="game-over hidden">
                <div class="game-over-text">GAME OVER</div>
                <div class="replay-button">🔄</div>
            </div>
        </div>
        <script src="src/index.js"></script>
    </body>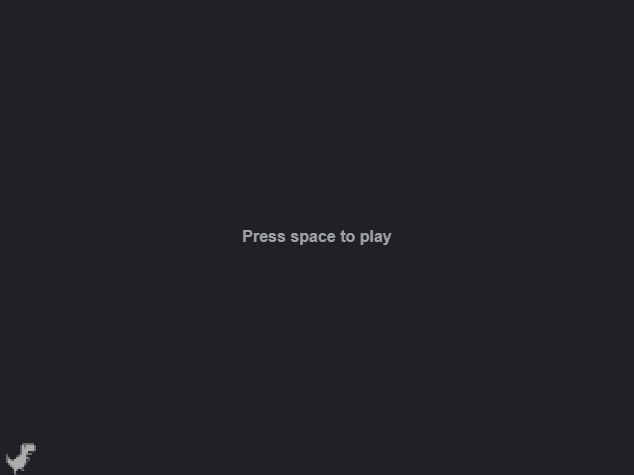
</html>This will be the whole markup that comes with the game. Let's take it apart. We will put the whole game into the #dino div. This is where we will display the UI, such as the "Press space to play", the score, or the "Game Over" text.
We also have two resources imported from the html file; one for the stylesheet for giving some better looks for the UI, and one for our main entry file, index.js. The CSS includes some general styles. You can see all of the rules involved in the GitHub repository. For this, create a src/assets/css folder. As for the index file, it will go into the root of the src folder. Make sure you also create an img folder for the atlas and the tiles.
Creating the Phaser configuration
The index.js file will hold the main configuration for Phaser. This is where we can set up the dimensions, the physics, and the scenes:
import Phaser from 'Phaser'
import Dino from './dino.js'

const config = {
    width: 640,
    height: 480,
    parent: 'dino',
    backgroundColor: '#202124',
    title: 'Dino',
    url: 'webtips.dev',
    pixelArt: true,
    physics: {
        default: 'arcade',
        arcade: {
            // debug: true, set debug to true if you want collision boxes to be drawn
            gravity: {
                y: 1000
            }
        }
    },
    scene: [
        Dino
    ]
};

new Phaser.Game(config);Make sure you set the parent to dino to reference the correct div inside the DOM. Also set pixelArt to true to avoid any blurred sprites. By default, this is set to false. You can see the difference it makes in this Mario game:
As for the physics, we can use arcade. It can be set to arcade, impact, or matter. Also, note that we have a single scene imported as a file called dino.js. This is where the core logic of the game will go. Create this new file next to your index.js, and let's have a look at what we have.
Creating the Dino scene
To create a new scene, we want to create a new class that extends Phaser.Scene. This class has some predefined methods we can use:
class Dino extends Phaser.Scene {

    constructor() {
        super('Dino');
    }

    preload() {
        // This is where we can preload our assets
    }

    create() {
        // This is where we will create our game objects
    }

    update(time, delta) {
        // This is where we will update the game state
    }
}

export default Dino;For the constructor, you want to call super with an identifier. This will identify this scene, so we can reference this class in other scenes if we would need to. For this simple project, however, this is the only scene we will have.
If you are further interested in how scenes are built up in Phaser, you can read more on them in the following tutorial:
Preloading assets
Let's start populating this class by first preloading all of our assets. I've separated the assets into a spritesheet and an atlas. Everything that uses animations will use an atlas while the rest of the static assets will be stored in a spritesheet. In terms of performance, there's really no difference, it's only for separating the two.
preload() {
    this.load.spritesheet('tiles', './assets/tiles.png', { frameWidth: 16, frameHeight: 16 });
    this.load.atlas('atlas', './assets/atlas.png', './assets/atlas.json');
}Loading assets in Phaser can be done through the this.load call. The first argument will be a key that can be referenced throughout the game. The rest are paths pointing to the correct location, and setting some configs for the assets. For example, make sure you set the frameWidth and frameHeight properties of the spritesheet to be 16. This needs to match the size of the sprites.
Now you may notice that inside the preload method, we don't reference the img folder inside the src folder. Instead, it is pointing to ./assets/ which we don't have. Since we use Parcel, the assets will be served from the build folder, and we can't really reference source images from the build folder. We also need them in the build output, otherwise, if we want to distribute our project, the images won't be served.
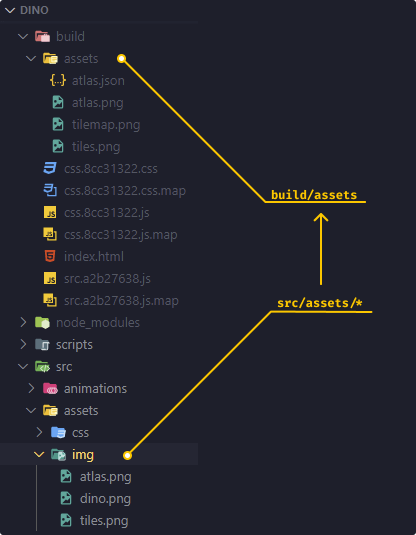
Creating a start script for Parcel + Phaser
To solve this issue, we will need to put some custom logic in place to copy all assets over to the build folder. At the root of your project, create a new folder called scripts and add a start.js file. Inside our package.json, we can use this script to start the dev server:
{
    "scripts": {
        "start": "node scripts/start.js"
    }
}This will call the start.js file, which spawns Parcel to start the bundling, and also does a check beforehand to see if the source assets have been copied over to the build folder. If not, it will copy them. This is the start script in its entirety:
const fs = require('fs');
const paths = {
    src: {
        imageAssets: './src/assets/img',
        jsonAssets: './src/assets/json'
    },
    build: {
        root: './build',
        assets: './build/assets'
    }
};


if (!fs.existsSync(paths.build.root)) {
    fs.mkdirSync(paths.build.root);
}

if (!fs.existsSync(paths.build.assets)) {
    fs.mkdirSync(paths.build.assets);

    Object.keys(paths.src).forEach(key => {
        const assets = fs.readdirSync(paths.src[key]);

        for (const asset of assets) {
            fs.copyFileSync(`${paths.src[key]}/${asset}`, `${paths.build.assets}/${asset}`);
        }
    });
}

require('child_process').spawn('parcel', ['index.html', '--no-autoinstall', '--open', '--out-dir', 'build'], {
    stdio: ['ignore', 'inherit', 'inherit'],
    shell: true
});This is a naive algorithm, it won't work when adding new assets on the fly, or if you have an empty assets directory, but it will get the job done for our simple case.
The script however does loop through the paths object, meaning if you need more assets to be copied over, all you have to do is add a new line to paths.src, pointing to the right directory.
Setting Up Animations
Once all assets have been loaded successfully, we can generate the animations that we will use throughout the game. Knowing when all assets have been loaded can be achieved by listening to the complete event in the preload method:
import generateAnimations from './animations/index'

...

preload() {
    ...

    this.load.on('complete', () => {
        generateAnimations(this);
    });
}As a callback, we can run a custom function called generateAnimations. For using this custom function, we can create a new folder called animations, with an index file:
export default scene => {
    scene.anims.create({
        key: 'run',
        frames: scene.anims.generateFrameNames('atlas', {
            prefix: 'atlas_',
            start: 1,
            end: 2,
        }),
        frameRate: 10,
        repeat: -1
    });

    scene.anims.create({
        key: 'idle',
        frames: [{ key: 'atlas', frame: 'atlas_0' }],
        frameRate: 10
    });
};This file will export a function that takes in the scene as a parameter. To create new animations, we need to call anims.create on the scene, with at least 3 arguments:
- a
key, which can be used later on throughout Phaser to play an animation by calling this key. frames: An array of objects that define the frames to use. In the code example above, for theidleanimation it calls the frame from theatlasthat is loaded through thepreloadmethod, and references theatlas_0frame fromatlas.json. Essentially, it will get the first object from the frames array from the JSON.- A
frameRate, that defines the frequency at which the sprites are displayed. This is basically setting FPS (frames per second) for a given game object. The higher the number, the faster the animation if the number of frames is low.
For the run animation, you may notice we are using a function call for frames. This handy function has the ability to generate an array of frames for us. It is equivalent to writing:
[
    { key: 'atlas', frame: 'atlas_1' },
    { key: 'atlas', frame: 'atlas_2' }
]
It tells Phaser to start at the frame at index 1, and end at index 2, and also prefix the frames with "atlas_". By adding a repeat property, we can also set how many times we want this animation to be played. By specifying it as -1, we can make it play infinitely.
Adding Dino to the Game
To finish off the first part of this tutorial, let's finally add the dinosaur to the game, so we can actually see some results from our hard work. To keep our code more maintainable, let's create a new folder called objects, with a Player.js for holding our Player class:
We can import this to our Dino scene, and create a new player inside the create method:
import Player from './objects/Player'

class Dino extends Phaser.Scene {
    create() {
        this.player = new Player(this, 25, 460);
    }
}Make sure you assign the class to a new property, so we can reference it layer in our scene. As for the arguments, we can pass the scene itself, as well as an x and y coordinates, so we know where to place it in the scene.
class Player {
    constructor(scene, x, y) {
        this.scene = scene;
        this.sprite = scene.physics.add.sprite(x, y, 'atlas')
            .setScale(2)
            .setImmovable()
            .setCollideWorldBounds();

        return this;
    }
}To make the scene referenceable in our Player class, we can assign it to a property. And to actually add the dino to the scene, we can call physics.add.sprite, passing the x and y coordinates, as well a key for the asset we want to use. Remember, we named the atlas — that we loaded in the preload method — "atlas", so we want to reference it here. As you can see, we can chain methods in Phaser. To modify the behavior of the sprite, we:
- Scale it up to make it bigger.
- Set it to immovable to make sure nothing can move it from its original position.
- Make it collide with the bounds of the world to make sure it does not fall out of the screen
Lastly, we want to return the class itself with return this, as we assigned this class to a property inside our scene.
update() {
    this.player.sprite.play('run', true);
}If we also play the run animation inside the update method of our scene, we should be presented with a walking t-rex in the desert.
Summary
And now you know how to set up a new Phaser project with Parcel, how to create new scenes, preload assets, generate animations, and draw sprites onto the canvas. If you've reached this far, congratulations, you've already learned a lot! 🎉 This tutorial is broken down into three sections. Make sure you continue your journey with part II.
Do you have experience building platform games in PhaserJS? Let us know your thoughts and opinions about it in the comments below! Thank you for reading through, happy coding! 🎮

Rocket Launch Your Career
Speed up your learning progress with our mentorship program. Join as a mentee to unlock the full potential of Webtips and get a personalized learning experience by experts to master the following frontend technologies:
Courses

Game Development in JS/TS - The Complete Guide

HTML5 Game Development