Turning Your Friend Into a Chatbot
Ever got angry over a friend for not replying for a long period of time? Maybe you were just waiting for some reaffirmation or just wanted to get your mind off of other things. Whatever the reason may be, thanks to advances in natural language processing or NLP for short, as a developer you can make a change.
Natural Language Processing is a field of AI, which gives computers the ability to understand human language.
By turning your friend into a chatbot, you’ll always have them around no matter what. It won’t be as smart as your friend, but it will be a chatbot anyway. Does that mean you are beyond lonely? Maybe it does. Is it really a good idea? Maybe it isn’t, but we can definitely learn interesting things about NLP along the way.

What Will We Need?
To start off, we are going to need some data to work with, namely your messaging history with the friend you want to turn into a chatbot. Despite the hero image, this article will assume you are using Facebook’s Messenger. But if you are using another platform and you can get the raw data from there, that’s fine as well.
We are also going to make use of natural, a robust natural language processing toolkit in JavaScript. The only other thing we are going to need is the built-in fs module of npm to read and write datasets.
If you have everything ready, let’s move onto the next step and see how will it actually work.
How Does it Work?
So how does it work? First and foremost we will need to retrieve the data from Facebook. The more messages we have, the better the end result will be. After getting the messages, we will need to parse it to remove all unnecessary information, metadata like timestamps, and irrelevant messages like shared stickers or attachments. We are only interested in text.
Once we have a clean dataset in place, we can start the work on it, which is classification. Basically, we are going to classify sentences into different categories so whenever an input is given, a closely matching output is chosen based on previous messages.
This is why it’s so important to have sufficient data — the wider the data range, the better the end results. For reference, I will be working with a messaging history consisting of roughly 18k lines of data.

Retrieving The Dataset
To export your messages, go to your Facebook account settings and click on the third tab on the left-hand side: “Your Facebook information”.

You’ll see an option that says “Download your information”. Clicking on View will take you to a new page. Here you can request a copy of your collected Facebook information. There’s a ton of stuff you can export, but the one we are interested in right now is messages. So click on “Deselect all” to remove the checkboxes from each category and scroll down to select only messages.
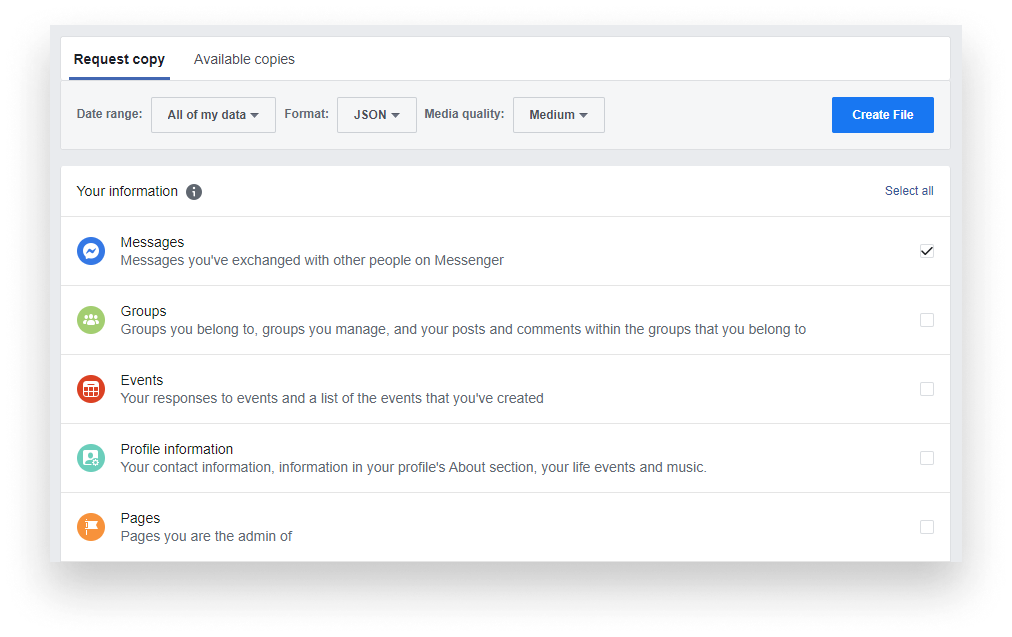
It’s also important to change the Format from HTML to JSON as that is easier to work with. Everything else can stay the same. Once you click on “Create File”, it will start creating an archive for you, which may take a while, but once it is ready, you will get a notification and you will be able to download the prepared zip file for you.
Setting Up The Project
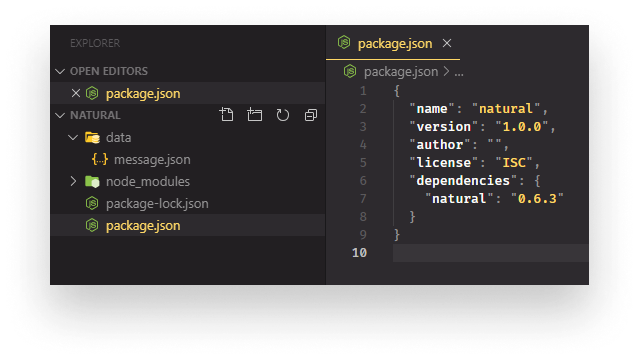
Once you have your data ready, we can start setting up the project. I created a project folder and I have a sub-folder inside, called data. This is where we will store all data required for classification.
In your downloaded zip file, you should have an inbox folder containing all your messages with the name of people being the folder names for each conversation. Open the one you want to work with and copy the message.json file to the data folder we’ve just created.
While also here, let’s get the single dependency we are going to use which is natural. You can pull it down by running npm i natural, after your npm init.
Parsing The Data
If you are not using data extracted from Messenger, the steps in this section may differ for you, but I would still advise you to read through to get a good understanding of what steps you need to take to format any dataset.
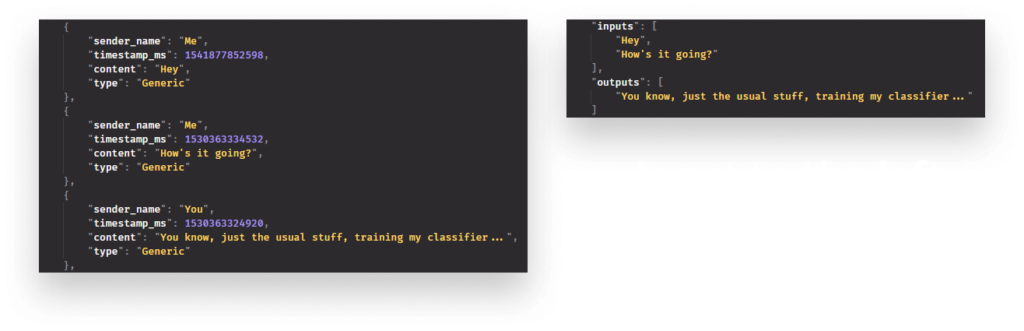
If you open the message.json file, you’ll notice we have a bunch of irrelevant information that can be considered as noise for our training algorithm. Right at the beginning, we have a participants array. You can get rid of it right away, which only leaves us with a messages array.
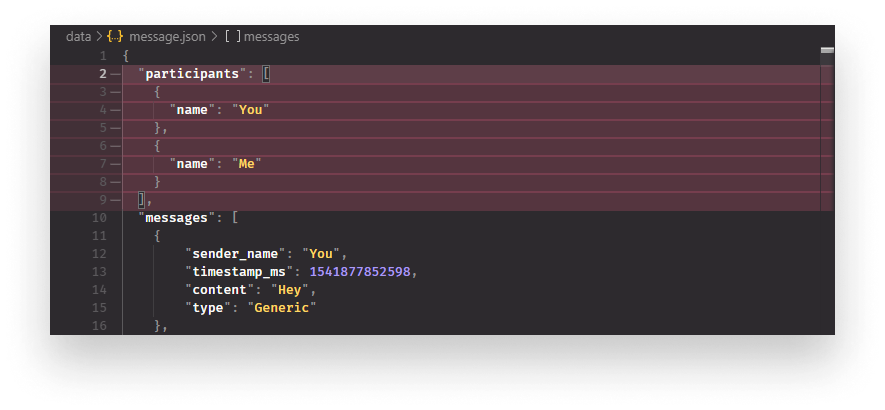
Inside each message, we still have information that we don’t need. Removing them manually would take ages and developers are known for being lazy anyway. So let’s write a script that loops through them and extract the relevant information.
For that, I’ve created a file called parser.js at the root of my project and I also added a script called parse into the package.json file that runs parser.js with node parser.js.
To fully understand what we are going to implement, let’s take a look at the end result:
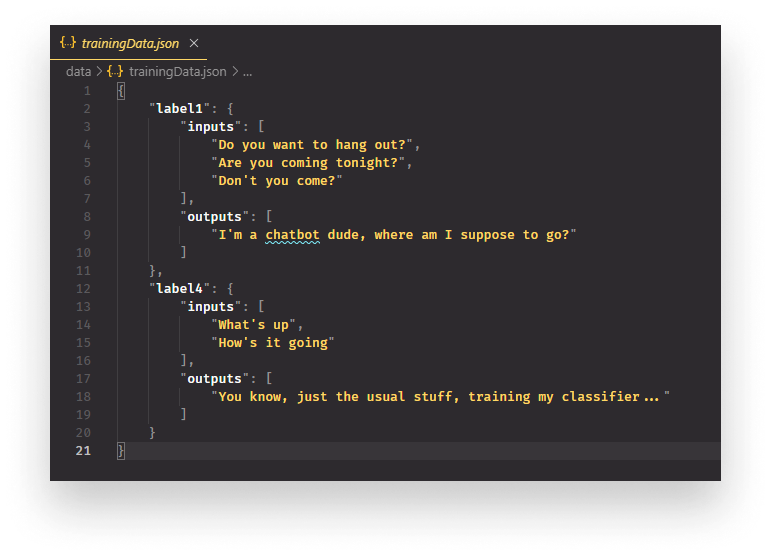
For the training data that will be used to train our classifier, we want to have labels. Inside each label we will have an inputs and outputs array containing messages and their responses from the original Messenger history. This is what our classifier will use to train itself. What response to give to each input. It will even manage to give us good responses to inputs it has never seen before.
Before starting the parsing itself, we need to define some variables and helper functions:
const fs = require('fs');

const messages = {};
const messageObject = {
    inputs: [],
    outputs: []
};

const input = './data/message.json';
const output = './data/trainingData.json';

const messageHistory = JSON.parse(fs.readFileSync(input));

const decodeUtf8 = (string) => decodeURIComponent(escape(string));

const getMessageType = (message) => {
    if (message) {
        return message.sender_name === 'Me' ? 'input' : 'output';
    }

    return '';
}

let hasInput = false;
let hasOutput = false;In the very first line, we pull in the fs module which will help us reading in the messaging history and writing out the final training data that will be used to train our classifier. Next, we define a message object which will hold all of our inputs and outputs with their corresponding labels and we also define a blueprint for each individual message using the messageObject variable.
We then set the input source for the messages that we read in and the output source for the training data.
I also defined two helper functions. Messages are not stored in UTF-8 encoding so we need a decoder. This is what you see on line:14 and another function which helps to determine whether the message was sent by you (in that case it will be an input) or by your friend. (in that case, it will be an output)
This will help us to put separate consecutive messages into the same array. The same goes for the two variables on line:24 and 25 that will act as flags.
Before starting the actual parsing we can also reverse the array, to put the latest messages at the top and oldest at the bottom:
// Reversing the order of messages to make most recent messages appear at top
messageHistory.messages = messageHistory.messages.reverse();This way, we can start creating the training set with more relevant information. Now we can loop through the message history and start populating the training data:
messageHistory.messages.forEach((singleMessage, index) => {
    const currentMessageType = getMessageType(singleMessage);

    if (currentMessageType === 'input') {
        messageObject.inputs.push(decodeUtf8(singleMessage.content));
        hasInput = true;
    }

    if (currentMessageType === 'output') {
        messageObject.outputs.push(decodeUtf8(singleMessage.content));
        hasOutput = true;
    }

    // Only proceed if next message sender is not the same as the current in the loop
    if (hasInput && hasOutput && getMessageType(messageHistory.messages[index + 1]) !== currentMessageType) {
        messages[`label${index}`] = Object.assign({}, messageObject);

        messageObject.inputs = [];
        messageObject.outputs = [];

        hasInput = false;
        hasOutput = false;
    }
});

fs.writeFileSync(output, JSON.stringify(messages, null, 4), 'utf-8');

console.log(`parsed data written to ${output}`);For each message, we want to determine who was the sender. Me or you? If it’s me, it’s going to be an input. If it’s you, it’s going to be an output. We push the message into the corresponding array and we set the input or output flag to true respectively.
And if we have them both set to true and the next message’s sender is different from the current one, we can create a new label containing both inputs and outputs arrays. Then we set everything back to its initial value and start again. Note that we need to use Object.assign to create copies from the original object, otherwise we would start populating the messages object with empty arrays.
When we all finished, we write the created object into the output file using UTF-8 as encoding.
Running npm run parse will execute the JavaScript file and you should see a trainingData.json file generated into the data folder.
Classification
Classification will be much easier than parsing the data. We can do it using just a couple of lines. For the training, I’ve created a separate file called train.js and a new script in package.json again so we can do npm run train to execute the train.js file.
Now let’s take a look at the training algorithm and go through it step by step to see how to train the classifier:
const fs = require('fs');
const nlp = require('natural');

const input = './data/trainingData.json';
const output = './data/classifier.json';

const trainingData = JSON.parse(fs.readFileSync(input));
const classifier = new nlp.LogisticRegressionClassifier();

Object.keys(trainingData).forEach((label, index) => {
    trainingData[label].inputs.forEach(input => classifier.addDocument(input.toLowerCase(), label));

    if (index + 1 === Object.keys(trainingData).length) {
        classifier.train();
        classifier.save(output, (err, classifier) => {
            if (err) {
                console.error(err);
            }

            console.log(`Classifier generated at ${output}`);
        });
    }
});We start off by importing the FileSystem API and Natural. Since we want to work on the training data we need it as an input and our generated output will be the classifier.json file.
We store the training data inside the trainingData variable and we also define the type of classifier we want to use. In Natural we can choose between various classifiers. The one we are using here is a Logistic regression classifier.
To train the classifier, we loop through the training data. For each label, we loop through the inputs inside them and we call classifier.addDocument, passing in the inputs individually while also making everything lowercase — this will make the classifier more accurate — and the label to use for them.
addDocument also accepts an array so we could simply do: classifier.addDocument(traininData[label].inputs, label);, but this way, we will have more fine-grained samples, which will give us more accuracy.
And if we reach the end of the training data, we call classifier.train to train it. To also make the trained classifier reusable, we save it to the output location we defined on line:5, with classifier.save.
Final Results
To test out everything we’ve done, we can create a final script to handle an input text and generate an output for it. One more time, I’ve created a separate script with a separate command, making the package.json file look like this:
{
  "name": "natural",
  "version": "1.0.0",
  "scripts": {
    "parse": "node parser.js",
    "train": "node train.js",
    "test": "node test.js"
  },
  "author": "",
  "license": "ISC",
  "dependencies": {
    "natural": "0.6.3"
  }
}I added a test script which runs test.js. And for that, we bring our chatbot to life with roughly 20 lines of code:
const fs = require('fs');
const nlp = require('natural');
const data = JSON.parse(fs.readFileSync('./data/trainingData.json'));

const input = process.argv.slice(2)[0];

nlp.LogisticRegressionClassifier.load('./data/classifier.json', null, (err, classifier) => {
    const guesses = classifier.getClassifications(input.toLowerCase());
    const guess = guesses.reduce((x, y) => x && x.value > y.value ? x : y);

    // if guess probability is less than 90% we can fallback to a generic message
    if (guess.value < 0.9) {
        console.log(`I don't understand what do you mean by "${input}"...`);

        return;
    }

    const replies = data[guess.label].outputs;
    const reply = replies[Math.floor(Math.random() * replies.length)];

    console.log(reply);
});First, we import all the dependencies and we’re going to make use of the training data we created as well. Then we define the input which can be passed in right from the command line. So we can do npm run test "Hey". Here the passed string will be the input.
Next, we load in the classifier.json which we generated earlier, and as a callback function, we do classifier.getClassifications to get a classification for the input and store it inside the guesses variable. This will give us an array with labels and probability values. The higher the value, the more sure we can be we have a match. Remember, we set a threshold of 90%.
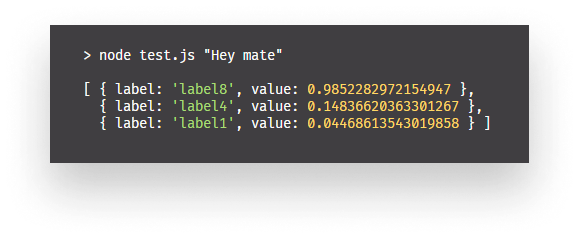
We then select the one with the highest score with reduce and if the probability of that is less than 90%, we fall back to a generic message and return. Otherwise, we read the outputs from our trainingData.json with the label of the most probable guess and we select a random reply from the outputs array.


The classifier can tackle sentences it has never seen before and still manages to produce valid outputs.
No more “seen“ and no more scene, this is how you turn your friend into a chatbot only waiting for your messages. 🤖
Do you already have experience with building chatbots? What are some common pitfalls developers tend to commit? Let us know in the comments below!
Thank you for reading through, happy coding!
If you would like to learn more about AI, check out how you can create your own neural networks in JavaScript, using TensorFlow.js.

Rocket Launch Your Career
Speed up your learning progress with our mentorship program. Join as a mentee to unlock the full potential of Webtips and get a personalized learning experience by experts to master the following frontend technologies:
Courses


Recommended
50 JavaScript Interview Questions
What is The Event Loop in JavaScript?