How to Recreate Tic-Tac-Toe in Vanilla JavaScript
Tic-Tac-Toe, which origin can be traced back to ancient Egypt from around 1300 BC is a two-player turn-based game, played on a 3x3 grid with X and O marks. The player who manages to get their marks placed on the grid in a row, column, or diagonal first, wins the game.
In this tutorial, we'll take a look at how you can recreate it in vanilla JavaScript. You'll also find the link to the full code in one piece hosted on GitHub. Without further ado, let's jump into it.

Setting Up the Project
Let's start by setting up the project. Create a new folder for the project and add an index.html file with the following markup:
<!DOCTYPE html>
<html lang="en">
<head>
<meta charset="UTF-8" />
<meta http-equiv="X-UA-Compatible" content="IE=edge" />
<meta name="viewport" content="width=device-width, initial-scale=1.0" />
<link rel="stylesheet" href="styles.css" />
<script src="game.js" defer></script>
<title>❌⭕ Tic-Tac-Toe</title>
</head>
<body>
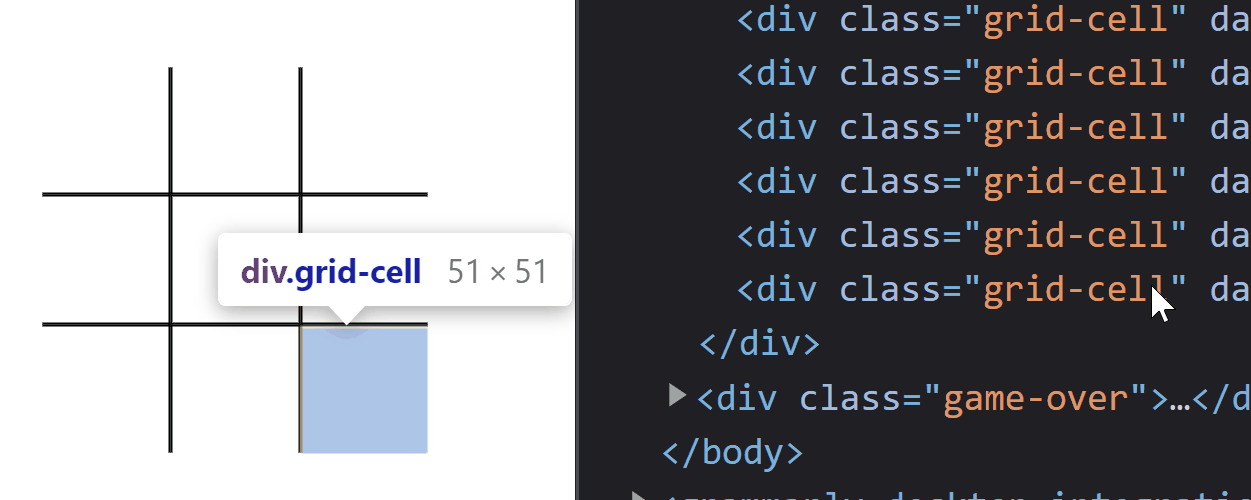
<div id="game">
<div class="grid-cell" data-value="0"></div>
<div class="grid-cell" data-value="1"></div>
<div class="grid-cell" data-value="2"></div>
<div class="grid-cell" data-value="3"></div>
<div class="grid-cell" data-value="4"></div>
<div class="grid-cell" data-value="5"></div>
<div class="grid-cell" data-value="6"></div>
<div class="grid-cell" data-value="7"></div>
<div class="grid-cell" data-value="8"></div>
</div>
<div class="game-over">
<span class="game-over-text"></span>
<button class="restart">Restart</button>
</div>
</body>
</html>This will be the whole markup that is required for the entire game. Each cell on the board will be represented by a div. They'll also have a data-value attribute that we can later use in our JavaScript file to know which cell has been clicked in each turn.

data-valueYou may have also noticed that we're linking a stylesheet and a script in the head, so make sure you add these next to your index.html file.
We'll also need an element for the game over text and a restart button that we can use to reset the game. We can leave the .game-over-text element empty, as we'll use JavaScript to give it a value. It can have three possible states:
- Draw
- X wins
- O wins
Styling the Board
That's all we need for the markup. Now let's have a look at the CSS, so we can actually have something that resembles a board. To start off, add the following rules to your empty styles.css to center the board and give it a border:
#game {
    position: absolute;
    top: 50%;
    left: 50%;
    transform: translate(-50%, -50%);
    display: grid;
    grid-template-columns: repeat(3, auto);
}

.grid-cell {
    border: 1px solid #000;
    width: 50px;
    height: 50px;
    cursor: pointer;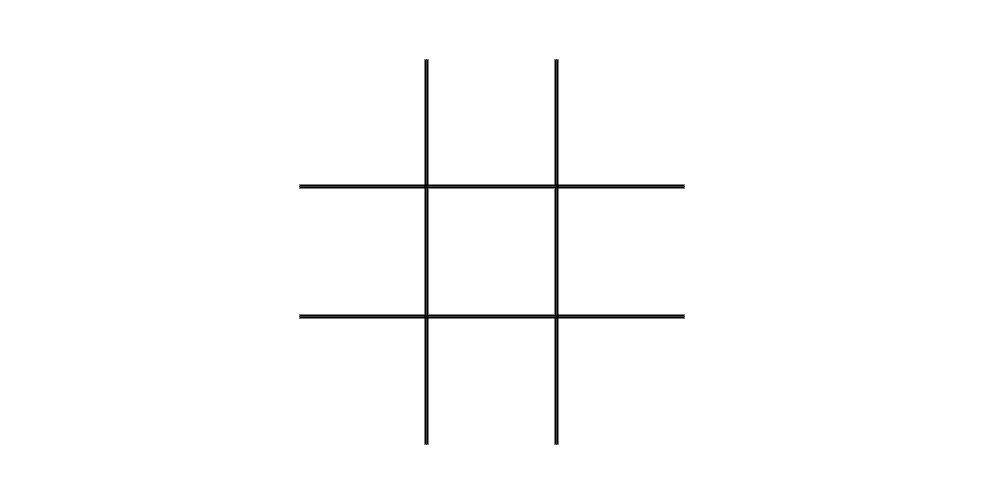
}We're using a CSS grid to create a 3x3 layout. Note that we also need to do a transform to dead-center the board on the screen. This will get us the following:
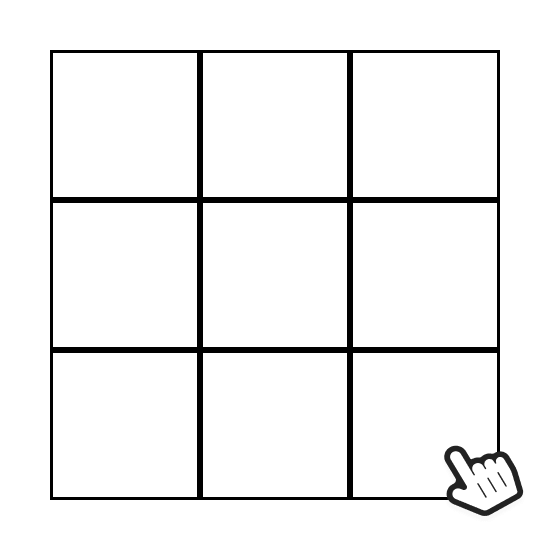
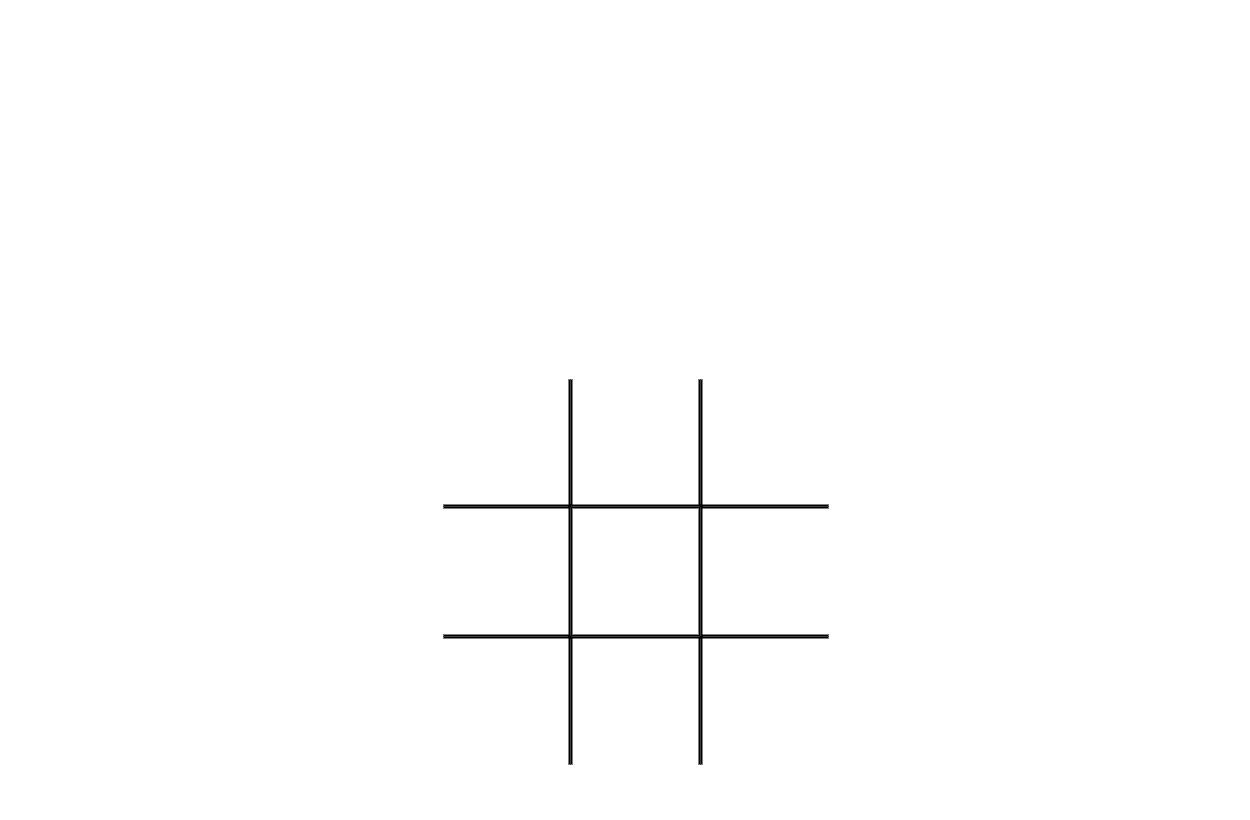
cursor: pointer to show a pointer upon hoverThis is so far not quite what we want, as we don't need borders around the board, only between cells, to get the classic grid layout of tic-tac-toe.
Removing unnecessary borders
To remove the unnecessary borders, we can use nth-child pseudo-selectors to target the cells on each side, and remove the correct border:
.grid-cell:nth-child(-n + 3) {
    border-top: none;
}

.grid-cell:nth-child(3n + 1) {
    border-left: none;
}

.grid-cell:nth-child(3n + 3) {
    border-right: none;
}

.grid-cell:nth-last-of-type(-n + 3) {
    border-bottom: none;
}The formula in the parentheses represents the list of elements we want to target. The n can be a number (the index), or it can be a keyword (like even or odd), or a formula (like in the code example above.) As counting is started from 0, the first formula will select the first three .grid-cell elements:
-n + 3: Gets the first three elements. This is equivalent to[-0+3, -1+3, -2+3]3n + 1: Gets the cells on the left. This is equivalent to[(3x0)+1, (3x1)+1, (3x2)+1], or[1, 4, 7]3n + 3: Gets the cells on the right. This is equivalent to[(3x0)+3, (3x1)+3, (3x2)+3], or[3, 6, 9]nth-last-of-type(-n + 3): Gets the last three elements. The same formula is used as for the first one, but this time, thenth-last-of-typeselector can be used to start the count from the end and get the last three elements instead of the first three.

Using pseudo-elements to add content
To show X and O inside the cells we're also going to use CSS. This time, we use ::after and ::before pseudo-elements:
This means every time we apply a class of .x or .o to one of the cells, it'll be marked. However, if we do so, they don't look quite right.
To fix this, we're going to need some extra CSS. Extend your .grid-cell with the following rules to make the marks bigger, and center them both horizontally and vertically:
.grid-cell {
    border: 1px solid #000;
    width: 50px;
    height: 50px;
    cursor: pointer;
    display: flex;
    justify-content: center;
    align-items: center;
    font-size: 28px;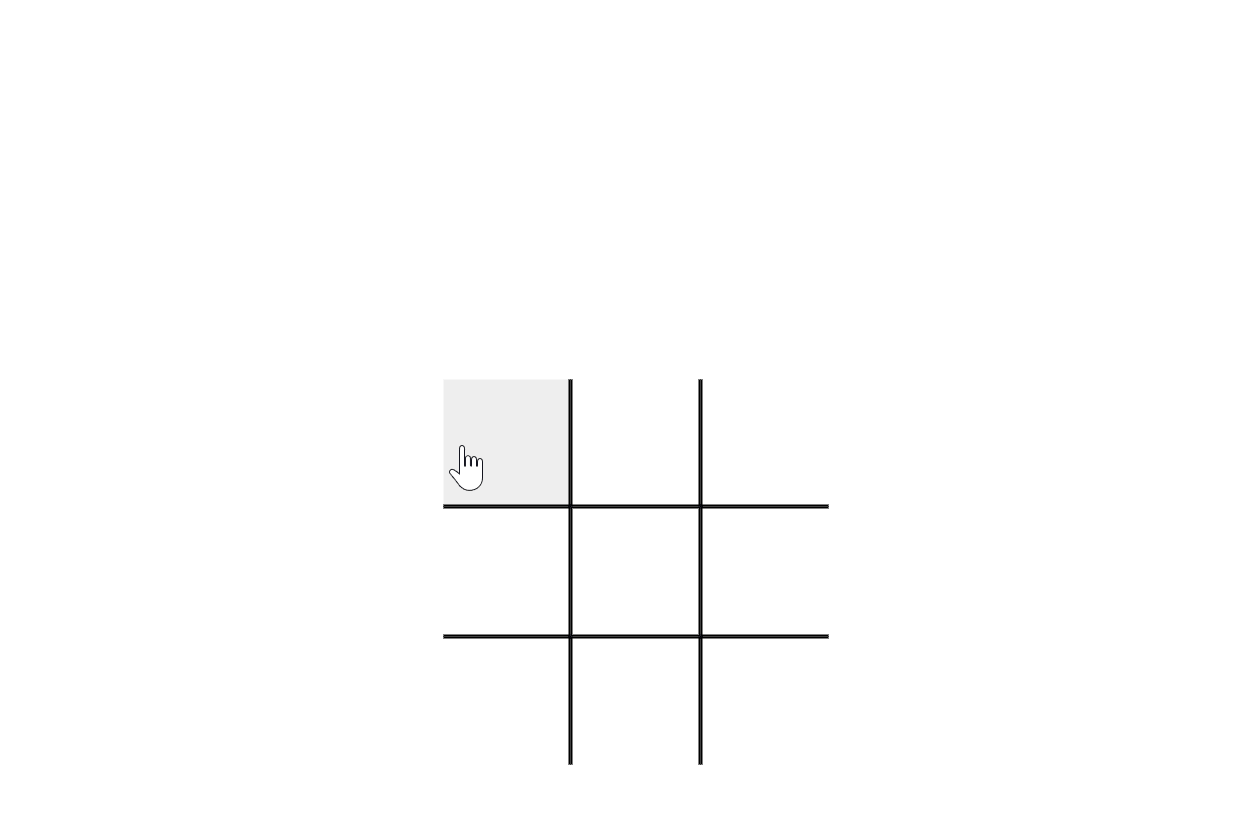
}Now this looks much better, but we can add some extra styles to indicate which cell already has values, and which one the user currently hovers by adding the following styles:
.disabled {
    cursor: not-allowed;
}

.grid-cell:not(.disabled):hover {
    background: #eee;
}
We can add a .disabled class to change the cursor to not-allowed, and also use this class to select cells that are not disabled to create a hover effect:
Styling the game over text
Lastly, we need to style the game over text. Just as for the board itself, we want the text to be displayed in the center of the screen. To achieve it, expand your styles.css file with the following rules:
.game-over {
    display: none;
    position: absolute;
    top: 50%;
    left: 50%;
    transform: translate(-50%, -50%);
    box-shadow: rgb(0 0 0 / 50%) 0 0 0 9999px;
}

.game-over-text {
    position: absolute;
    top: -200px;
    font-size: 60px;
    font-family: sans-serif;
    font-weight: bold;
    text-align: center;
    transform: translateX(-30%);
}

.visible {
    display: block;
}
One thing that is worth mentioning is the high box-shadow value. This is useful for creating overlays. Also note that initially, this element will be hidden, and we'll switch it on through JavaScript, that's why we'll need an additional .visible class.

Creating the Game
Now let's focus our attention on actually creating the game itself. We have the board, we have it styled, let's add the logic, which will fit in less than 100 lines of code. First, we want to define an object for storing the state of our game:
const game = {
    xTurn: true,
    xState: [],
    oState: [],
    winningStates: [
        // Rows
        ['0', '1', '2'],
        ['3', '4', '5'],
        ['6', '7', '8'],

        // Columns
        ['0', '3', '6'],
        ['1', '4', '7'],
        ['2', '5', '8'],

        // Diagonal
        ['0', '4', '8'],
        ['2', '4', '6']
    ]
}This object will hold 4 different properties:
xTurn, a flag to switch between turnsxState, the state of X, represented with an array of stringsoState, the state of Y, represented in the same waywinningStates, the possible combinations to win the game.
How did we get the possible combinations? Remember, we indexed the cells with data-value attributes. Based on those values, we can list the possible winning states here. We'll match this against xState and oState later on to see who is winning the game.
Adding click events to cells
To start off interacting with cells, we'll need to add a new click event listener. Under your game object, add the following:
document.addEventListener('click', event => {

});We'll define most of the game's logic inside this callback. Note that we have added the event listener on the document, rather than on individual cells, as we'll delegate the event, so we can have a single event listener. Because of this, we'll need to check whether the user clicked on a cell or not:
document.addEventListener('click', event => {
    const target = event.target
    const isCell = target.classList.contains('grid-cell')
    const isDisabled = target.classList.contains('disabled')

    if (isCell && !isDisabled) {
        // The player clicked on a cell that is still empty
    }
})For this, we can use classes to decide if the click event was triggered on the right element. We also want to check if the cell is disabled. If it's, that means we already have a mark in the cell, in which case, we want to do nothing. Essentially, not allow the user to place another mark into the cell.
Inside the if, we first want to update the state of the cell and then switch turns. Luckily, we already have all the necessary classes and attributes for this, so we can add the following:
const cellValue = target.dataset.value

game.xTurn === true
    ? game.xState.push(cellValue)
    : game.oState.push(cellValue)

target.classList.add('disabled')
target.classList.add(game.xTurn ? 'x' : 'o')

game.xTurn = !game.xTurnFirst, we need to get the value of the cell from its data attribute so we can update the state with its value. We can use the xTurn flag to decide if it's the turn of X or O and push the cell's value into the state accordingly.
We also want to add two classes for the cell: one for .disabled and one for .x or .o, based on the turn. Lastly, we can set the flag to its opposite. That's all we really need to start adding marks into the cells, the rest of the code will be needed for checking draws and wins.
Check for draws
First, let's check for draws as that only requires 4 lines of code. Each time we add a mark to a cell, we disable it. This means that if all cells are disabled, then it's a draw:
if (!document.querySelectorAll('.grid-cell:not(.disabled)').length) {
    document.querySelector('.game-over').classList.add('visible')
    document.querySelector('.game-over-text').textContent = 'Draw!'
}We can achieve this with a simple selector. If there are no .grid-cells without .disabled classes, then we can show the game over text.
Check for wins
Checking for wins is a little bit trickier but nothing too complex. To check for wins, we want to loop through the possible winning states and compare the state of X and O to each winning state to see if there is a match:
game.winningStates.forEach(winningState => {
    const xWins = winningState.every(state => game.xState.includes(state))
    const oWins = winningState.every(state => game.oState.includes(state))

    if (xWins || oWins) {
        document.querySelectorAll('.grid-cell').forEach(cell => cell.classList.add('disabled'))
        document.querySelector('.game-over').classList.add('visible')
        document.querySelector('.game-over-text').textContent = xWins
            ? 'X wins!'
            : 'O wins!'
    }
})To do that, we first need to loop through winningStates with a .forEach, and then we can use .every to see if xState and oState includes all of the values that are required for a win. If they're, we can disable all cells and show the game over screen, this time, with a winning text.
Restarting the game
All we need now is the restarting functionality, so we can play a new round. Under the current click event listener, add a new click event listener on the .restart button:
document.querySelector('.restart').addEventListener('click', () => {
    document.querySelector('.game-over').classList.remove('visible')
    document.querySelectorAll('.grid-cell').forEach(cell => {
        cell.classList.remove('disabled', 'x', 'o')
    })

    game.xTurn = true
    game.xState = []
    game.oState = []
})The job of this callback will be to remove the .visible class from the .game-over element, and remove all unnecessary classes from the cells as well. Lastly, we can reset the state too, and set everything back to its original value.
Summary
And that's how you recreate Tic-Tac-Toe in vanilla JavaScript. I hope you learned much about basic game development in JavaScript, and you have found the explanation about the nth-child selectors useful too. If you would like to take your game development skills to the next level, but still stay with JavaScript, I recommend checking out the following game development tutorials:
Lastly, if you would like to get the code in one piece, you can clone the project from its GitHub repository. Thank you for reading through, happy coding!

Rocket Launch Your Career
Speed up your learning progress with our mentorship program. Join as a mentee to unlock the full potential of Webtips and get a personalized learning experience by experts to master the following frontend technologies:
Courses


Recommended
How to Use NPM Modules in Your Browser in Three Steps

How to Mock process.env in Jest