The Decorator Design Pattern in JavaScript
If you were working before with Angular or Mobx, you already somewhat familiar with decorators as they make heavy use of them. They have been part of other languages for long, but they are coming to JavaScript as well.
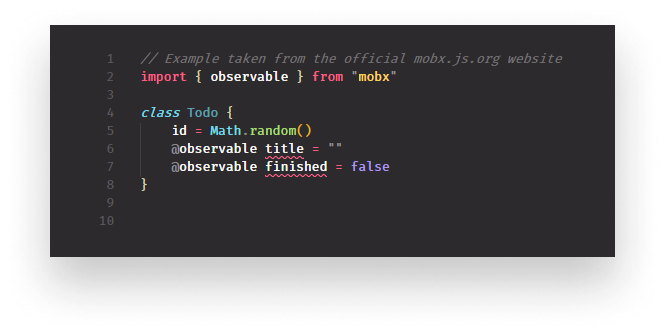
We can already use them today with polyfillers or compilers such Babel. If you are not familiar with decorators, we are talking about the following:

Here @observable is a decorator, which is responsible for wrapping the two properties with additional functionality. So how are they created?
Let’s first take a step back and define what design patterns are in general.
What Are Design Patterns?
Design patterns are tested solutions to common problems in software development. The different patterns can be categorized into three different categories: creational, structural, and behavioral.
I already wrote about a commonly used behavioral design pattern in JavaScript, the PubSub pattern. Now is the time to discuss a structural pattern used for adding enhanced functionality to objects dynamically.
The Concept of the Decorator Pattern
We already saw how decorators look like. They are denoted with an @ symbol followed by the name of the decorator. Decorators are really just syntactic sugar for higher-order functions. They essentially wrap a method or a property into another function that extends its original functionality.
It can be anything as simple as adding logs or as complex as defining access for user groups. It’s important to mention that you can only use decorators for properties or methods, this is why you will see objects used throughout this tutorial.

Creating Decorators
To work with decorators, you’ll need to first set up Babel with a decorators plugin. It will transpile your code down to ES6 so browsers will be able to parse it correctly. If you only want to experiment with decorators but don’t want to configure anything, you can use Repl on the official site of Babel.

So what are decorators? — Decorators are really just functions which takes three parameters as arguments:
object: the object on which we want to define the propertyproperty: the name of the property or method on the object which we want to modifydescriptor: describes how the new property or method should behave
If you ever used Object.defineProperty you may recognize some similarities between the two. Let’s see a very simple example:
const greetPatrick = (object, property, descriptor) => {
    descriptor.value = () => {
    	console.log('Hello Patrick!');
    }
}

const spongeBob = {
    @greetPatrick
    greet() {
    	console.log('Hello!')
    }
}

spongeBob.greet();We have an object with a greet method and we want to override the body of the method. We annotated the function with a decorator. To create that decorator, you simply have to create a function with the same name which takes the three parameters we discussed. Assigning descriptor.value to a new function overrides the original and we get back Hello Patrick! in the console.

Now let’s see two more practical examples: one for testing performance and another one for improving it.
@time decorator
Say we have a function to get the first n of triangular numbers and we want to know the time it takes to generate them:
const calculate = {

    triangularNumbers(n) {
        const nums = [];

        for (let i = 0; i < n; i++) {
            nums.push((i * (i + 1)) / 2);
        }

        return nums;
    }
};We have a simple function with a loop and we want to decorate it. So we create a new decorator called @time:
const time = (object, property, descriptor) => {
    const originalFunction = descriptor.value;

    descriptor.value = (...args) => {
        console.time(`Time it takes to run ${property}`);
        const originalValue = originalFunction(...args);
        console.timeEnd(`Time it takes to run ${property}`);

        return originalValue;
    }
}This time, we don’t want to override the whole body of the function, rather we want to extend it with additional functionality. So we start off by storing the original function in descriptor.value.
We can use destructuring to get all available properties passed into the original function and get the value of the function return, which we then store in originalValue. This is what we return at the end. We wrap everything in console.time which measures the time it takes for the function to run.
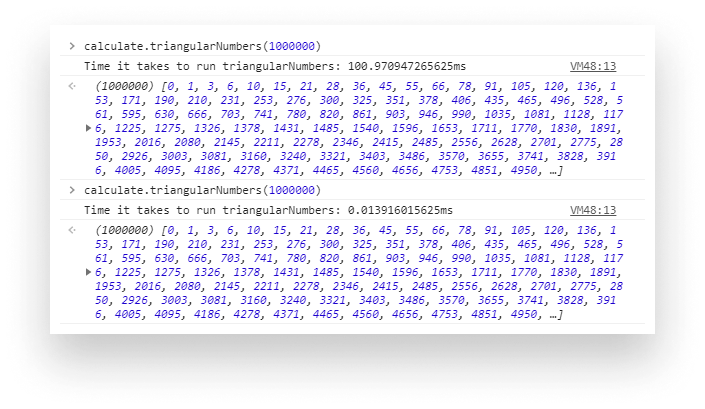
If we use the decorator and call the function we get back the following printed to the console:

Now imagine this is done with the first 1,000,000 sets of numbers. Time increases so we want to optimize this function with another decorator:
@memoize decorator
If you haven’t heard about memoization, it’s all about caching previous results. So instead of rerunning calculations for previous executions, we can instead return the cached value.
So again, we create another function called memoize:
const memoize = (object, property, descriptor) => {
    const originalFunction = descriptor.value;
    const cache = {};

    descriptor.value = (...args) => {
        const cachedValue = cache[args.toString()];

        if (!cachedValue) {
            cache[args.toString()] = originalFunction(...args);
        }

        return cachedValue ? cachedValue : originalFunction(...args);
    }
}In this function, we can create a cache object to store previous values. Then we can either get or assign a new value to a property named based on the passed parameters to the function. This will ensure that we have unique properties and only one value will be assigned to one set of results.
If we already have a cached value, we return that. Otherwise, we execute the original function.
Now we need to assign both decorators to the calculate function:
const calculate = {

    @time
    @memoize
    triangularNumbers(n) {
        const nums = [];

        for (let i = 0; i < n; i++) {
            nums.push((i * (i + 1)) / 2)
        }

        return nums;
    }
};First, we want to call @time then @memoize. If we run the method again two times we see that for the first time, it takes about 100ms to run, but in the second time, it only takes ~0.014ms as the result is requested from the cache.

Summary
Of course, the list goes on. You can add extra properties to objects or use it for more complex situations such as Angular’s @Component or Mobx’s @observable or @observer.
Since we are talking about function calls, you can also use decorators by passing values into them:
@Component({
    selector: 'selector',
    template: `
      Component template...
    `
})
class BaseComponent {
    ...
}What are your favourite use-cases of decorators? Have you used them before? Let us know in the comments below. Thank you for reading through, Happy coding!

Rocket Launch Your Career
Speed up your learning progress with our mentorship program. Join as a mentee to unlock the full potential of Webtips and get a personalized learning experience by experts to master the following frontend technologies:


