
How to Get Started With React + JSON Server
Building the frontend of an application is often just one part of the whole equation. For an application that needs to manage users, store state, allow CRUD operations, and so on, having a frontend is not enough. You also need the backend counterpart that can communicate with a database, and send responses down to the UI that the frontend can consume.
Of course, as frontend developers, the last thing we want to deal with is setting up a database, a server, the routes, handling HTTP requests, and the list goes on and on. These are just some of the things you need to do to get a backend up and running for your frontend app. JSON Server is an NPM package that aims to provide an easy solution for that.
What is JSON Server?
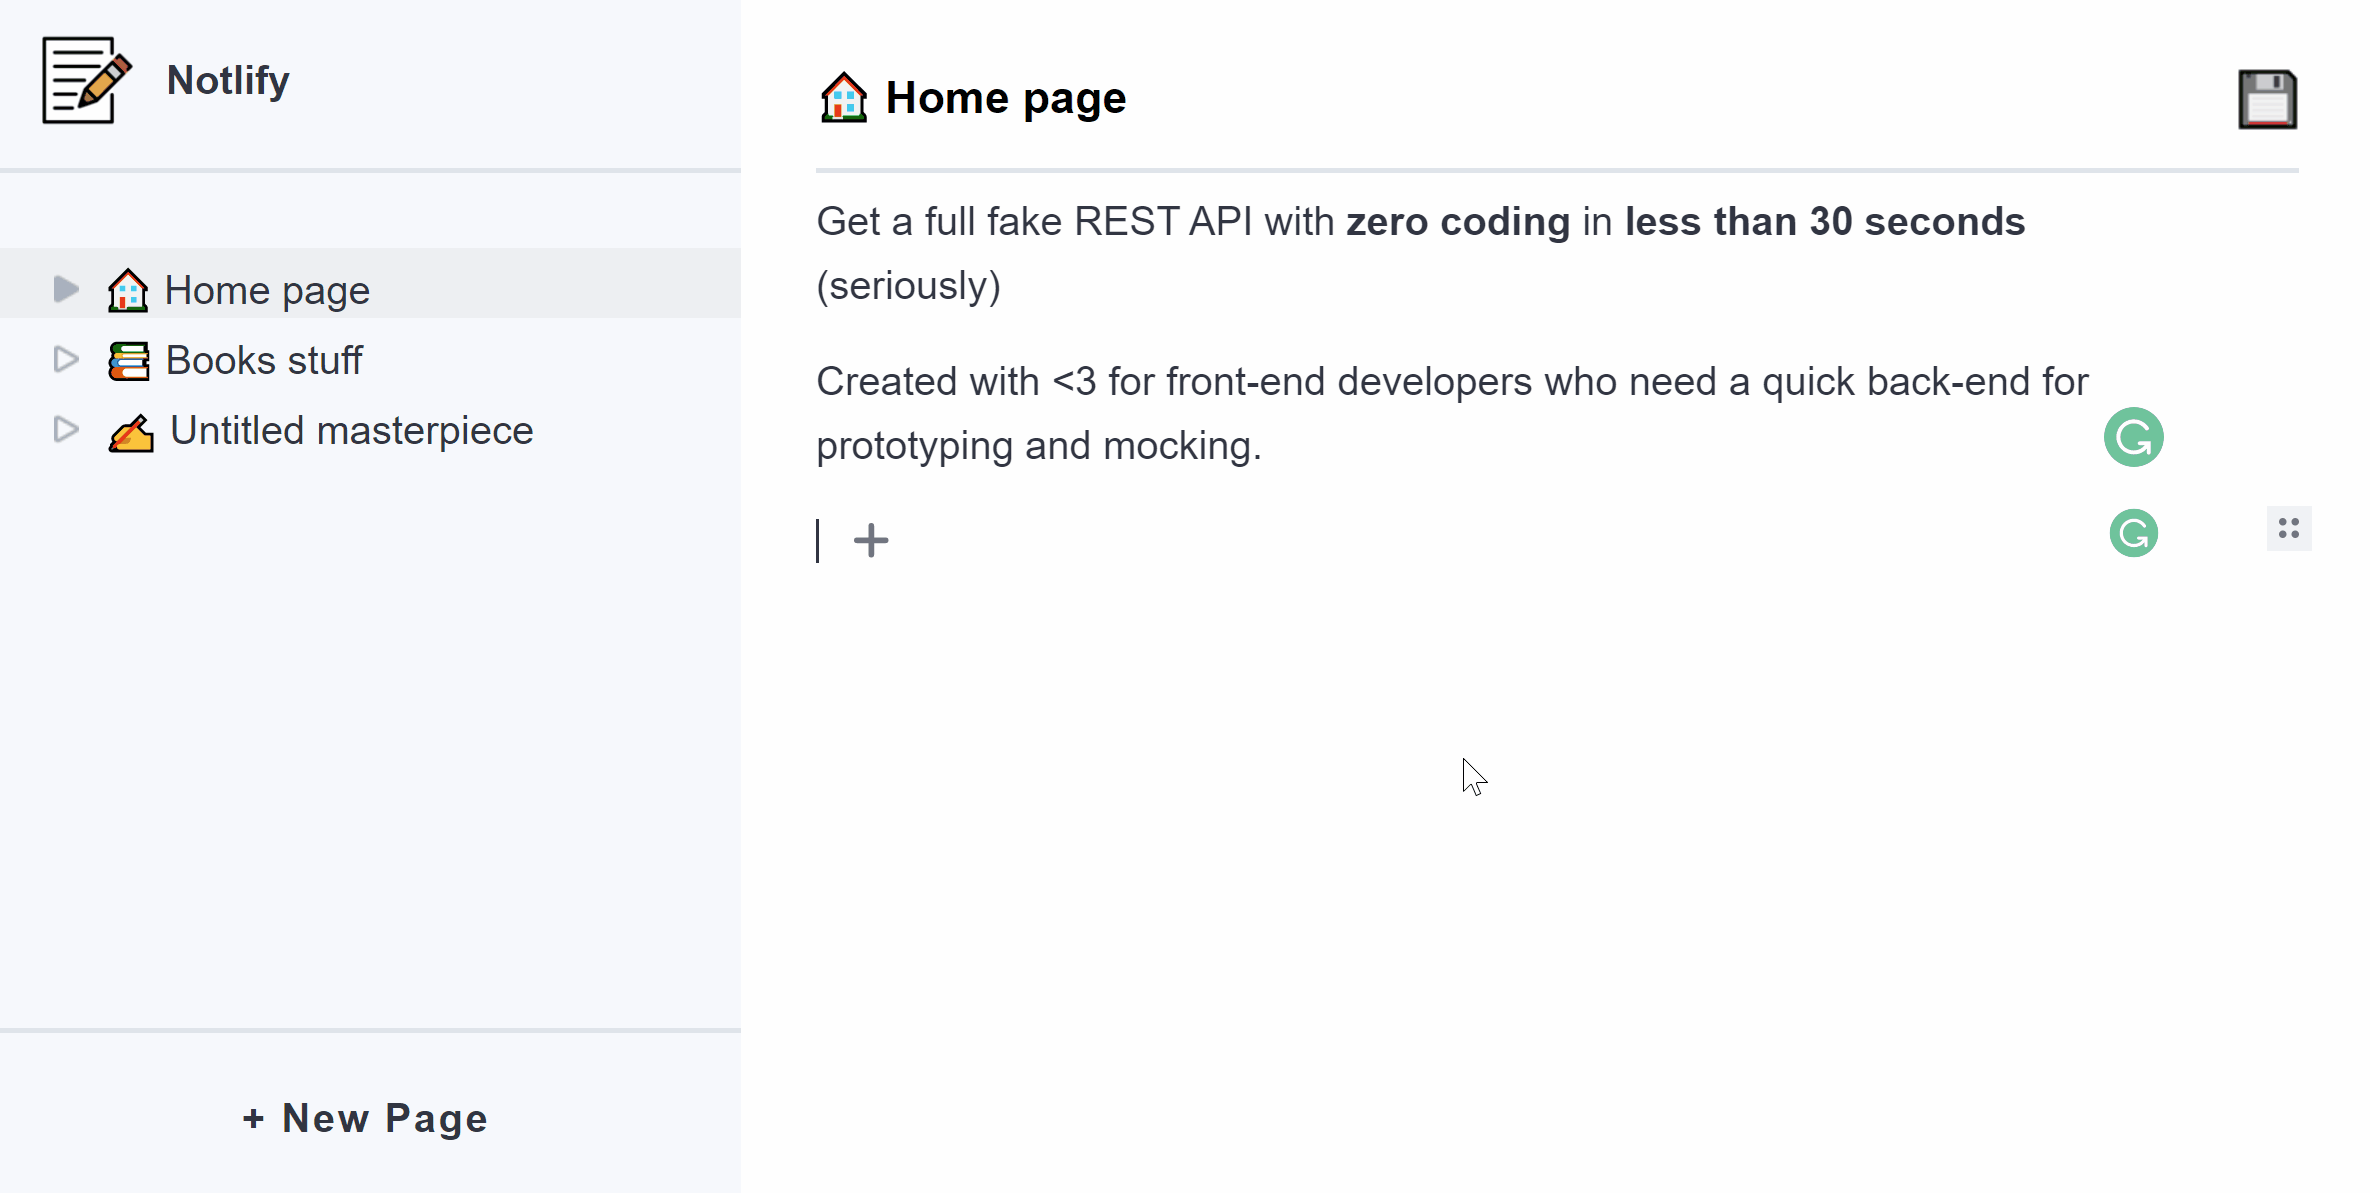
JSON Server provides a full fake REST API that requires no configuration or coding to set up. With its help, we can quickly and easily set up a backend for prototyping and mocking, without having to worry about the underlying logic. This way, we can focus more on developing the frontend, and less on configuring the backend.
The React app we will build
We will build a note-taking app that will use React as a frontend, and JSON-Server as the backend. We will also integrate Editor.js, a blocked-style editor, similar to WordPress’s Gutenberg. If you would like to get the full project in one go, you can clone it from GitHub. Without further ado, let’s jump into setting up the project first with Snowpack.


Table of Contents
- Setting up Snowpack
- Setting up the JSON Server
- Setting up React
- Requesting data from the JSON server
- Displaying the Sidebar
- Displaying the page
- Summary
Setting up Snowpack
For this project, I’m using Snowpack, which is a build tool that uses an unbundled development approach.

To set up Snowpack with React, run the following command, where notlify is the folder you want the project to be bootstrapped:
npx create-snowpack-app notlify --template @snowpack/app-template-minimal
This will create a new NPM project for you with the minimum required files for a Snowpack project. If you cd into the project folder, and run npm run start, you will be greeted with the following message:
Welcome to Snowpack!

Setting up the JSON Server
Now that we have a package.json file, let’s quickly set up the JSON Server. To set it up, all we have to do is install it as a dependency and the rest will be handled by the package. Run:
npm i json-server --save-dev
Once the JSON server is installed, open your package.json file, and add a new command for starting the server. This will serve as our backend:
"scripts": {
  "start": "snowpack dev",
  "start:server": "json-server --watch db.json",
  ...
}It will tell the JSON server to start a server and watch db.json for file changes. You will notice that it will create a db.json file at the root of your project directory. We are going to use a different format for the data, however, so change the contents of db.json to the following:
{
    "pages": [
        {
            "id": "491cee0d-17f9-4629-ac33-0dd8ef985b8a",
            "title": "🏠 Home",
            "content": {
                "blocks": [
                    {
                        "id" : "w2YBRdFkRK",
                        "type" : "paragraph",
                        "data" : {
                            "text" : "Get a full fake REST API"
                        }
                    }
                ]
            },
            "children": []
        }
    ]
}We will have a list of pages in an array with an id, a title, and a content for the page that will hold data entirely generated by Editor.js. You can also have an optional children array with the same data structure to allow nested pages.
How to communicate with the JSON server
The server will automatically create routes for the different nodes we have inside db.json. This means that since we have a pages node, we can now access localhost:300/pages, which will respond with all pages. We can also fetch individual pages using an id, or query params. The following will all return the same page:
GET /pages/491cee0d-17f9-4629-ac33-0dd8ef985b8aGET /pages?id=491cee0d-17f9-4629-ac33-0dd8ef985b8aGET /pages?title=Home
To update them, we will need to use POST / PUT / DELETE. The only thing we need to keep in mind when working with the JSON server is to set the content type to application/json. Everything else is handled by the server internally.
Setting up React
Now that we have the server out of the way, let’s focus our attention to React. Currently, this project has nothing in common with a React app, so first, add react and react-dom as dependencies to use them:
npm i react react-dom
Then, to make the project structure more scalable, create two new folders called src and public. The core of the app will go inside the src folder and any static assets, such as images will go inside the public folder.
To make the new structure work with Snowpack, update yoursnowpack.config.mjs file with the following:
This will tell Snowpack to build both the public and src folder to the root of the project once it’s deployed. Now you can move your index.html inside the public folder. Make sure you also create an entry for React inside it:
  <body>
-     <h1>Welcome to Snowpack!</h1>
+ <div id="root"></div>Since the HTML references index.js, let’s create an index.jsx inside the src folder. We don’t need to worry about the extension as Snowpack will take care of that.
import React from 'react'
import ReactDOM from 'react-dom'


ReactDOM.render(<div>👋</div>, document.getElementById('root'));
Adding Sass Support
To make it easier to work with CSS, we can easily add Sass support by adding npm i @snowpack/plugin-sass. All you have to do is include it inside the plugins array in snowpack.config.mjs:
  plugins: [
+     '@snowpack/plugin-sass'
]To keep the tutorial focused on React and JSON server, I won’t go into details about the CSS involved, you can get the full set of styles in the GitHub repository.
Requesting data from the JSON server
To start requesting the data from the server, let’s create the base component for our app that will fire the requests:
  import React from 'react'
  import ReactDOM from 'react-dom'
+ import App from './app'

- ReactDOM.render(<div>👋</div>, document.getElementById('root'));
+ ReactDOM.render(<App />, document.getElementById('root'));Since we want to have a global state for our pages, we can use the context API to store everything at the top-most component. Create a new directory called context in your src folder, and add a page.jsx file with the following:
import { createContext } from 'react'

const PageContext = createContext({});
const PageProvider = PageContext.Provider;

export { PageContext, PageProvider };This will export both the context and the provider. In order to use the context, we need to import the provider into our app.jsx, and wrap our components with it:
import React from 'react'

import { PageProvider } from './context/page'

const App = () => {
    const context = ?;

    return (
        <PageProvider value={context}>
            { /* The rest of the components will be placed here */ }
        </PageProvider>
    );
};

export default App;The context variable will be passed as a value to the PageProvider, but in order to get the correct value for the context, we need to first fetch the data from the JSON server.
Fetching the data with hooks
To keep the component small and clean, I will be using a custom hook for fetching the pages, called useFetch.
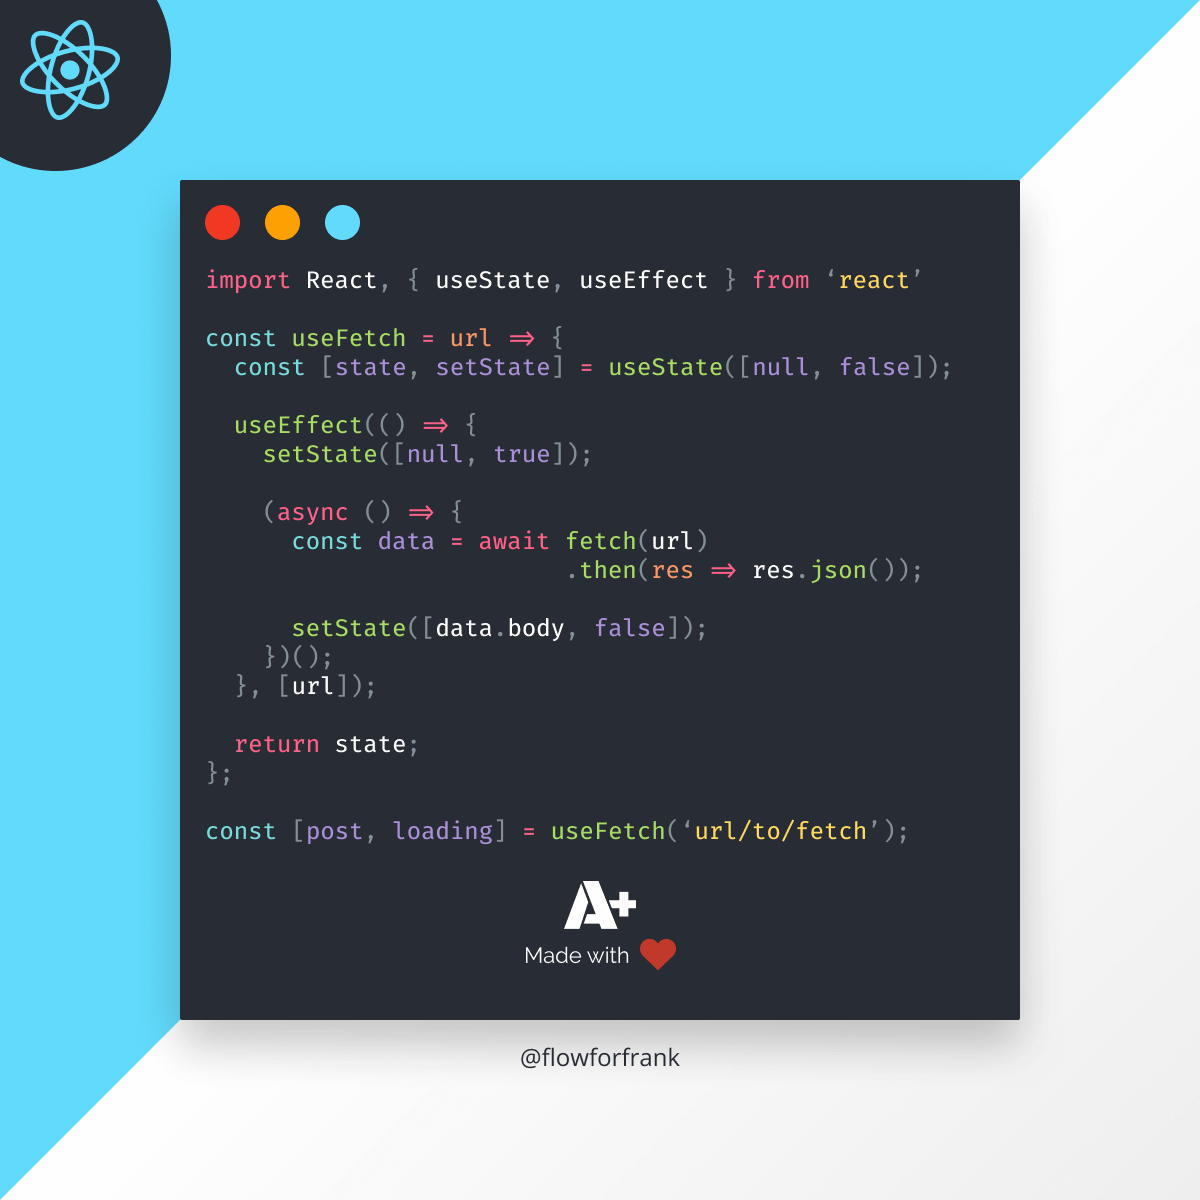
We can point this hook to the /pages endpoint, and display a loading state as long as we are waiting for the response:
import React, { useState, useEffect } from 'react'

import Sidebar from './components/sidebar'
import Page from './components/page'

import { PageProvider } from './context/page'
import useFetch from './hooks/useFetch'

const App = () => {
    const [data, loading] = useFetch('http://localhost:3000/pages');
    const [pages, setPages] = useState(data);
    const [activePage, setActivePage] = useState(data);

    useEffect(() => {
        if (data) {
            setPages(data);
            setActivePage(data[0]);
        }
    }, [data]);

    if (loading || !data) {
        return <div>loading...</div>
    }

    const context = {
        sidebar: [pages, setPages],
        page: [activePage, setActivePage]
    };

    return (
        <PageProvider value={context}>
            <Sidebar />
            {activePage && <Page />}
        </PageProvider>
    );
};

export default App;Once we got the pages in the response, we can use it for two different states: one for the sidebar, and one for the currently active page. We can set both of them using a useEffect and useState hooks. Note that the active page will be always set to the very first page initially, that is the first element of data.
We also want to pass these states to the context so we can access them in all child components. This way we will be able to avoid passing down data through deeply nested components, and we can access everything through the use of useContext.
Displaying the Sidebar
As we could see, our app imports two new components now: Sidebar, and Page. Create both of them inside a components folder. At this stage, we have nothing but the markup and the context:
import React, { useContext } from 'react'
import Navigation from './navigation'

import { PageContext } from '../context/page'

const Sidebar = () => {
    const { sidebar } = useContext(PageContext);
    const [pages, setPages] = sidebar;

    return (
        <aside>
            <div className="logo">
                <img src="img/logo.png" />
                <span>Notlify</span>
            </div>
            <Navigation pages={pages} />
            <button>+ New Page</button>
        </aside>
    );
};

export default Sidebar;Note that we can get both pages and setPages destructured from the context we have defined in app.jsx. We can pass pages down to an extra component called Navigation, whose only purpose is to loop through the pages and display them in the sidebar:
import React, { useContext } from 'react'

import { PageContext } from '../context/page'

const Navigation = ({ pages }) => {
    const { page } = useContext(PageContext);
    const [activePage, setActivePage] = page;

    return (
        <ul>
            {pages?.map(page => (
                <li key={page.id}>
                    <span className={activePage.id === page.id ? 'active' : null}
                        onClick={() => setActivePage(page)}
                    >
                        <img src="img/chevron-empty.png" />
                        {page.title}
                    </span>
                </li>
            ))}
        </ul>
    );
};

export default Navigation;If you would like to see how you can achieve a nested structure, make sure to checkout the GitHub repository.
This component uses the context again, but this time, we need to be aware of the active page so that we can:
- Highlight the appropriate menu when the user clicks on it.
- Set the clicked page as the active one.
Adding new pages
We also want to be able to add new pages, for which we already have the button inside sidebar.jsx. Attach an event listener to it:
return (
    <aside>
        <div className="logo">
            <img src="img/logo.png" />
            <span>Notlify</span>
        </div>
        <Navigation pages={pages} />
-       <button>+ New Page</button>
+       <button onClick={() => addNewPage()}>+ New Page</button>
    </aside>
);And let’s add a new function before the return statement with this function’s name:
import { uuidv4, add } from '../utils'

const addNewPage = () => {
    const page = {
        id: uuidv4(),
        title: '✍️ Untitled masterpiece',
        content: {
            blocks: [],
        },
        children: []
    };

    add(page);
    setPages([
        ...pages,
        page
    ]);
};So what is going on here? First, we want to have the basic object structure for a new page that we define for the page variable. To make sure we get unique ids for each page, I’ve created a utils.js file and turned to StackOverflow to find out how you can generate unique identifiers, and apparently, the following will do it:
export const uuidv4 = () => 'xxxxxxxx-xxxx-4xxx-yxxx-xxxxxxxxxxxx'.replace(/[xy]/g, function(c) {
    const r = Math.random() * 16 | 0, v = c == 'x' ? r : (r & 0x3 | 0x8);
    return v.toString(16);
});But what happens if we get the same ID for two different pages? Since we are using Math.random, we can run into duplicates, right? We are probably good with this small application.
According to Wikipedia — “the probability to find a duplicate within 103 trillion version-4 UUIDs is one in a billion.”
Sending requests to the JSON server
In the above code example, I’ve also imported an add function. I’ve created three different functions for adding, updating, and removing pages from the mock database. These functions are all using the Fetch API, and you can add them to your utils.js. Make sure you set the correct headers in order for the JSON server to accept your requests:
const request = ({ endpoint, method, data }) => {
    fetch(endpoint, {
        body: JSON.stringify(data),
        method,
        headers: {
            'Content-Type': 'application/json'
        }
    });
};

export const add = data => {
    request({
        endpoint: 'http://localhost:3000/pages',
        method: 'POST',
        data
    });
};

export const update = page => {
    request({
        endpoint: `http://localhost:3000/pages/${page.id}`,
        method: 'PUT',
        data: page
    });
};

export const remove = page => {
    request({
        endpoint: `http://localhost:3000/pages/${page.id}`,
        method: 'DELETE'
    });
};Using the add function and setPages, we can update both the mock data and the state of the app with our new entry.
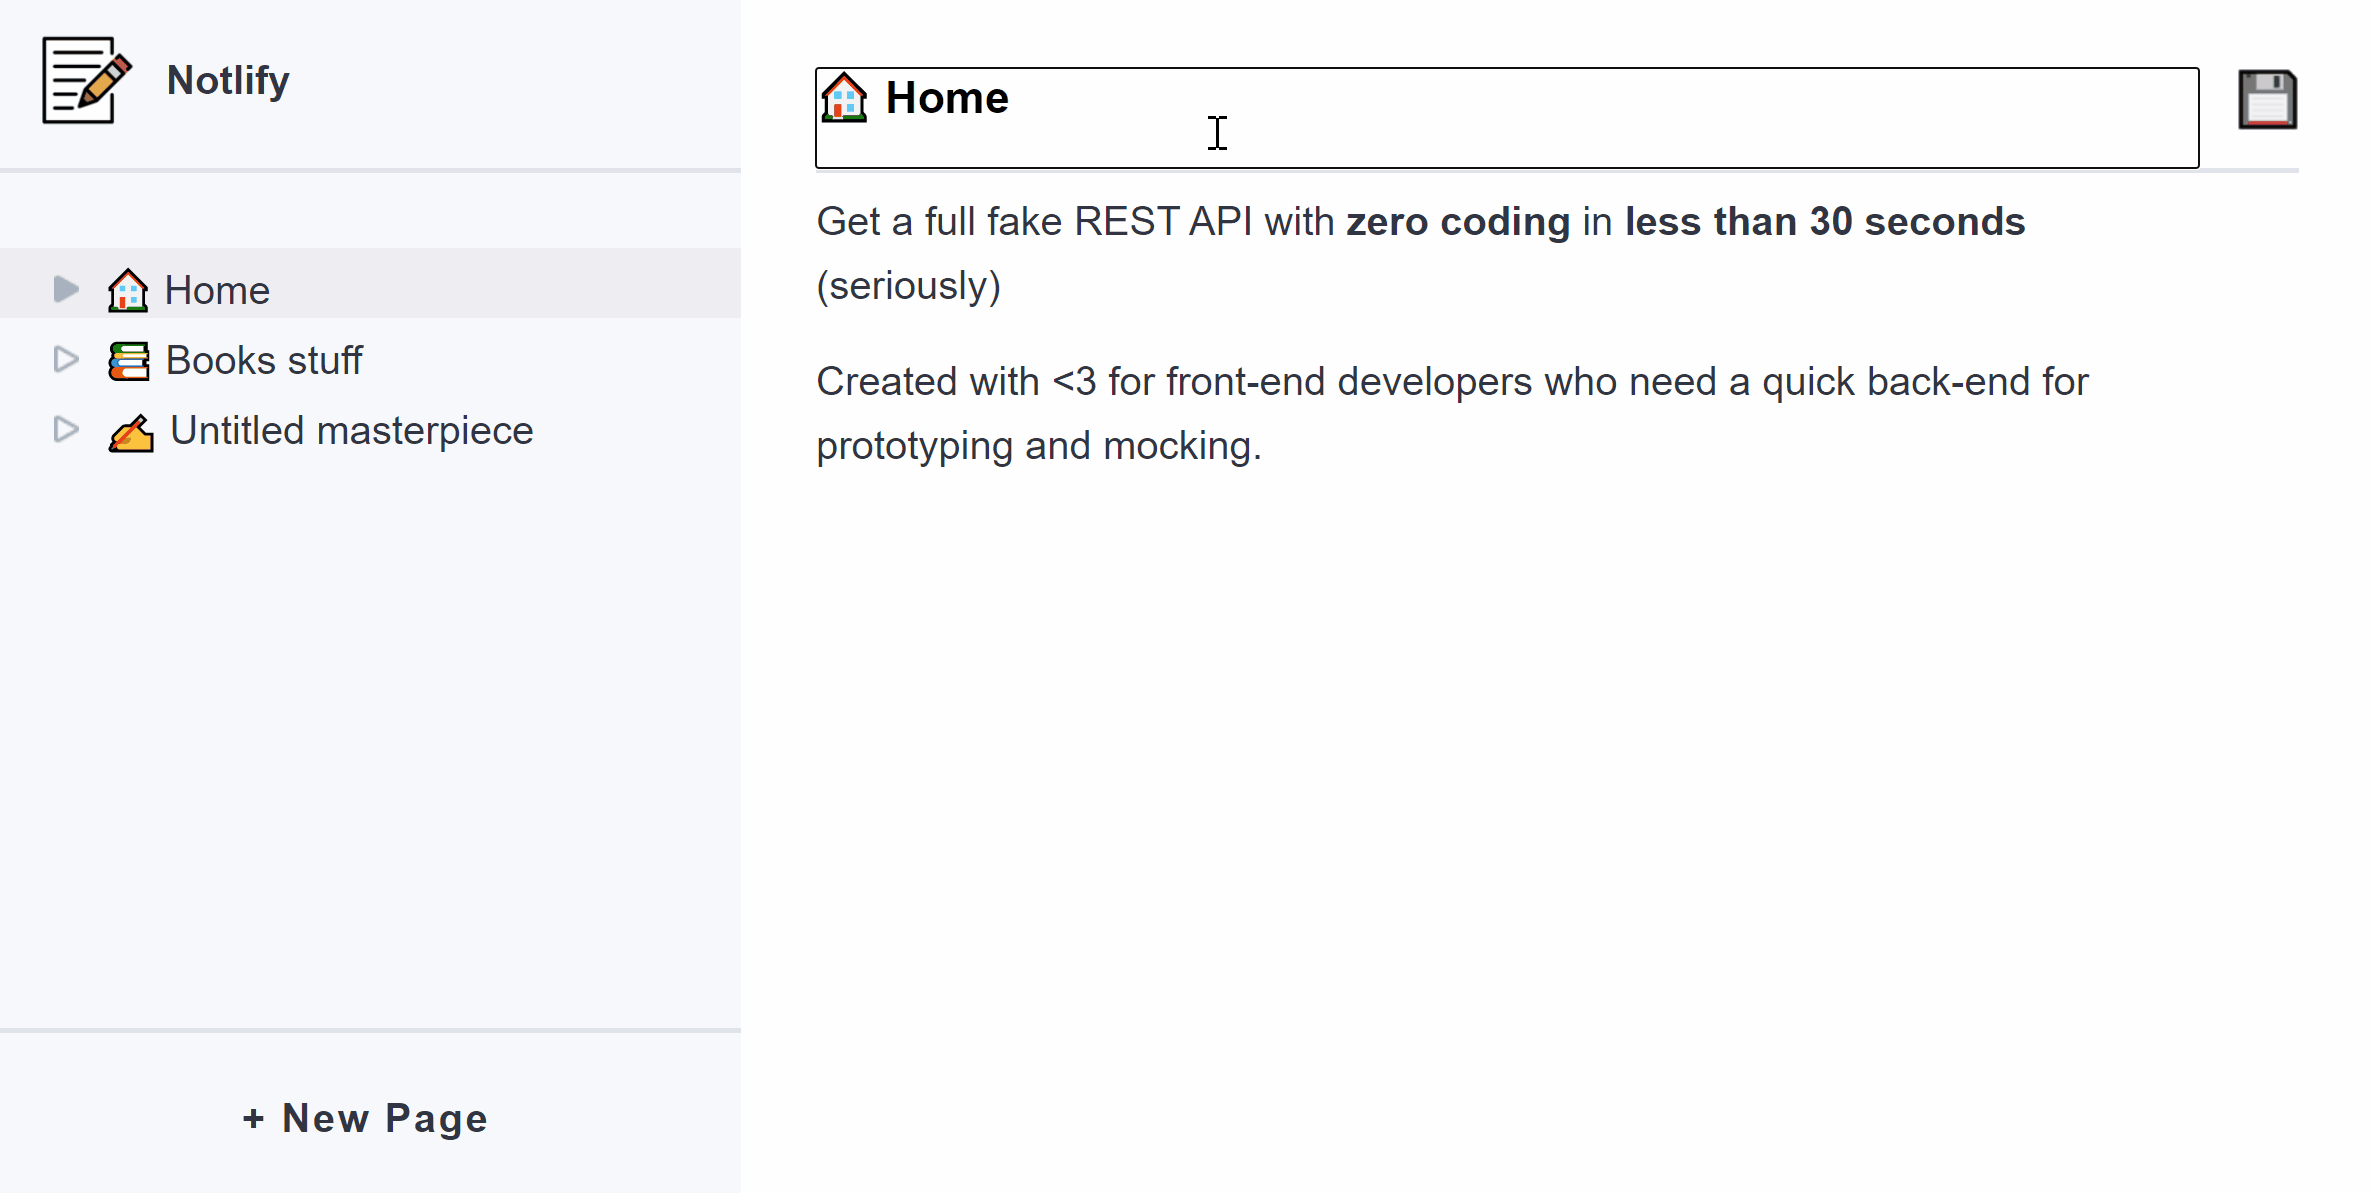
Displaying the page
But there’s still one core part that is missing, and that is, displaying the contents of the page, and make them editable. Create the Page component if you haven’t already, and add the markup we need:
import React, { useContext } from 'react'

import { PageContext } from '../context/page'

const Page = () => {
    const { page, sidebar } = useContext(PageContext);
    const [activePage, setActivePage] = page;
    const [pages, setPages] = sidebar;

    return (
        <main>
            <div className="controls">
                <input onChange={updateHeading} value={activePage?.title || ""} />

                <img src="img/save.png" onClick={save} />
                {pages[0].id !== activePage.id &&
                    <img src="img/trash.png" onClick={deletePage} />
                }
            </div>
            <div id="editorjs" />
        </main>
    );
};

export default Page;There are two things we need to note up front. First, we are going to need both the page and the sidebar from the context. This is so that we can update not just the active page, but the sidebar at the same time.
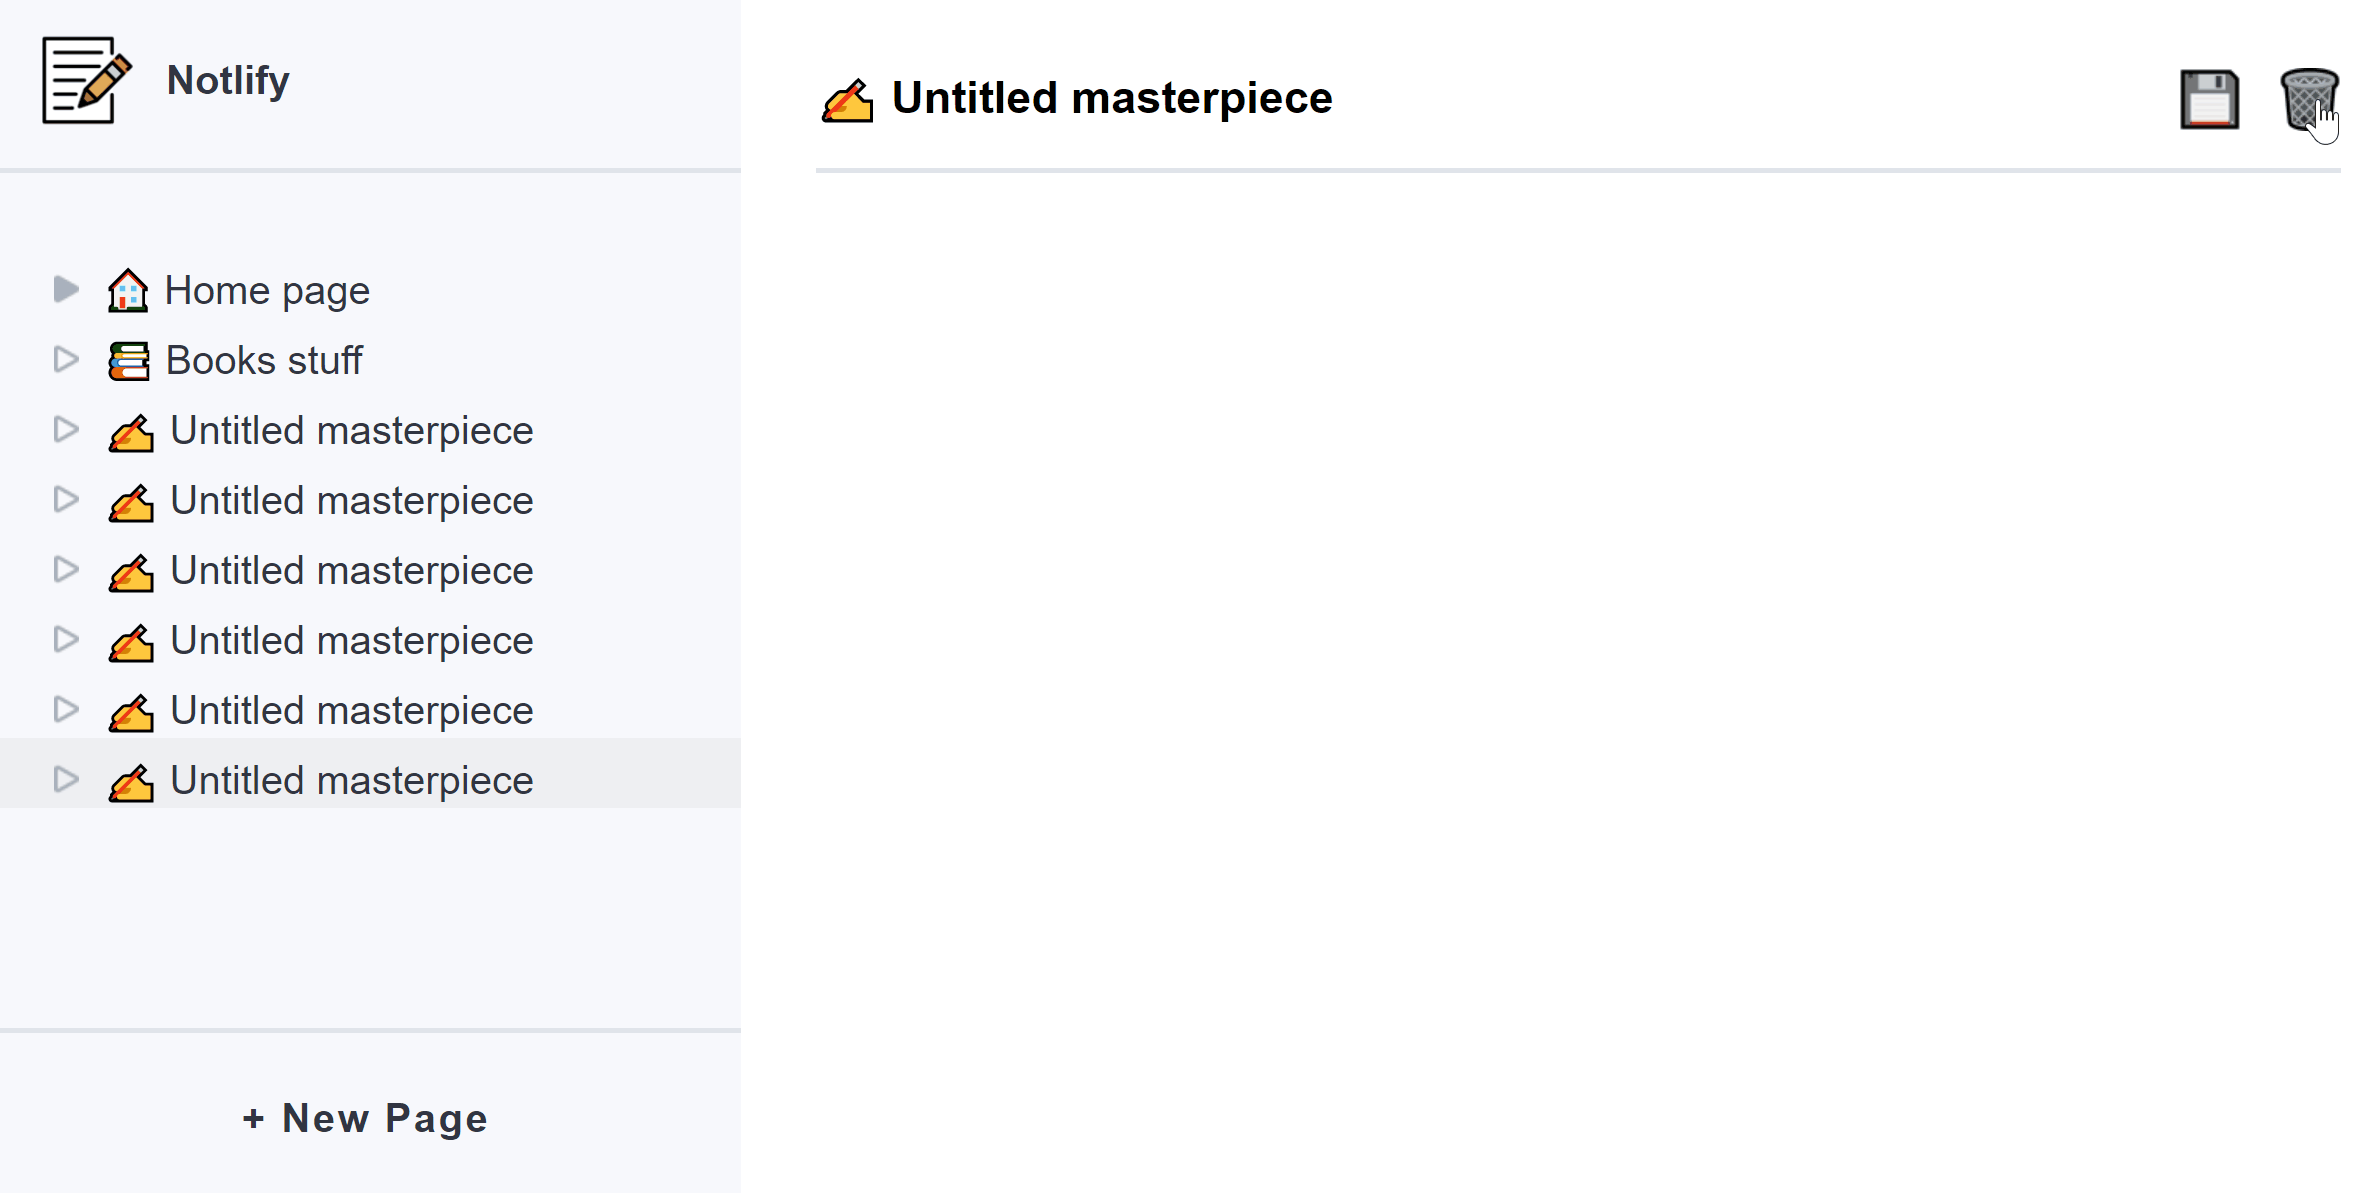
I’ve also wrapped the trash icon into an if statement, to make sure we always have one default page. This prevents the user from deleting the home page. We also have three different functions we need to define:
updateHeading: Update the state of the input so it is reflected on the UI.save: Save the page once we click the save button, and update the state, so it reflects the updated state if we revisit the page.delete: Remove the page, also update the state to remove it from the sidebar.
Let’s go in order, and define the updateHeading function, which is going to be the smallest of them:
const updateHeading = e => {
    setActivePage({
        ...activePage,
        title: e.target.value
    });
};Saving pages
For saving the pages, we have the save function that is triggered once we click the save icon:
const save = () => {
    const updatePages = pages => pages.map(page => {
        if (page.id === activePage.id) {
            page.title = activePage.title;
        }

        return page;
    });

    setPages(updatePages(pages));
    update(activePage);
};In order to update the name inside the sidebar, we want to call setPages with the updated pages. To update the correct one, we can simply map over the pages and set the title if the id of the page matches the id of the active page. This, however, will only update the title, and we don’t have any means to update the content, so let’s look into setting up Editor.js.
Setting up Editor.js
To set up editor.js, we need to add it as a dependency first:
npm i @editorjs/editorjs @editorjs/header @editorjs/list
This will add the core editor.js plugin, as well as two extra block elements. By default, editor.js only comes with a paragraph tag, and everything else needs to be added separately. We can import them to our Page component:
import EditorJS from '@editorjs/editorjs'
import Header from '@editorjs/header'
import List from '@editorjs/list'

const editorJS = {
    instance: null,

    getInstance(data) {
        if (!this.instance) {
            this.instance = new EditorJS({
                data,
                tools: {
                    header: Header,
                    list: List
                }
            });
        }

        return this.instance;
    }
};

const Page = () => { ... };I have also set up a singleton above the component, to make sure we only have one single instance of editor.js at any given time. The constructor accepts a configuration object, where we can set the data (that we will set once we get the instance) and the tools that we want to use. Inside the component, we can call the getInstance function to create a new editor:
const editor = editorJS.getInstance(activePage.content);

// Make sure you import `useEffect` at the top
useEffect(() => {
    if (activePage.content.blocks.length) {
        editor.render?.(activePage.content);
    }

    return () => {
        editor.clear();
    };
}, [activePage]);We also want to use a useEffect hook to render the content into the page and clear it once we switch pages. Now we can add new blocks to our pages, but we cannot save the content, because we only update the title inside the save function, so let’s update that:
const save = async () => {
    const data = await editor.save();
    const updatePages = pages => pages.map(page => {
        if (page.id === activePage.id) {
            page.content = data;
            page.title = activePage.title;
        }

        return page;
    });

    setPages(updatePages(pages));
    update(activePage);
};Notice that I have changed the function to async, as editor.save returns a promise. This will hold the exact same data structure that we need to assign for the content of the page.
Removing pages
Only one last thing remained, and that is to actually be able to remove pages, which we can do with simple filtering:
import { update, remove } from '../utils'

const deletePage = () => {
    const filteredPages = pages.filter(page => page.id !== activePage.id);

    setPages(filteredPages);
    setActivePage(pages[0]);
    remove(activePage);
};Note that I also set the active page to the home page, so we are not stuck on a page that has been deleted.
Summary
And with that being said, you’ve just learned how to create a React application that is backed by a JSON server. This eliminates the extra time needed for setting up a server that you can interact with, without having to wait for the backend part to be ready.
As mentioned at the beginning of the tutorial, you can get the full source code in one piece from GitHub. Have you worked with a JSON server before? What are your impressions? Let us know your thoughts in the comments below! Thank you for reading through, happy coding!

Rocket Launch Your Career
Speed up your learning progress with our mentorship program. Join as a mentee to unlock the full potential of Webtips and get a personalized learning experience by experts to master the following frontend technologies:
Courses


Recommended

How to Deploy a React App with a Node Backend

Generic React Components with TypeScript