Building a React Contact Form Without a Backend
Quickly creating a contact form on our site to let our audience get in touch with us can be anything but quick. This is especially true if you don’t have a backend in place or you don't have control over the backend.
Yet, we can get up and running fairly quickly with third-party solutions without the need for a backend. In this tutorial, we'll do just that. We'll utilize a third-party service for sending emails.

What is Needed for a Contact Form Without a Backend
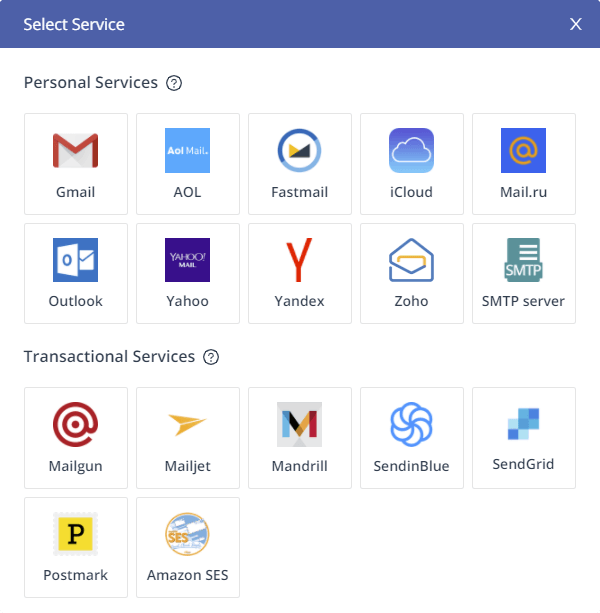
Apart from React itself, we'll be using EmailJS as a third-party service for sending emails right from our React component. The service has a free plan for up to 200 monthly requests and integrates nicely with multiple services. In this tutorial, we'll connect it to a Gmail account, but you can use any of the following services:
Setting Up the Contact Component
To start out, let’s set up the component that we'll use to send emails. Create a new component in your React app called ContactForm and add the following layout:
import { useState } from 'react'

export const ContactForm = () => {
    return (
        <div id="contact-form">
            <input type="text" placeholder="Your Name" />
            <input type="email" placeholder="Your email address" />
            <textarea placeholder="Your message"></textarea>
            <button>Send Message</button>
            <span>Thank you for your message, we will be in touch in no time!</span>
        </div>
    )
}Make sure you import useState from React, as we'll need to use it for the input fields. Here we have some input fields and a button for sending an email. To store the state of each input, we can introduce a useState for each of the fields:
export const ContactForm = () => {
    const [name, setName] = useState('')
    const [email, setEmail] = useState('')
    const [message, setMessage] = useState('')
    const [emailSent, setEmailSent] = useState(false)

    return (
        <div id="contact-form">
            <input
                type="text"
                placeholder="Your Name"
                value={name}
                onChange={e => setName(e.target.value)}
            />
            <input
                type="email"
                placeholder="Your email address"
                value={email}
                onChange={e => setEmail(e.target.value)}
            />
            <textarea
                placeholder="Your message"
                value={message}
                onChange={e => setMessage(e.target.value)}
            ></textarea>
            <button onClick={submit}>Send Message</button>
            <span className={emailSent ? 'visible' : undefined}>
                Thank you for your message, we will be in touch in no time!
            </span>
        </div>
    )
}We'll need to assign the first value of the useState to the input and add an onChange event listener for updating the state. Make sure you only pass the value of the input to the set function that you can reach through e.target.value.
Are you new to React hooks? Make sure you give a go for the tutorial below:
We also have an emailSent flag for verifying if the email has been sent. We can use this flag to show and hide a thank you message at the end of the form. Note that we have also added an onClick callback for the button in the code example. This will call the submit function that we’ve yet to define above our return statement:
const submit = () => {
    if (name && email && message) {
        // TODO - send mail

        setName('')
        setEmail('')
        setMessage('')
        setEmailSent(true)
    } else {
        alert('Please fill in all fields.')
    }
}

return ( ... )We only want to send an email when all of the fields are filled out. Of course, this basic example doesn’t cater to invalid emails. For that, we can use the following function to validate emails:
It uses regular expressions to only allow valid email addresses. If one of the fields is empty, we can alert the user about it in the else branch. This is where you can also implement showing toast messages or other types of feedback to the user. We can also empty the input field once the email is sent and set the emailSent flag to true to show the thank you message.

Setting Up EmailJS
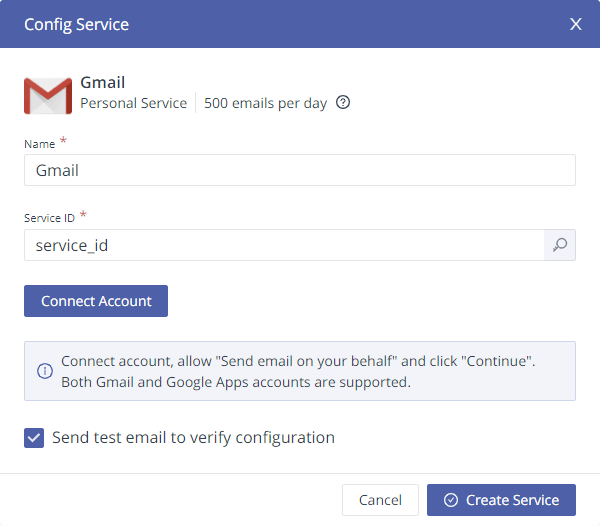
The last step that remains is to actually hook up EmailJS with our component, so we can send out the messages. Head over to emailjs.com and create a new account if you haven’t already, then log into your dashboard and add a new service using the "Email Services" tab. As mentioned in the beginning, we're using Gmail throughout this tutorial.
If you also choose to use Gmail, make sure you allow “Send email on your behalf” on the authentication page when you connect your Gmail account to EmailJS. After creating the service, you'll receive a service ID. We'll need this to send emails through React.
Now head over to the “Email Templates” tab on your dashboard and create a new template as well. This will be the template that is used when you receive new emails from the contact form:
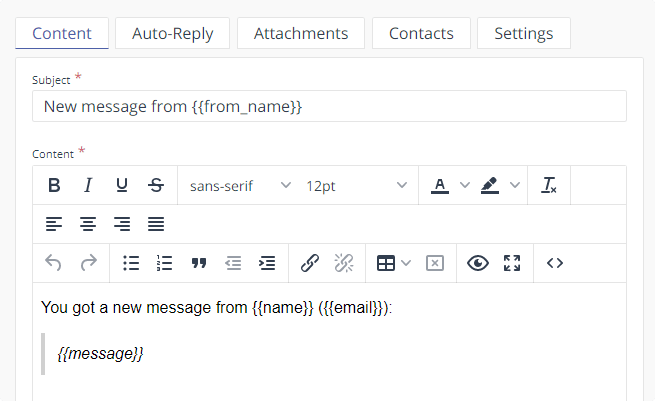
As you can see, we can use the {{name}} notation in order to insert template parameters. We want to name the variables the same way we have inside this template. In the settings tab under the template, you’ll be able to find a template ID. Make sure you save this as we'll need this as well.
Lastly, we also need the public key so the request to EmailJS can be authenticated. To get the public key, head over to the “Account” tab and copy the value in the "Public Key" field.
You can find the full source code in one piece on Stackblitz.
Connecting EmailJS
Now that we have everything set up, we can finally connect EmailJS to our React component. But first, we'll need to install the SDK as a dependency. Enter the following into your terminal to install EmailJS:
npm i @emailjs/browserNext, we need to authenticate the SDK by calling the init function. If you're using contact forms in multiple places, you'll likely want to do this at the root of your component, such as in your App component:
import { ContactForm } from './ContactForm'
import emailjs from '@emailjs/browser'

const App = () => {
    emailjs.init('publicKey')

    return (
        <ContactForm />
    )
}Insert the public key you've copied from the dashboard into the init method. Now we can import the SDK into our ContactForm component and call emailjs.send inside the submit function to send an email with the template parameters that we have defined:
import emailjs from '@emailjs/browser'

export const ContactForm = () => {
    ...

    const submit = () => {
        if (name && email && message) {
            const serviceId = 'service_id'
            const templateId = 'template_id'
            const templateParams = {
                name,
                email,
                message
            }

            emailjs.send(serviceId, templateId, templateParams)
                .then(response => console.log(response))
                .then(error => console.log(error));

            setName('');
            setEmail('');
            setMessage('');
            setEmailSent(true);
        } else {
            alert('Please fill in all fields.');
        }
    }
}As we can see, it takes in three different parameters:
serviceId: The ID of the service we have created on the "Email Services" tab.templateId: The ID of the template we have created using the "Email Templates" tab.templateParams: The list of parameters that need to be resolved inside the template. The variables must match the keys defined inside the template on EmailJS.
The send method returns a Promise, so we can chain then callbacks or we can also use async/await. When testing the sending functionality, make sure to keep an eye on the console, as EmailJS provides helpful error messages in case something goes wrong:
{status: 400, text: 'The Public Key is invalid...' }
{status: 400, text: 'The template ID is invalid...' }Summary
If we click on the send button now, we should be able to receive an email a couple of seconds later with the data we have provided in the form. Overall, EmailJS makes it easy and quick to set up a contact form inside a React application, or for that matter, in any JavaScript application without the need for a backend.
You can find additional documentation on the SDK on their official website. If you would like to get the source code in one piece that is used for this project, you can find it on Stackblitz. Thank you for reading through, happy coding!

Rocket Launch Your Career
Speed up your learning progress with our mentorship program. Join as a mentee to unlock the full potential of Webtips and get a personalized learning experience by experts to master the following frontend technologies:
Courses


Recommended
How to Generate TypeScript Types From GraphQL

Prevent Imports From Being Used With ESLint