Introduction to Push Notifications
Push Notifications are a great way to stay in touch with your userbase. It takes your web app one step closer to native desktop and mobile apps.
These notifications can be triggered either by your running app or even from your server when your app is not running. The API requires the user’s permission so you can be sure you only send notification to those who really want them.
They are working on top of a Service Worker, a special type of web worker whose purpose is to make your app usable when users are offline. So in order to use push notifications, you have to have a service worker in place. After establishing a service worker we can go ahead and check for support and user permission.
Checking Support and Permission
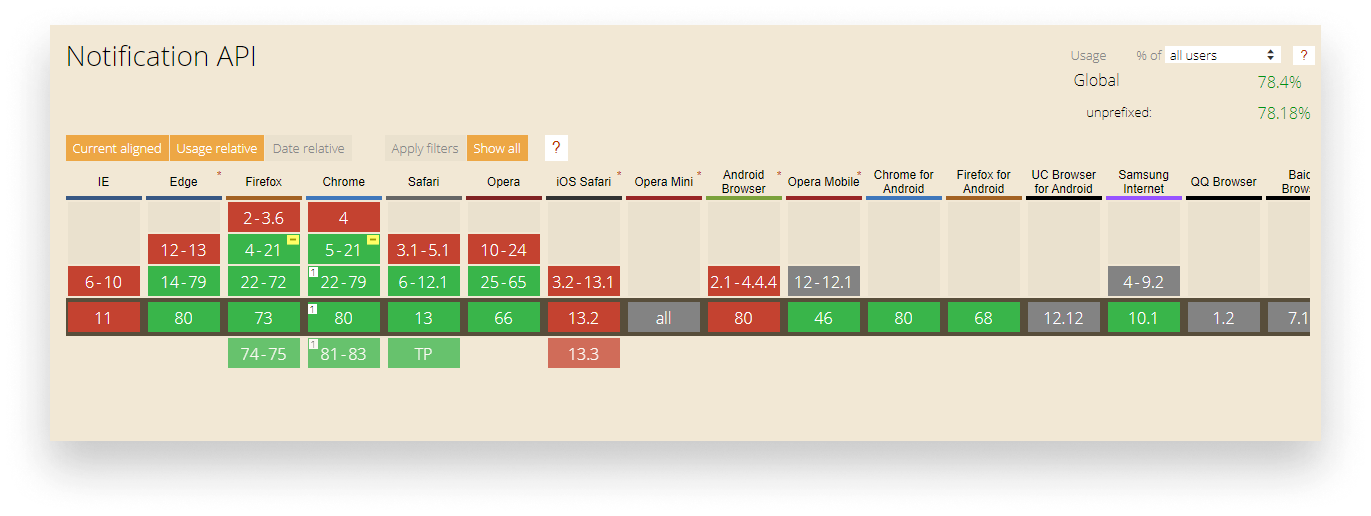
If we check support on Caniuse, we can see that the notification API is not yet widely adopted, it’s currently sitting at 78%.

This is why we need to check whether the browser supports it. Luckily it can be done with a single if statement:
if ('Notification' in window && navigator.serviceWorker) {
    // This means we can send notifications
}As you can see, we also need to check for the presence of serviceWorker since notifications are sent through them. Apart from support, we also need to check for permission, since we need to get user permissions to show notifications:
if (Notification.permission === 'granted') {
    // user has already granted access to the Notification API
    // this means we can send notifications
} else if (Notification.permission === 'blocked') {
    // the user has denied the use of push notifications
    // we can fall-back to an only browser implementation
} else {
    // permissions has not been given yet
    // we can show a prompt to the user
    Notification.requestPermission(permission => {
        if (permission === 'granted') {
            // push the first notification
        }
    });
}If the first if statements have been fulfilled, we can start sending notification to the users.
Sending Notifications
As mentioned at the beginning of this article, to send notifications we have to have a serviceWorker registered. To show notifications, we will need to use the service worker registration object:
// First we need to register a service worker
navigator.serviceWorker.register('sw.js');

// We can use serviceWorker.ready.then to wait until the registration has been done.
navigator.serviceWorker.ready.then(() => {
    if ('Notification' in window && navigator.serviceWorker) {
        Notification.requestPermission(permission => {
            if (permission == 'granted') {
                // Using the registration object, we can call the `showNotification` method to push notification
                navigator.serviceWorker.getRegistration().then(registration => {
                    registration.showNotification('👋 sent from push notification');
                });
            }
        });
    }
});After registration and checking for support/permission, we can call serviceWorker.getRegistration() to request the registration object from the service worker, then we can send out our very first push notification:

Looks good but nothing fancy so far. Let’s add some more options.
Adding More Options
For adding options, you can create a new object and add it as a second parameter to showNotification:
navigator.serviceWorker.getRegistration().then(registration => {
    const options = {
        body: 'This notification is brough to you by a `serviceWorker`',
        icon: 'icon.png',
        silent: true
    };

    registration.showNotification('🍊 Your daily notification', options);
});In this case, the first parameter becomes the title. For a full list of available options, please see the documentation on MDN. There are plenty of useful properties you can pass, such as:
vibrate: the vibration pattern used for mobile devicessilent: a boolean specifying whether the notification is silent or notdata: an arbitrary data containing any value so that you can identify which notification was interacted withactions: an array ofNotificationActionsavailable for the user to choose from, which we will look into right now

Adding Actions
If you want the user to interact with your push notification you need to add an actions object to your options. Adding the following object will add two new buttons to the notification:
actions: [
    { action: 'open',  title: 'Open',  icon: 'open.png' },
    { action: 'close', title: 'Close', icon: 'close.png' },
]There are three properties you can use here:
action: used for identifying the action the user takestitle: this will be the text on the buttonicon: in case there’s not enough space for the title, an icon will be displayed instead

Listening for Events
The last thing to do is to listen when the user clicks one of the buttons so we can take action accordingly. For that, you need to attach an event listener inside the Service Worker:
self.addEventListener('notificationclick', event => {
    console.log(event);
});Adding the above lines into sw.js (the service worker which we have registered) will log out the emitted event:

Inside the NotificationEvent, you have access to the action which can tell us which button was clicked by the user.

Summary
Now you can send notifications to users whenever it is suitable. It’s a great way to keep in touch with your users, increase engagement, and deliver updates right into their devices. Users can opt-in and out-out any time and the number of options you can provide for your notifications can make your content rich as well as tailored to your users.
Now comes the hard part: making good business decisions and figuring out the what, when, and how. What you should notify users about, when is the right time to notify them (don’t do it in the middle of the night) and how frequent your notifications should be. The answers to these questions will differ for each application so the best way is to start experimenting right now.

Rocket Launch Your Career
Speed up your learning progress with our mentorship program. Join as a mentee to unlock the full potential of Webtips and get a personalized learning experience by experts to master the following frontend technologies:
Courses
Recommended


