How to Secure Your API With JSON Web Tokens
When dealing with APIs, we often have to think about restricting resources and routes. We can usually do this with the use of sessions. Sessions are stored in memory on the server-side.
But, we can also switch things around and take another approach. Store everything inside a token, which is stored on the client-side. We will take a look at how this can be achieved with the use of JWT.
Okay, so what is JWT?
What is JWT?
JSON Web Tokens are an open, industry-standard RFC 7519 method for representing claims securely between two parties.
The most common scenario for using JWT is for authorization. Once a user is logged in, each subsequent request will include a token. This token allows the user to access routes and make requests that are only permitted to authenticated users.
Each token is made up of three parts:
- header: contains information about the algorithm and the token type
- payload: contains arbitrary data. Usually, you would store information that identifies the user. Such as an id alongside with an expiration date. This ensures that the token expires over time and cannot be used indefinitely.
- signature: this is where your token gets generated. It combines a base64 encoded version of your header and payload with a secret key of your choice.
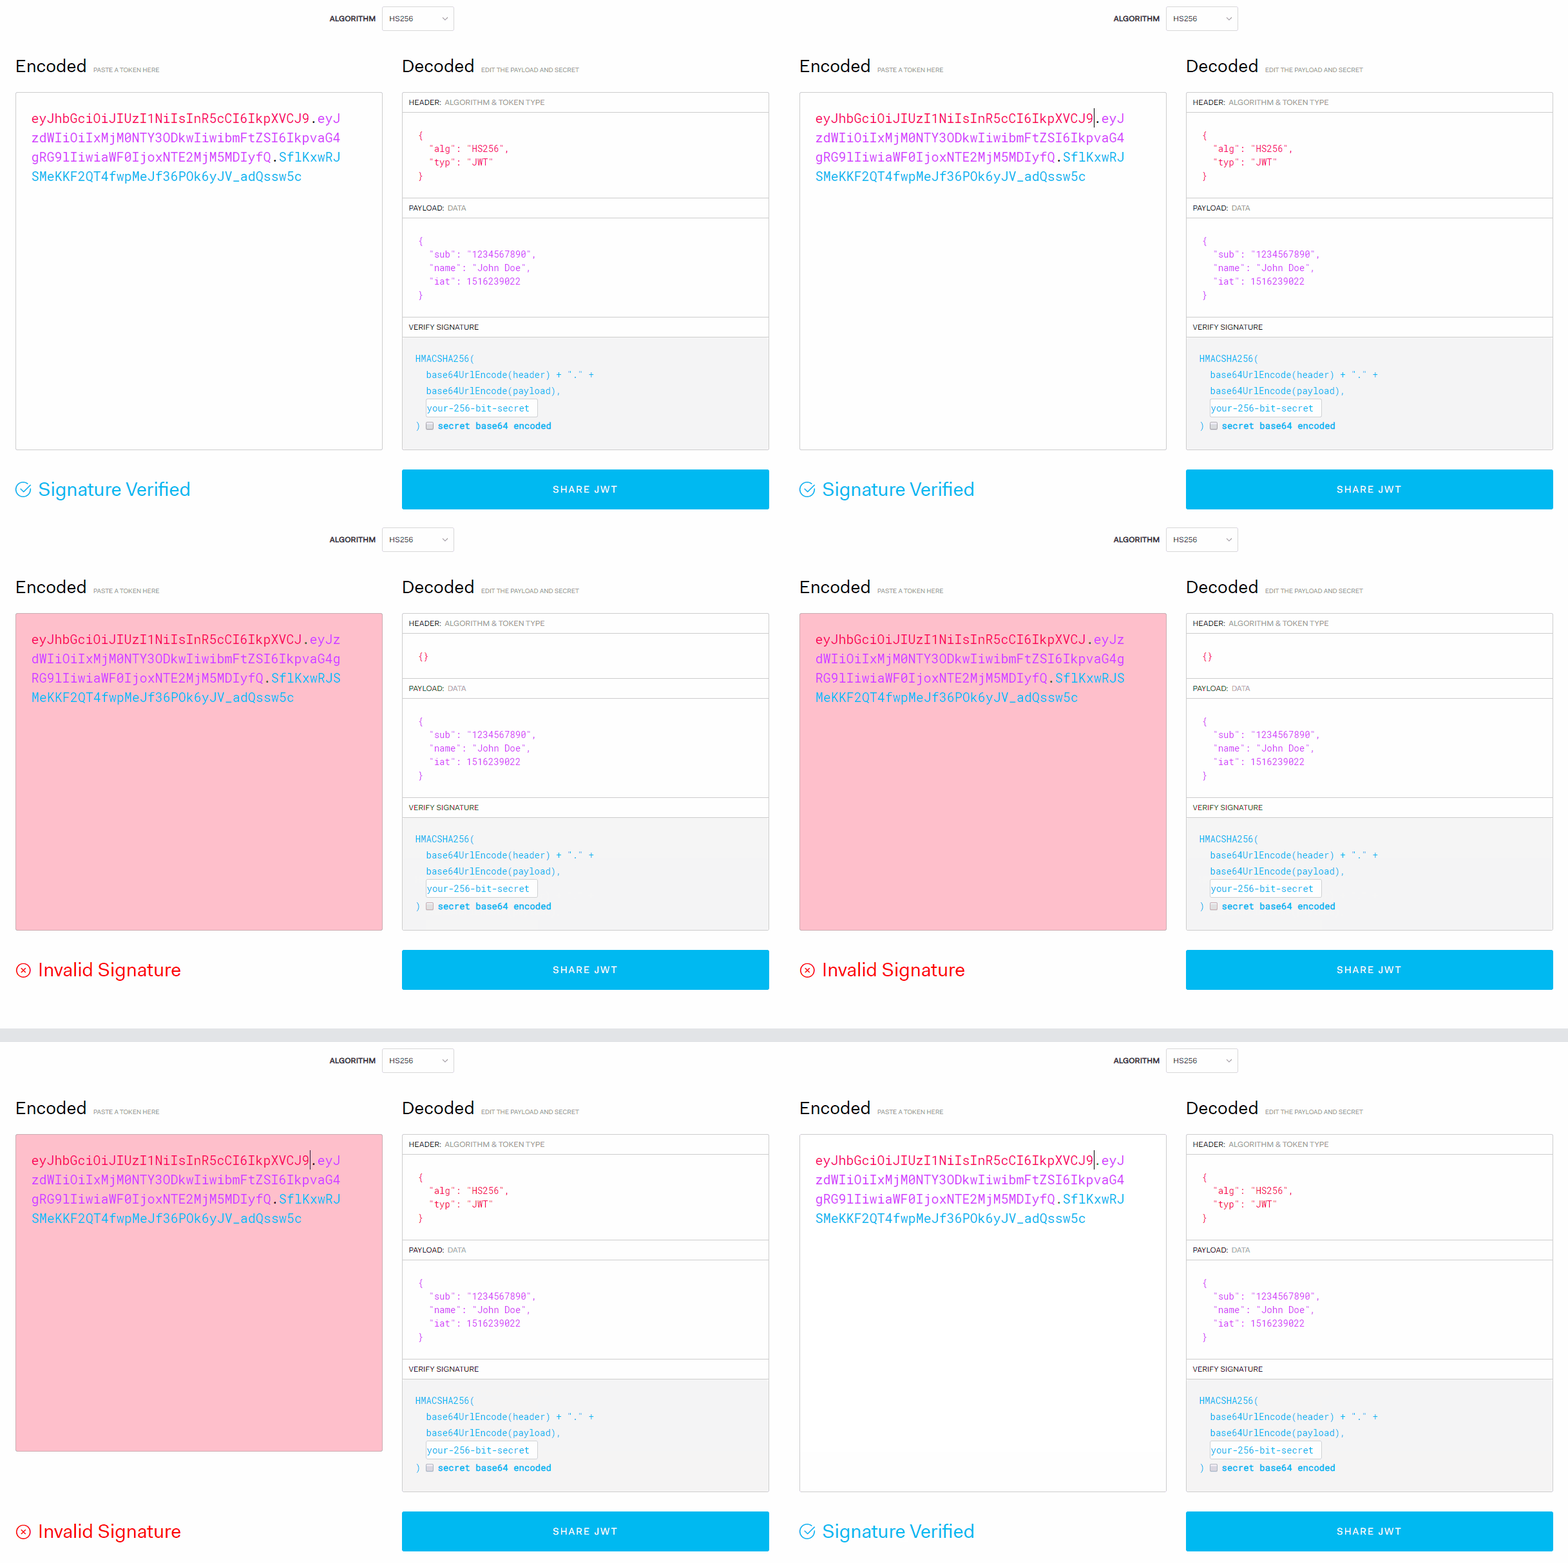
If I temper with the token on the client-side, it invalidates the signature. So if someone tries to make a request with a forged signature, we know that the user is not authenticated.
Authentication vs Authorization
Before moving on to coding, we must differentiate between authentication and authorization. While they sound similar, they do not mean the same thing. Authentication means we take a username and a password and check if they are correct. Authorization on the other hand is used for verifying any subsequent request to make sure they are originating from the same user we logged in.
In the context of user-based web applications this can be explained with the following examples:
- Authentication: John logs in with his username and password successfully, therefore he is authenticated.
- Authorization: He doesn’t have permission to manage user accounts, thus he is not authorized to access that page.
Or in more simple terms, as carefully worded in this post,
authentication is the process of verifying who you are, while authorization is the process of verifying what you have access to.
Setting Up The Project
First, you want to have Express installed and two routes ready. One for the login and one for managing todo items. I’m going to build upon a previous tutorial, where I used Express to build a REST API. You can clone the project repository from GitHub that will serve as a starting point. First, you’ll need to get JWT with npm i jsonwebtoken.
{
    "name": "express-api",
    "version": "1.0.0",
    "private": true,
    "scripts": {
        "start": "node server.js"
    },
    "keywords": [],
    "author": "",
    "license": "ISC",
    "dependencies": {
        "express": "4.17.1",
+       "jsonwebtoken": "8.5.1",
        "node-localstorage": "2.1.5"
    }
}Set up routes
Here we want to set up an additional route for authenticating users. Inside routes/index.js, add the following three new lines:
const routes = (app) => {
    const todo  = require('../controllers/Todo');
+   const login = require('../controllers/Login');

+   app.route('/login')
+       .post(login.authenticate);

    // Todo Route
    app.route('/todo/:id?/')
        .get(todo.get)
        .post(todo.create)
        .put(todo.update)
        .delete(todo.delete);
};

module.exports = routes;This means that we have to create a new file under controllers. Name it Login with a method called authenticate. It will be called whenever we make a post request to /login.
module.exports = {
    authenticate(request, response) {
        response.json({
            hello: '🌎'
        });
    }
};For now, this is all we need to see if everything works.
Testing the new route
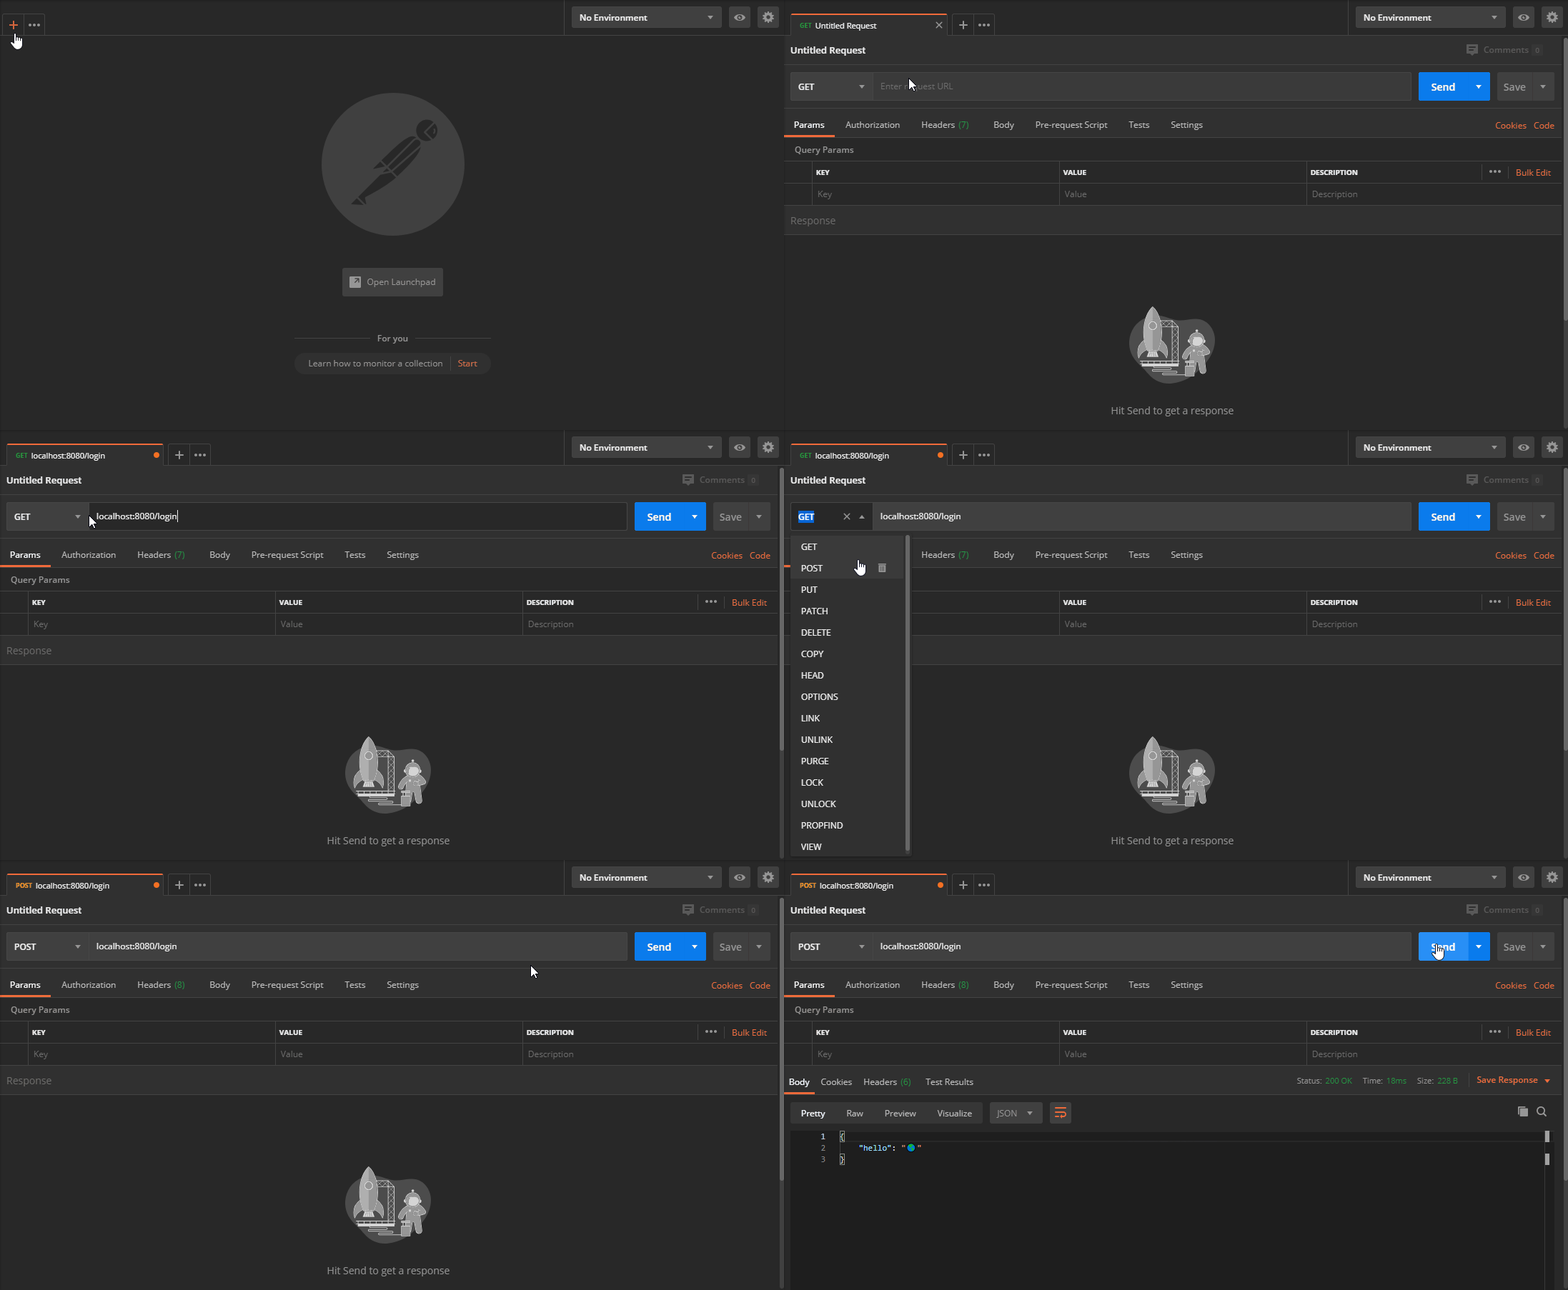
I’m using Postman to test my changes. After starting the webserver, create a new POST request to /login. You should get back the same JSON response:
Signing JWT
Now that we have everything set up, we can start using JWT. First we need to generate a new token whenever a user hits /login. To do that, let’s get rid of the mock response and replace it with the following:
const jwt = require('jsonwebtoken');

module.exports = {
    authenticate(request, response) {
        if (request.body.email && request.body.password) {
            // Fetch user's data and verify credentials
            const user = getUser(request.body.email);

            jwt.sign(user, process.env.SECRET, (error, token) => {
                response.json({
                    id: user.id,
                    token
                });
            });
        } else {
            response.json({
                error: 'We\'ve couldn\'t sign you in 😔'
            });
        }

    }
};We need to pull in the JWT module first. Inside authenticate, the first thing should be to see if the user provided an email and a password. Then you would fetch the user and do all your verification steps. The last thing is to send back a response inside the callback of jwt.verify. This will accept:
- A payload: the payload to sign, in this case, the
userobject - A private key: containing the secret for HMAC algorithms
- A callback: this will return the token to us which we can send down to the client
You shouldn’t expose your secret key to the client. And to further secure it on the server, you can store it in a process variable. This prevents it from getting into source control.
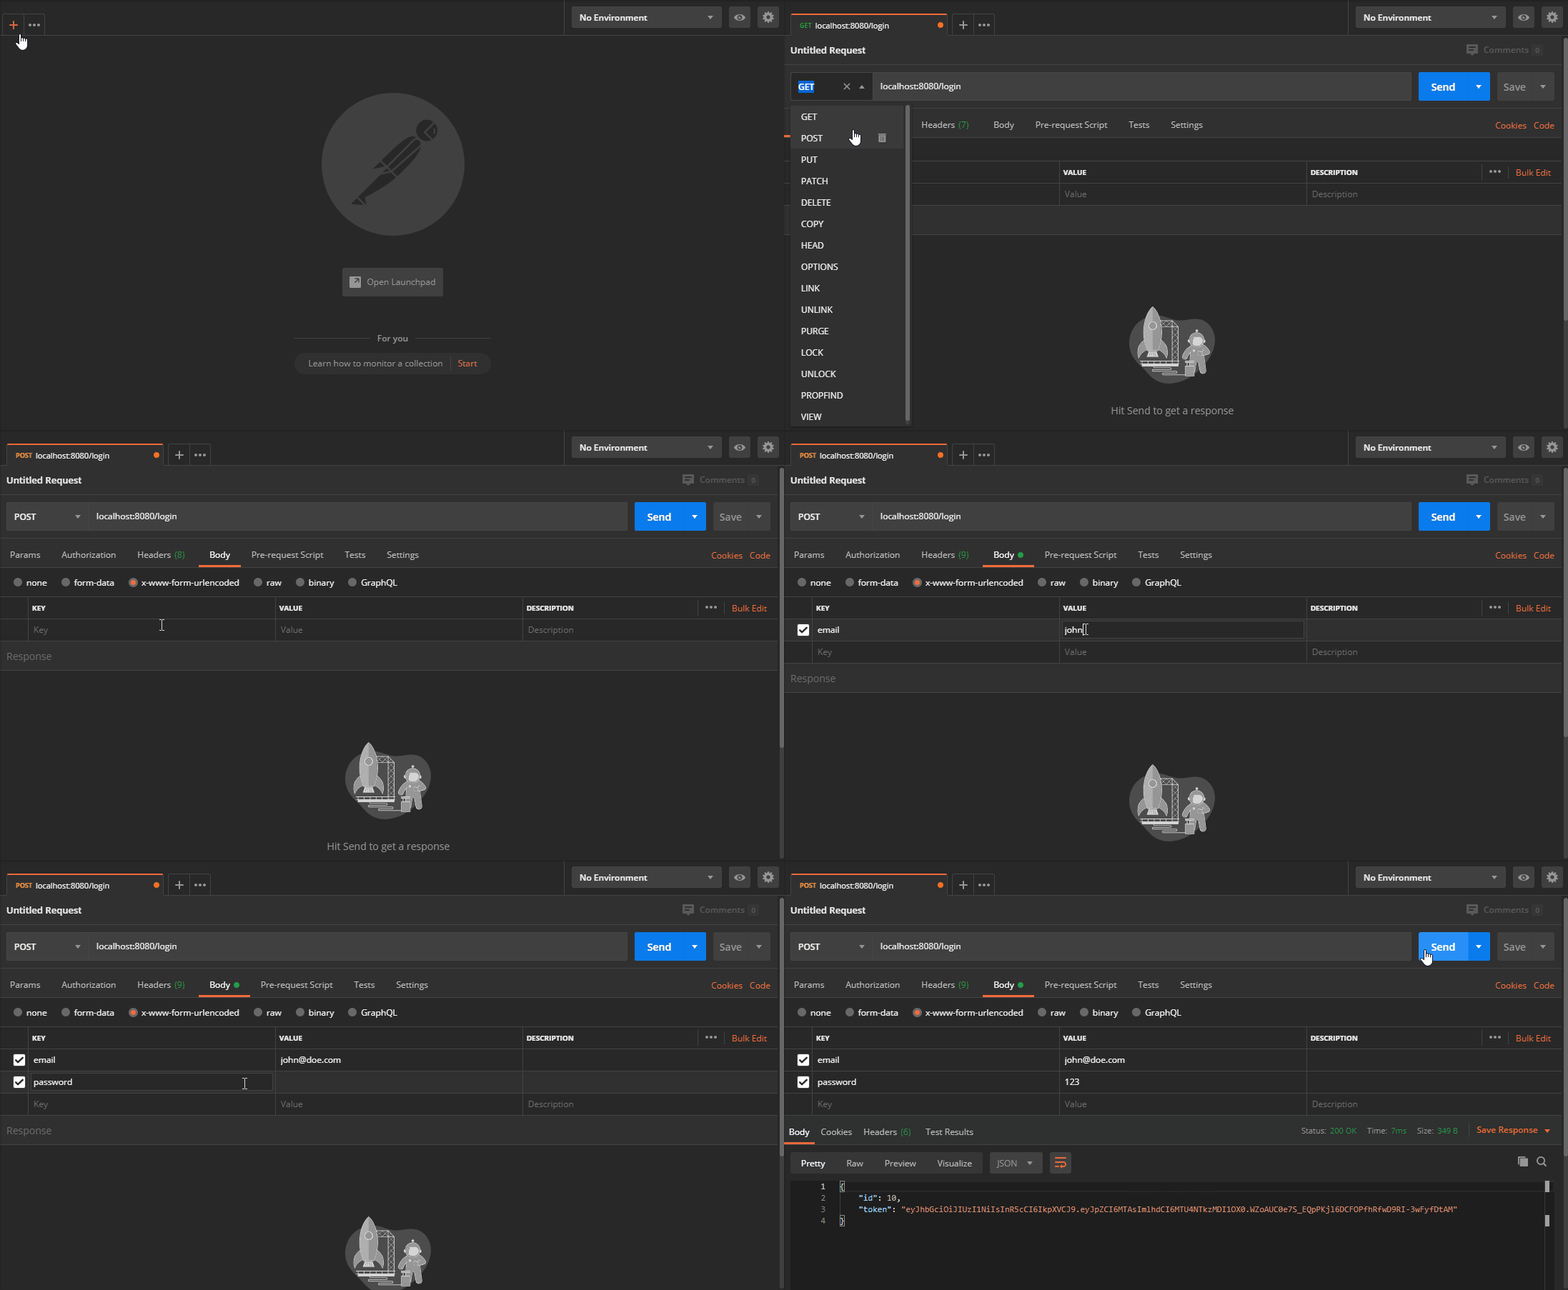
Now if we create a new POST request with the required payload, we should get back a JSON Web Token.

Verifying JWT
Now that we have the token we can use it to verify subsequent requests to the API. Say we want to secure every method of the todo route. Right now, we have no problem accessing any of them.
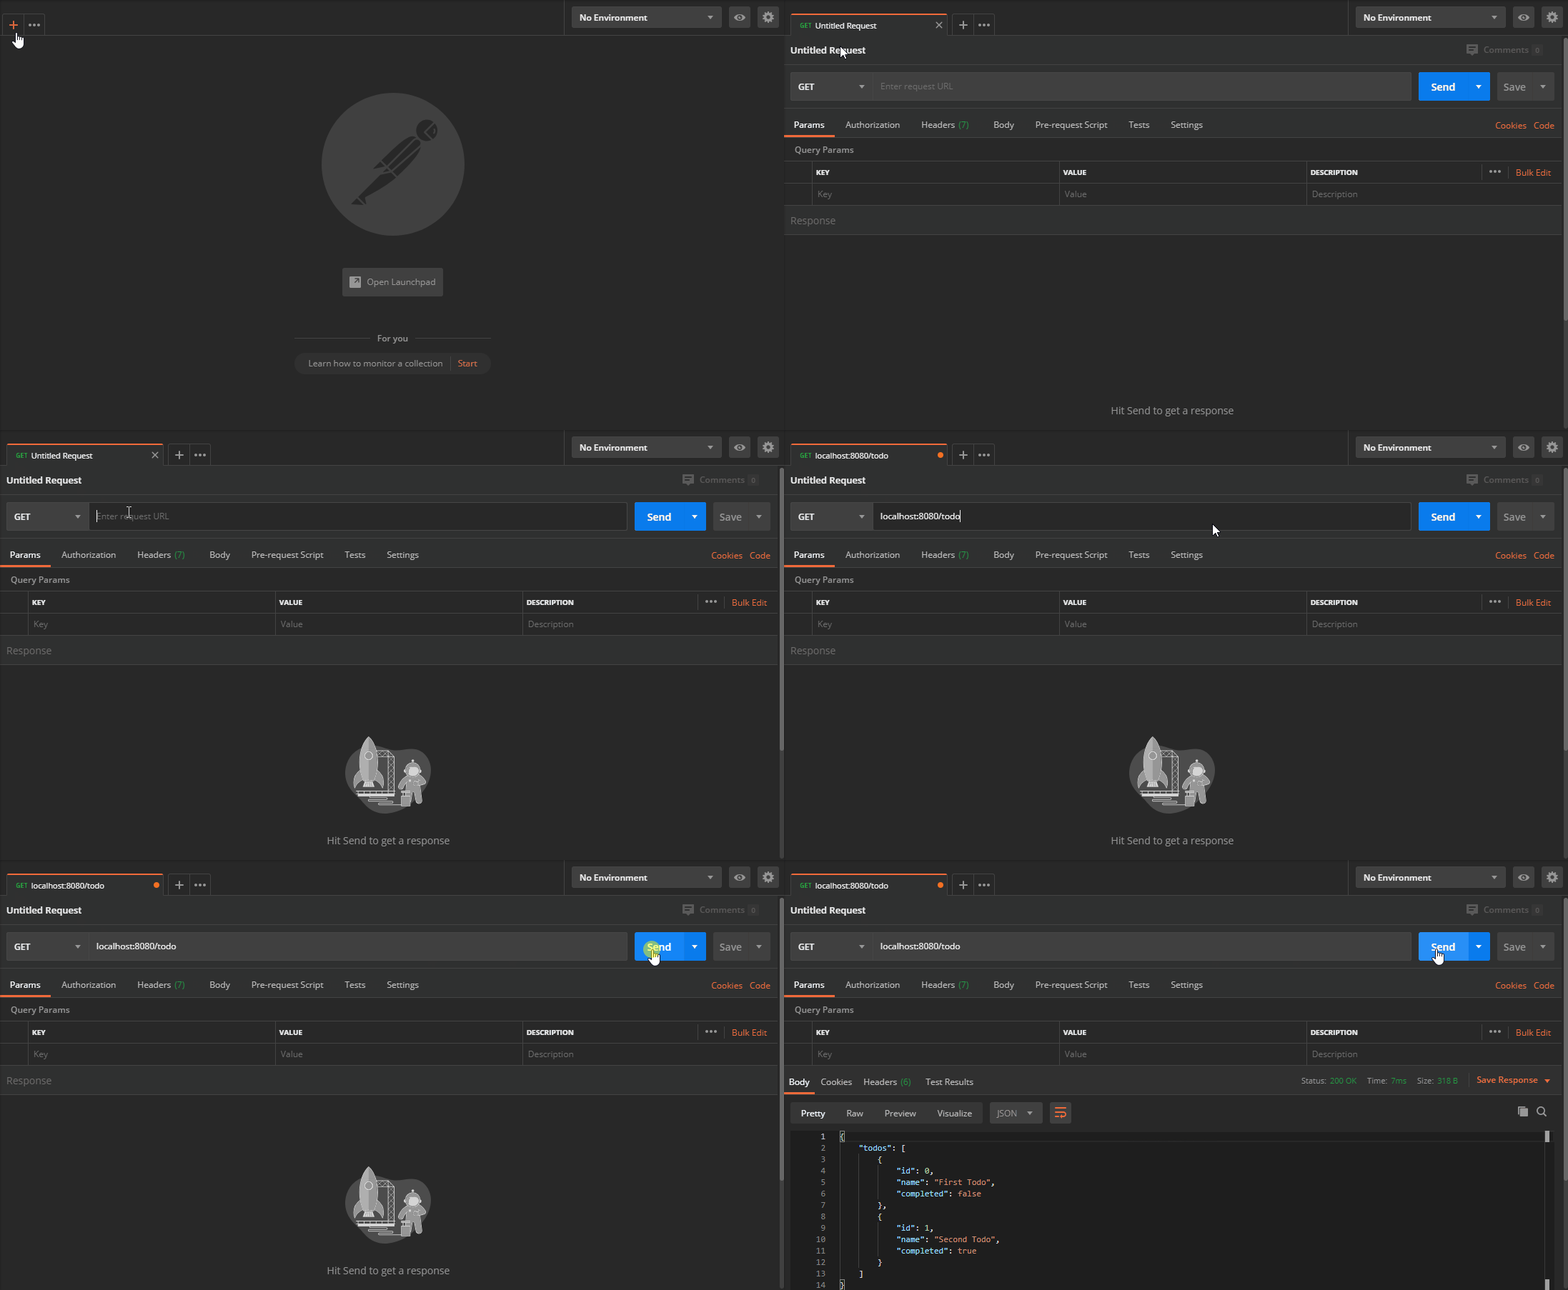
If we want to authenticate each route with JWT, it would mean we need to duplicate the same code four times. If the application grows, so does code duplication. So instead, let’s create a new function that acts as a wrapper.
const jwt = require('jsonwebtoken');

module.exports = callback => {
    return (request, response) => {
        jwt.verify(request.headers.token, process.env.SECRET, (error, payload) => {
            if (error) {
                response.sendStatus(403);
            } else {
                callback(request, response);
            }
        });
    };
}This function needs to return a new function with two parameters; request and response. This is what each route expects. We can use jwt.verify to verify the token. Here I send it as an additional HTTP header.
You also need to provide the same secret key that we used for signing. Lastly in the callback function, we can define our custom functionality. If there’s an error, we return 403. Otherwise, we can call the function we pass to authorize.
You also have access to the signed payload. To use this wrapper function, all we have to do is wrap each HTTP method into it.
const authorize = require('../authorize');

const routes = (app) => {
    const todo  = require('../controllers/Todo');
    const login = require('../controllers/Login');

    app.route('/login')
        .post(login.authenticate);

    // Todo Route
    app.route('/todo/:id?/')
        .get(authorize(todo.get))
        .post(authorize(todo.create))
        .put(authorize(todo.update))
        .delete(authorize(todo.delete));
};

module.exports = routes;Notice how every todo route is wrapped into authorize. All that’s left to do is verifying if everything works as expected.
Testing Routes
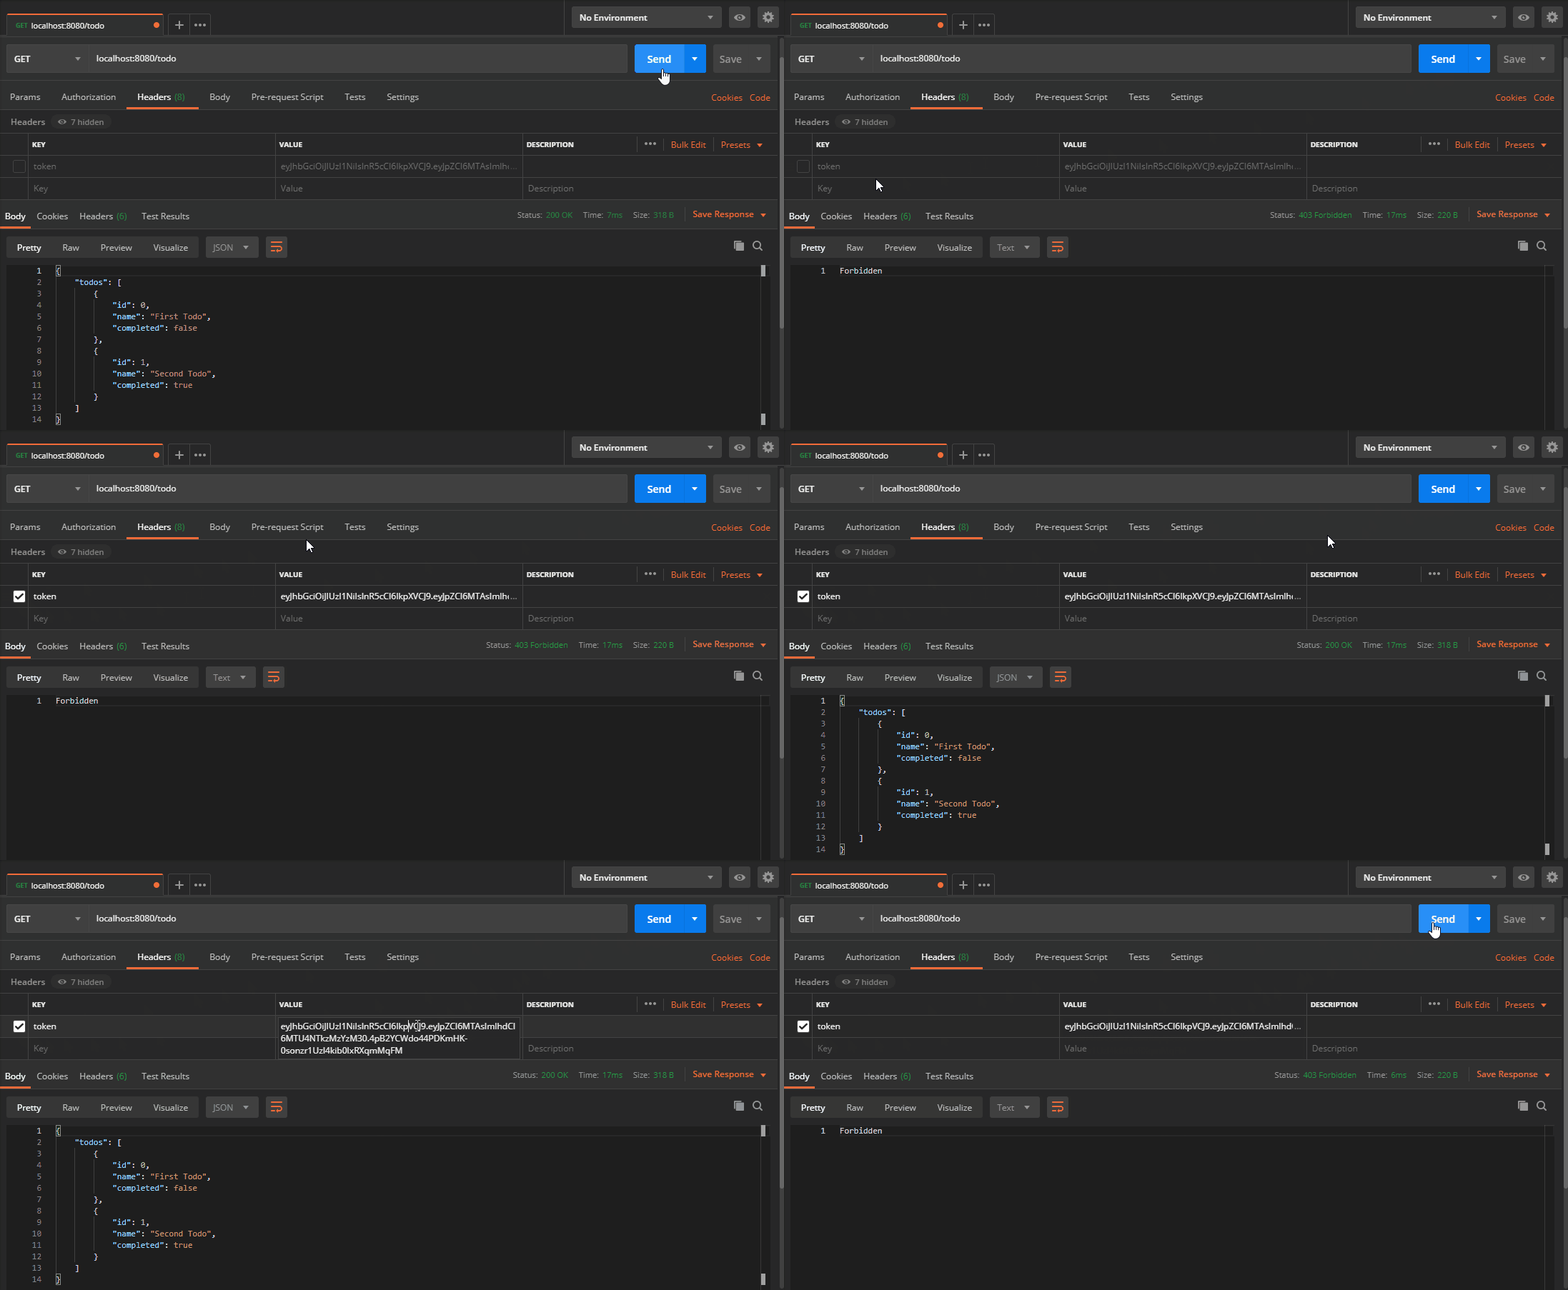
Now the route requires a token header with a valid JWT. If it’s not present we get back 403. If I try to mess with the token, it invalidates the signature and we get back 403 again. These routes will now only be accessible in the presence of a valid JSON Web Token.
Summary
If you would like to learn more about JWT, the introduction section on its homepage goes into depth about how it works. If you are interested in the jsonwebtoken module, NPMJS has documentation with examples on how to use its node implementation.
If you’re looking for an implementation in Java, I recommend checking out how you can use JWT with Spring Security.
Do you have suggestions on how to make the above code even more secure? Let us know in the comments. Thank you for your time and happy coding!
☕ Get yourself an Expresso Sticker ☕

Continue the tutorial, by also learning how to create your very own Express Middleware functions:


Rocket Launch Your Career
Speed up your learning progress with our mentorship program. Join as a mentee to unlock the full potential of Webtips and get a personalized learning experience by experts to master the following frontend technologies:


