
How to Build Plugins for Figma
If you haven’t heard about Figma, it is a UX/UI design application just like Adobe XD or Sketch. It describes itself as
“The collaborative interface design tool”
I’ve been using it for a while now, mostly for creating web tips like the one below:
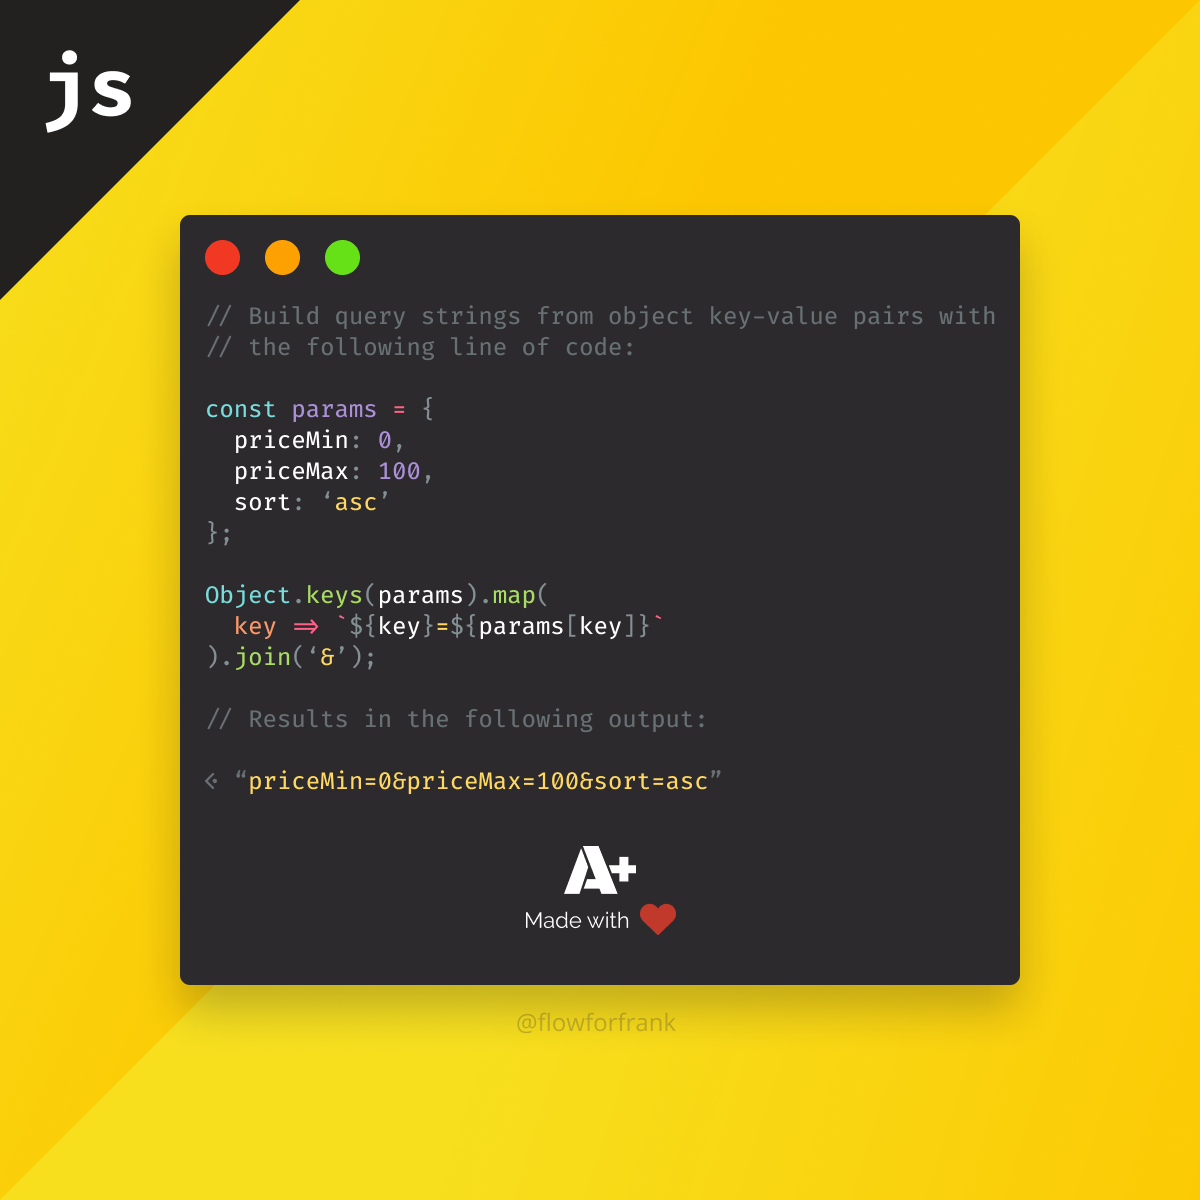
But previously I also used it for its main purpose; Designing user interfaces. Can you guess what takes up the most time when creating a card similar to the one above? — If you guess highlighting the syntax, you were right.
Since I’m using the same colors for the same tokens over and over again, this step is redundant, and not automating it is just wasting your time for no reason.
Fortunately, Figma has plugins that could potentially solve this problem. Unfortunately, I haven’t found one so I had to create my own.

The Concept
First, we need to find out whether it is possible to create such a thing, so I went over to the API documentations on Figma and looked into the TextNode object since I wanted to work with text. It looked like you can color a piece of text using the setRangeFills method, so I came to the following conclusion:
setRangeFills expects a start (inclusive) and end (exclusive) index to know what part of the text should be styled. So first we need to get the selected text, get the tokens from it through regex and find out each token’s start and end position then apply the appropriate style to it.
Note that implementing syntax highlight with regex is not the preferred way. You can’t parse HTML, CSS, or JS with regex because their grammar is much more complex than what regex can handle. In order to cope with the task, you would need a full lexer and parser to identify each token and to make it more robust and act like a real syntax highlighter. However, I wanted to get things done with the least amount of effort for a small set of tokens.
Setting Up The Plugin
In order to start working on plugins, you need to have the desktop application as it can’t be done from the web app. You can download the desktop app here.
Once you have it installed, open it up and go the the “Plugins” option on the left-hand side then click on the plus sign on the right-hand side next to “Development”. It will present you with the following popup:
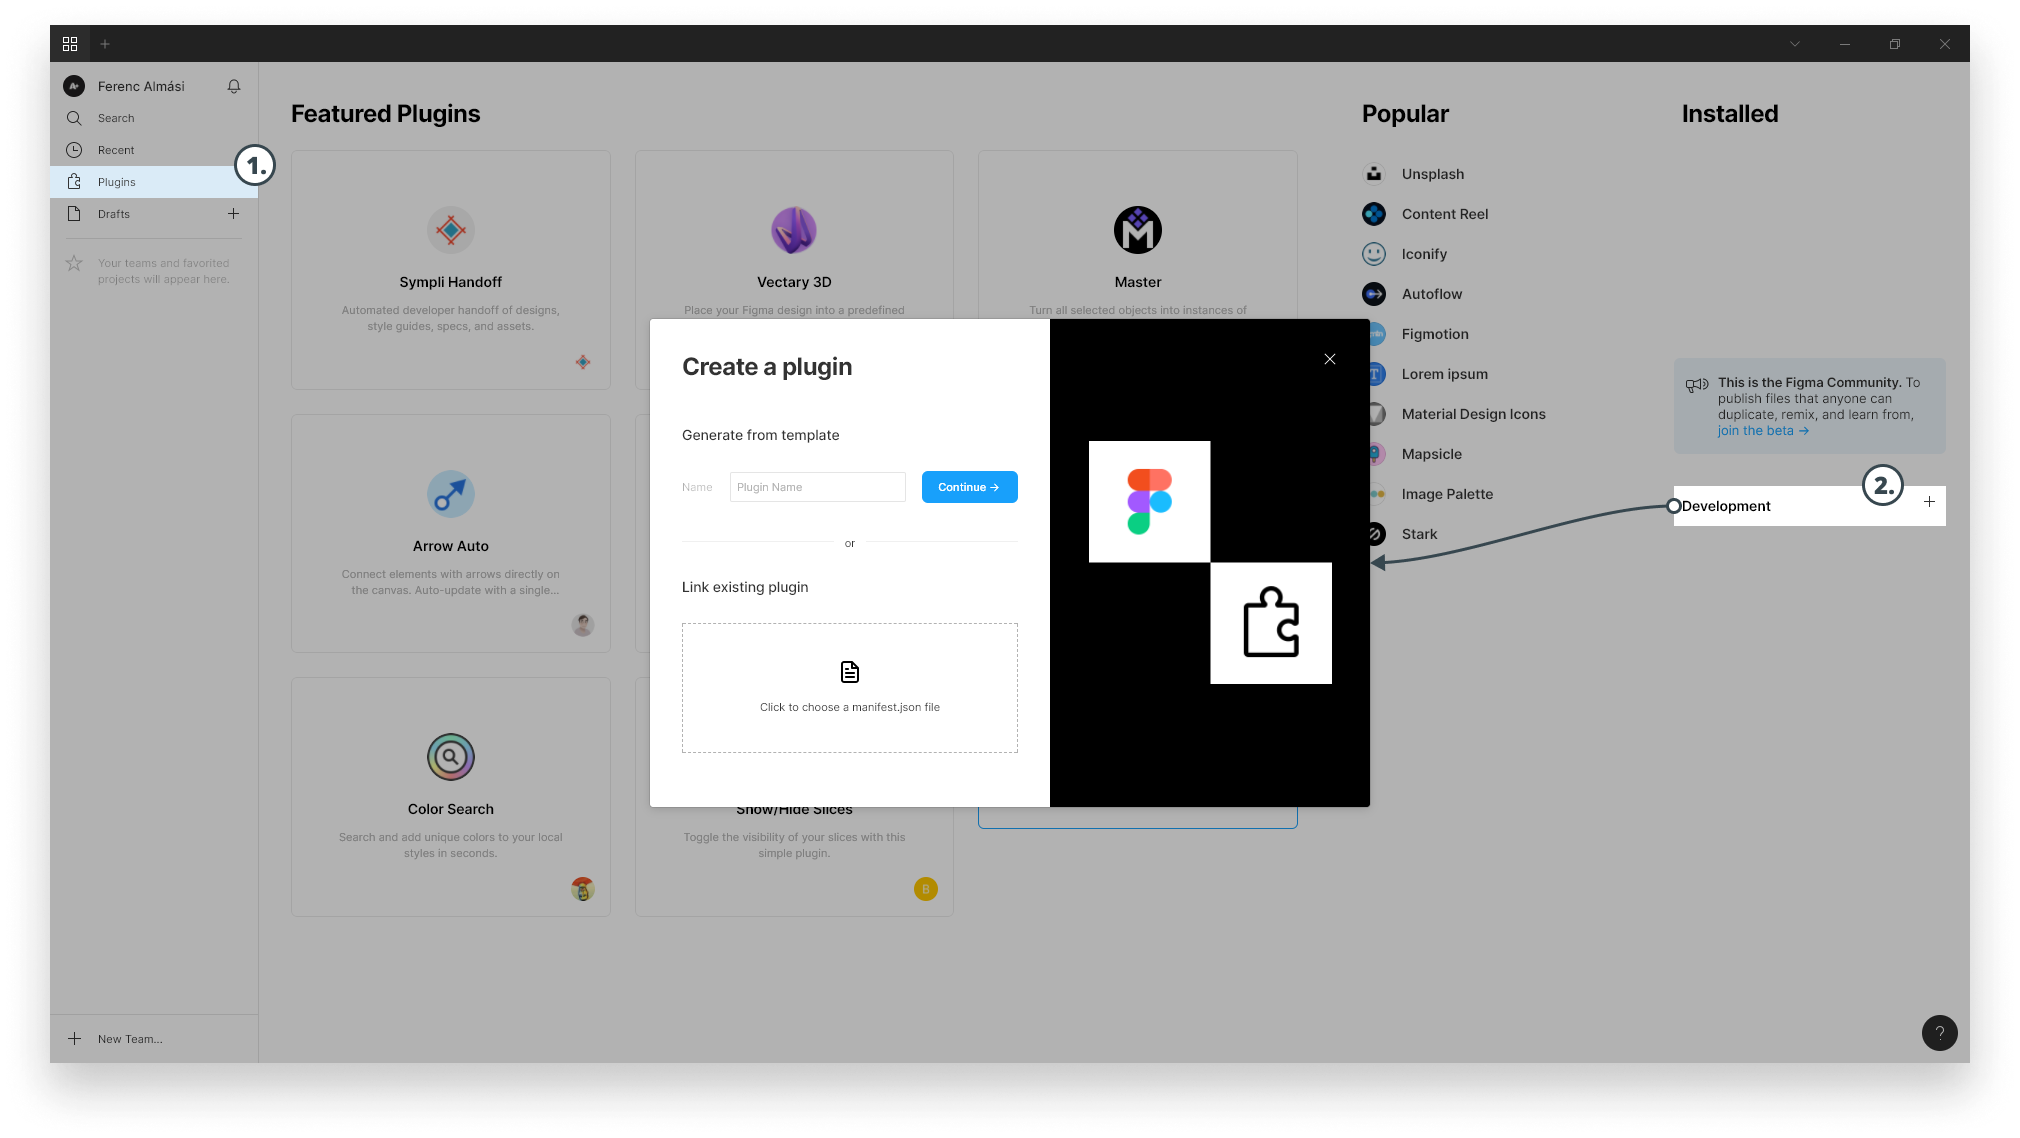
Add a name for your plugin and click on Continue. For the template, we are going to use the default: run once. You can also create an empty project or one with a user interface. It will present you with the following folder structure:
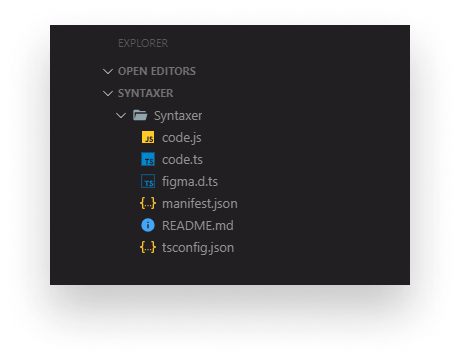
Everything will be done inside the code.ts file. As you can see, Figma uses TypeScript. You can also write your plugin in vanilla JavaScript, in that case, you can skip the following steps and go straight to the next section.
If you don’t have TypeScript installed already, you can install it globally with npm i -g typescript. Using Visual Studio Code, run the “Run Build Task” menu item (ctrl+ shift + b on Windows) and select tsc: watch — tsconfig.json to compile the project on each save.
If you’re getting the following error even after installing TypeScript globally:
tsc is not a recognized as an internal or external command...
Try to add the following into your system environment variables:
C:\Users\<user_name>\AppData\Roaming\npm

Styling Texts
Initially, code.ts holds a sample plugin. You can delete everything in the file as we are going to build ours from the ground up.
To do some precautions, we will need to check if there is an active selection, and if the selection is a text. We can do this with a simple if statement:
if (figma.currentPage.selection.length === 1 && figma.currentPage.selection[0].type === 'TEXT') {
    // Style text
} else {
    // Show error for user
}The global figma object is exposed by the API. Once we’re sure we have a selection we can get the whole text by accessing the characters node.
const text = (figma.currentPage.selection[0] as TextNode).characters;To make sure we don’t get type errors we need to cast the current selection as a TextNode. For styling the text, we can call setRangeFills on it which accepts three params:
- The start index (inclusive)
- The end index (exclusive)
- The color definition which has a type and a color object.
Making the whole text white can be done with:
const color = {
    r: 1,
    g: 1,
    b: 1
};

(figma.currentPage.selection[0] as TextNode).setRangeFills(0, text.length, [{ type: 'SOLID', color }]);As you can see the value of colors can be between 0 and 1 instead of 0 and 255. To make it easier to work with, let’s set up a function for normalizing values.
Normalizing Colors
To cap values between 0 and 1, all we have to do is divide each value by 255:
const getNormalizedRGB = (r, g, b) => {
    return {
        r: r / 255,
        g: g / 255,
        b: b / 255
    }
};Using this function, I also set up some predefined colors so they can be easily referenced:
const colours = {
    red: getNormalizedRGB(255, 97, 136),
    green: getNormalizedRGB(169, 220, 118),
    blue: getNormalizedRGB(120, 220, 232),
    yellow: getNormalizedRGB(255, 216, 98),
    purple: getNormalizedRGB(171, 144, 217),
    white: getNormalizedRGB(255, 255, 255),
    base: getNormalizedRGB(131, 144, 147),
    gray: getNormalizedRGB(103, 112, 114)
}This way, we can simply pass colours.x to the setRangeFills function without having to normalize and write out each color. Still, writing out the whole setRangeFills call can be tedious and we may have to color multiple parts of the text with the same color. To make it a little bit more dynamic, let’s also create a function for the setRangeFills calls.
Making Things Dynamic
Since we may have multiple blocks which require the same colors, we want our function to accept an array of indexes, more specifically a multidimensional array of indexes where each sub-array holds a start and end index like so:
[[0, 10], [23, 42]]
We might also want to pass the color here. This leaves us with the following function:
const applyStyles = (ranges, color) => {
    ranges.forEach(index => {
        (figma.currentPage.selection[0] as TextNode).setRangeFills(index[0], index[1], [{ type: 'SOLID', color }]);
    });
}We loop through the ranges array and set the start index to index[0] and the end index to index[1]. To try it out, let’s apply a base color to the text with the following function call:
if (figma.currentPage.selection.length === 1 && figma.currentPage.selection[0].type === 'TEXT') {
    const text = (figma.currentPage.selection[0] as TextNode).characters;

    // First apply base colour to whole text, then apply everything else to it
    applyStyles([[0, text.length]], colours.base);
} else {
    // Show error for user
}We can essentially do the same call for everything else. The only problem which prevents us from doing so is to get the proper index for each block of text. We might want a function that returns a multidimensional array, similar to the one above, that holds each and every start and end index.
Getting text ranges
For getting the indexes, I defined the following function, which takes in a text and a regex pattern which should be run against it:
const getTextRange = (text, regex) => {
    const textRanges = [];

    const results = [...text.matchAll(regex)];

    results.forEach(result => {
        const textIndex = result.index;
        const textLength = result[0].length;

        textRanges.push([
            textIndex,
            textIndex + textLength
        ])
    });

    return textRanges;
}text.matchAll returns a RegExpStringIterator, which can be transformed into an array using the spread operator. For each result, we get the index of the match — this will be the start index — and the length of the result, which will be the end index.
Adding some regex magic
We’ve left with the regex. This is what will get us the indexes for each text block. To keep everything in one place, I added a regex object at the top of the file which is responsible for holding regex for every possible token and language:
const regexes = {
    html: {
        tag: /<[a-z]+(?=\s)|\/[a-z]+(?=>)/g,
        attributeName: /\s[\w-]+(?=[^<]*>)/g,
        attributeValue: /=[”|"|'][^”|"|']+(?=[”|"|'])/g,
        comments: /<!--([\s\S]*?)-->/g,
    },
    css: {

    },
    javascript: {

    }
};As you can see, most of the regex patterns are ending with a lookahead which helps us to match certain patterns but omit the match in the end result. Unfortunately, lookbehinds are not supported yet so we might have matches where we also select unnecessary parts of the string. For example, the attributeValue will include an equal sign and a quotation mark at the beginning, we don’t want to color them the same way as we do for the attribute value, so we will need to offset the index for some of these patterns.
The way to get around this is to modify the getTextRange function a little bit:
const getTextRange = (text, regex, padding = 1) => {
    const textRanges = [];

    const results = [...text.matchAll(regex)];

    results.forEach(result => {
        const textIndex = result.index;
        const textLength = result[0].length;

        let startIndex = textIndex + padding;

        textRanges.push([
            startIndex < 0 ? 0 : startIndex,
            textIndex + textLength
        ])
    });

    return textRanges;
}We can introduce a 3rd param called padding. Instead of using textIndex for the start index, we can define a variable that adds padding to textIndex and use that as the start index for the text range. I also added a safety check to avoid going into negative values as we might get errors for that.
Putting Everything Together
Putting everything together, we can apply different styles with the combination of two function calls: applyStyles and getTextRange:
if (figma.currentPage.selection.length === 1 && figma.currentPage.selection[0].type === 'TEXT') {
    const text = (figma.currentPage.selection[0] as TextNode).characters;

    // First apply base colour to whole text, then apply everything else to it
    applyStyles([[0, text.length]], colours.base);

    // Apply HTML styles
    applyStyles(getTextRange(text, regexes.html.tag), colours.red);
    applyStyles(getTextRange(text, regexes.html.attributeName), colours.blue);
    applyStyles(getTextRange(text, regexes.html.attributeValue, 2), colours.yellow);

    // Apply CSS styles

    // Apply JS styles

} else {
    // Show error for user
}

figma.closePlugin();We supply getTextRange to the applyStyles function with the text and the required regex. For styling attribute values, we can supply an offset of 2, so =" at the beginning of each attribute won’t be styled with the same color.
Lastly, don’t forget to call figma.closePlugin() as the last thing to terminate the plugin.
To try out the plugin, right-click on your text, select Plugins — Development, and there you will find it. Now the code block will come alive with the click of a button:
Since the writing of this article, a more robust implementation has popped up that uses highlight.js parse logic. You can get the plugin here.

Rocket Launch Your Career
Speed up your learning progress with our mentorship program. Join as a mentee to unlock the full potential of Webtips and get a personalized learning experience by experts to master the following frontend technologies:
Courses


Recommended
The Power of Higher-Order Array Methods

Recreating Spotify’s Floating pop-ups