How To Make Dynamic Backgrounds With The CSS Paint API
Modern web applications are heavy on images. They are responsible for most of the bytes that are downloaded. By optimizing them, you can better leverage their performance. If you happen to use geometric shapes as background images, there is an alternative. You can use the CSS Paint API to generate backgrounds programmatically.
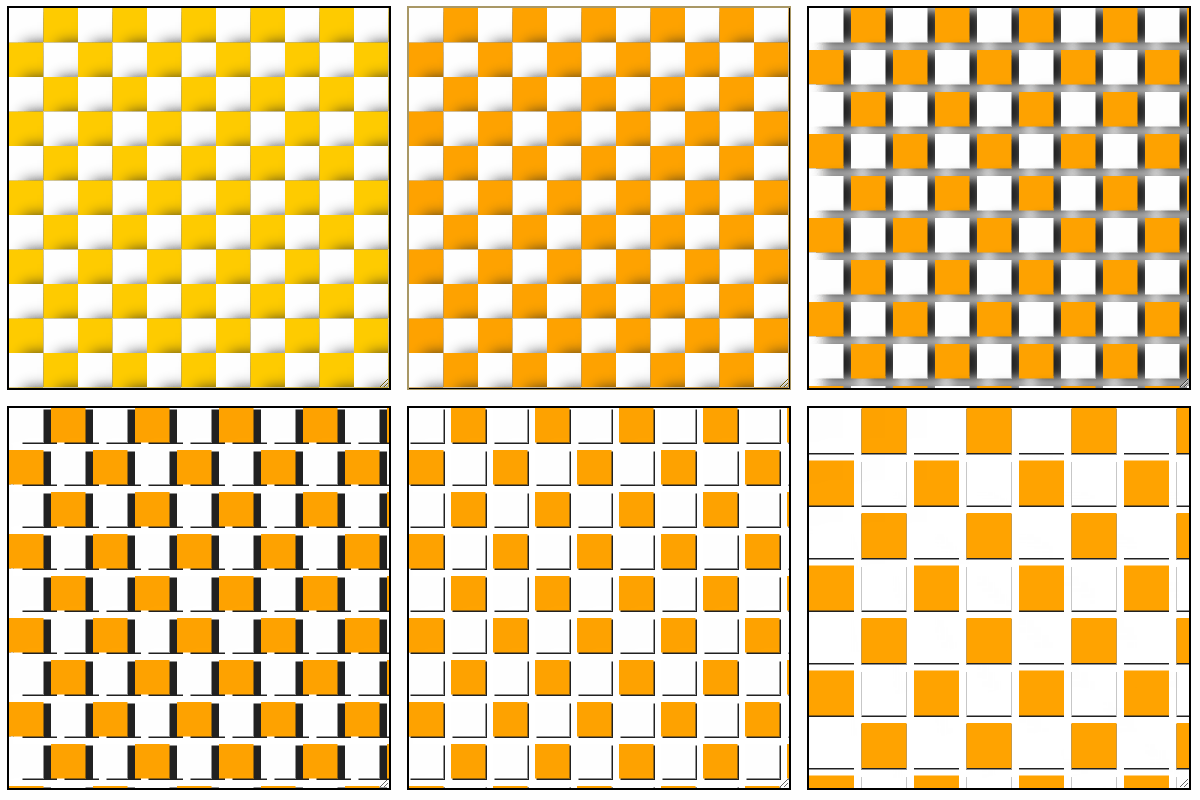
In this tutorial, we will explore its capabilities and look at how we can use it to create resolution-independent, dynamic backgrounds on the fly. This will be the output of this tutorial:
Setting Up the Project
Let’s start by creating a new index.html file and filling it up with the following:
<!DOCTYPE html>
<html lang="en">
    <head>
        <meta charset="UTF-8" />
        <meta name="viewport" content="width=device-width, initial-scale=1.0" />
        <title>🎨 CSS Paint API</title>
        <link rel="stylesheet" href="styles.css" />
    </head>
    <body>
        <textarea class="pattern"></textarea>
        <script>
            if ('paintWorklet' in CSS) {
                CSS.paintWorklet.addModule('pattern.js');
            }
        </script>
    </body>
</html>
There are a couple of things to note:
- On line 13, we load a new paint worklet. Global support currently sits at ~63%. Because of this, we must first check if
paintWorkletis supported. - I’m using a
textareafor demonstration purposes so we can see how resizing the canvas will redraw the pattern. - Lastly, you need to create a
pattern.js— which will register the paint worklet — as well astyles.csswhere we can define a couple of styles.
What is a worklet?
A paint worklet is a class that defines what should be drawn onto your canvas. They work similarly to the canvas element. If you have previous knowledge of it, the code will look familiar. However, they are not 100% identical. For example, text-rendering methods are not yet supported in worklets.
While here, let’s also define the CSS styles. This is where we need to reference that we want to use a worklet:
.pattern {
    width: 250px;
    height: 250px;
    border: 1px solid #000;

    background-image: paint(pattern);
}I’ve added a black border so we can better see the textarea. To reference a paint worklet, you need to pass paint(worklet-name) as a value to a background-image property. But where did pattern come from? We haven’t defined it yet, so let’s make it our next step.
Defining the Worklet
Open up your pattern.js and add the following content to it:
class Pattern {
    paint(context, canvas, properties) {

    }
}

registerPaint('pattern', Pattern);This is where you can register your paint worklet with the registerPaint method. You can reference the first parameter in your CSS that you defined here. The second parameter is the class that defines what should be painted on the canvas. This has a paint method that takes three parameters:
context: This returns aPaintRenderingContext2Dobject that implements a subset of theCanvasRenderingContext2DAPIcanvas: This is our canvas, aPaintSizeobject that only has two properties: width and heightproperties: This returns aStylePropertyMapReadOnlyobject that we can use to read CSS properties and their values through JavaScript.
Drawing the rectangles
Our next step is to get something showing up, so let’s draw the rectangles. Add the following into your paint method:
paint(context, canvas, properties) {
    for (let x = 0; x < canvas.height / 20; x++) {
        for (let y = 0; y < canvas.width / 20; y++) {
            const bgColor = (x + y) % 2 === 0 ? '#FFF' : '#FFCC00';

            context.shadowColor = '#212121';
            context.shadowBlur = 10;
            context.shadowOffsetX = 10;
            context.shadowOffsetY = 1;

            context.beginPath();
            context.fillStyle = bgColor;
            context.rect(x * 20, y * 20, 20, 20);
            context.fill();
        }
    }
}All we’re doing here is creating a nested loop for looping through the width and height of the canvas. Since the size of the rectangle is 20, we want to divide both its height and width by 20.
On line four, we can switch between two colors using the modulus operator. I’ve also added some drop shadows for depth. And finally, we draw the rectangles on the canvas. If you open this in your browser, you should have the following:


Making the Background Dynamic
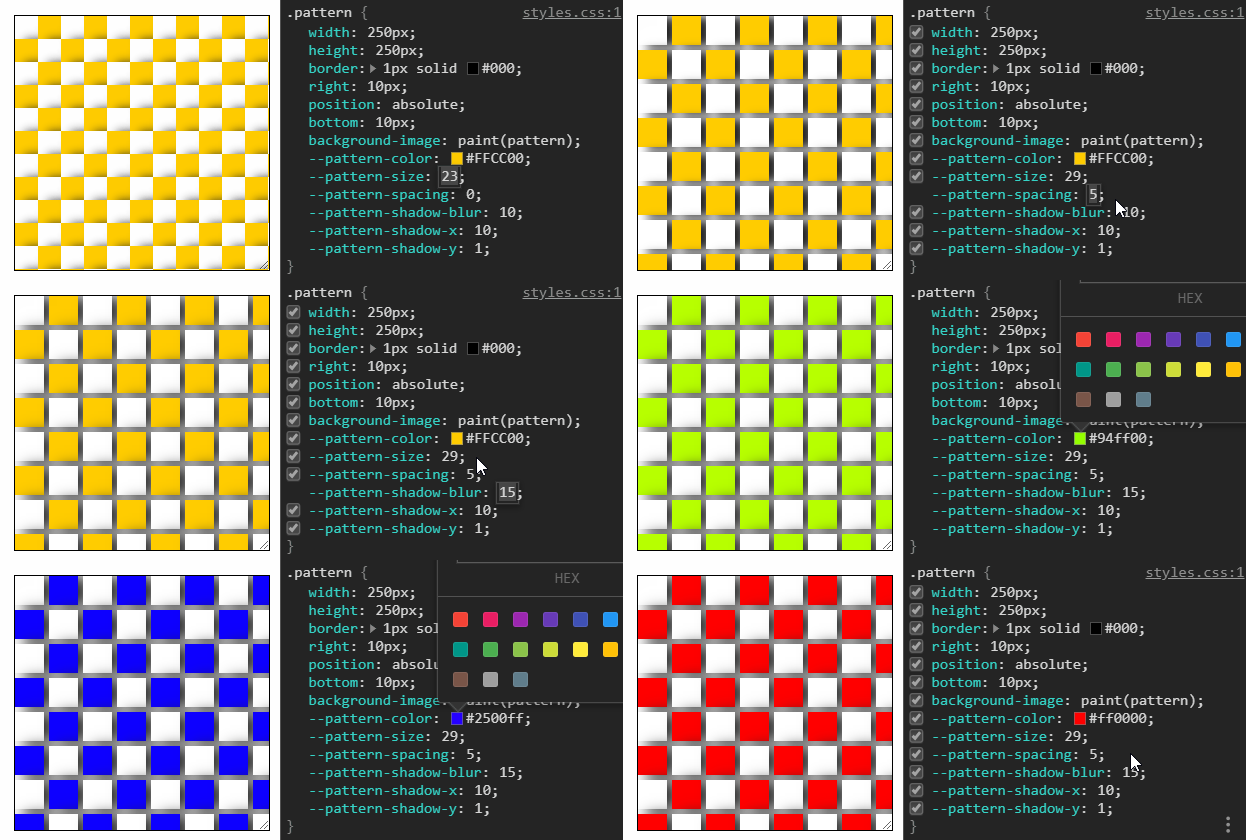
Unfortunately, apart from resizing the textarea and getting a glimpse of how the Paint API redraws everything, this is mostly still static. So let’s make things more dynamic by adding custom CSS properties that we can change.
Open your styles.css and add the following lines to it:
.pattern {
    width: 250px;
    height: 250px;
    border: 1px solid #000;

    background-image: paint(pattern);
    --pattern-color: #FFCC00;
    --pattern-size: 23;
    --pattern-spacing: 0;
    --pattern-shadow-blur: 10;
    --pattern-shadow-x: 10;
    --pattern-shadow-y: 1;
}You can define custom CSS properties by prefixing them with --. These can then be used by the var() function. But in our case, we will use it in our paint worklet.
Checking support in CSS
To make sure that the Paint API is supported, we can also check for support in CSS. To do this, we have two options:
- Guarding the rules with the
@supportsrule - Using a fallback background image
/* 1st option */
@supports (background: paint(pattern)) {
  /**
   * If this part gets evaluated, it means
   * that the Paint API is supported
   **/
}

/**
 * 2nd option
 * If the Paint API is supported, the latter rule will override
 * the first one. If it's not, CSS will invalidate it, and the one
 * with url() will be applied
 **/
.pattern {
  background-image: url(pattern.png);
  background-image: paint(pattern);
}Accessing the parameters in the paint worklet
To read these parameters inside pattern.js, you need to add a new method to the class that defines the paint worklet:
class Pattern {
    // Anything that the `inputProperties` method returns
    // the paint worklet will have access to
    static get inputProperties() {
        return [
            '--pattern-color',
            '--pattern-size',
            '--pattern-spacing',
            '--pattern-shadow-blur',
            '--pattern-shadow-x',
            '--pattern-shadow-y'
        ];
    }
}To access these properties inside the paint method, you can use properties.get:
paint(context, canvas, properties) {
    const props = {
        color: properties.get('--pattern-color').toString().trim(),
        size: parseInt(properties.get('--pattern-size').toString()),
        spacing: parseInt(properties.get('--pattern-spacing').toString()),
        shadow: {
            blur: parseInt(properties.get('--pattern-shadow-blur').toString()),
            x: parseInt(properties.get('--pattern-shadow-x').toString()),
            y: parseInt(properties.get('--pattern-shadow-y').toString())
        }
    };
}For the color, we need to convert it into a string. Everything else will need to be converted into a number. This is because properties.get returns a CSSUnparsedValue.

To make things a little bit more readable, I’ve created two new functions that will handle the parsing for us:
paint(context, canvas, properties) {
    const getPropertyAsString = property => properties.get(property).toString().trim();
    const getPropertyAsNumber = property => parseInt(properties.get(property).toString());

    const props = {
        color: getPropertyAsString('--pattern-color'),
        size: getPropertyAsNumber('--pattern-size'),
        spacing: getPropertyAsNumber('--pattern-spacing'),
        shadow: {
            blur: getPropertyAsNumber('--pattern-shadow-blur'),
            x: getPropertyAsNumber('--pattern-shadow-x'),
            y: getPropertyAsNumber('--pattern-shadow-y')
        }
    };
}All we need to do now is replace everything in the for loop with the corresponding prop values:
for (let x = 0; x < canvas.height / props.size; x++) {
    for (let y = 0; y < canvas.width / props.size; y++) {
        const bgColor = (x + y) % 2 === 0 ? '#FFF' : props.color;

        context.shadowColor = '#212121';
        context.shadowBlur = props.shadow.blur;
        context.shadowOffsetX = props.shadow.x;
        context.shadowOffsetY = props.shadow.y;

        context.beginPath();
        context.fillStyle = bgColor;
        context.rect(x * (props.size + props.spacing),
                     y * (props.size + props.spacing), props.size, props.size);
        context.fill();
    }
}Now go back to your browser and try to change things around.
Summary
So why CSS Paint API might be useful for us? What are the use cases? The most obvious one is that it reduces the size of your responses. By eliminating the use of images, you save one network request and a handful of kilobytes. This improves performance.
For complex CSS effects that use DOM elements, you also reduce the number of nodes on your page. Since you can create complex animations with the Paint API, there’s no need for additional empty nodes.
In my opinion, the biggest benefit is that it's far more customizable than static background images. The API also creates resolution-independent images, so you don’t need to worry about missing out on a single screen size.
If you choose to use the CSS Paint API today, make sure you provide polyfill, as it is still not widely adopted. If you would like to tweak the finished project, you can clone it from this GitHub repository. Thank you for taking the time to read this article. Happy coding! 🎨

Rocket Launch Your Career
Speed up your learning progress with our mentorship program. Join as a mentee to unlock the full potential of Webtips and get a personalized learning experience by experts to master the following frontend technologies:
Courses

CSS - The Complete Guide (including Flexbox, Grid and Sass)

The HTML & CSS Bootcamp


