
How to Make a Blog From Scratch Using Gatsby
With the recent growth of JAMStack, Static Site Generators — or SSG for short — are becoming more popular again. They provide a great way to simplify the architecture of your blog and make your site faster, more secure, and more responsive. All this without any restrictions. Since you have access to every bit of code that makes up your blog, you can customize it as much as you like.
So what exactly are Static Site Generators?
What are Static Site Generators?
Static Site Generators are used for generating sites that are only made up of static assets. It’s a middle ground somewhere between using a full-fledged content management system and hard coding every bit of your site.
There’s no backend architecture, no server-side code, and usually no database involved. You create your content by writing Markdown, host it, and you’re all done.
Of course, this often means you don’t have a CMS in place like WordPress that you can use for writing content. So why would you still choose to go with a Static Site Generator?

Why Should You Use a Static Site Generator?
Then comes the question: What are the potential benefits of using a Static Site Generator? Is it really worth it? There are three main benefits of using an SGG instead of a CMS.
Speed
The most prominent is the increase in speed. Since your site consists of only static assets, there’s no delay in network requests. No API or database calls are made which results in faster responses. You request a page and the server responds with a single HTML file.
The size of your files is also reduced. When using a CMS, you most likely end up with a bunch of unnecessary code injected into your page. If you don’t have full control over it, it can impact your performance, the accessibility of your site, or even your SEO.
Security
Another great benefit of using a Static Site Generator over a Content Management System is the added security. Since you don’t have any backend or database, there’s nothing really to hack. No sensitive information, all your content is stored in files. This means you don’t have to worry about hackers targeting you.
Workflow
Last but not least, as your files are static, your development workflow will also be much simpler. You can easily run your site locally as you don’t have to mock data. You can switch hosting without having to worry about backend re-configuration. Since you don’t need to host a database, this also means you can choose a free service such as GitHub Pages and host your blog completely free. As you can see SSGs also have reduced costs.
This however means you won’t be able to use a custom domain. If you choose to go with a paid service, I recommend going with Bluehost.
Why You Shouldn’t Use a Static Site Generator
While Static Site Generators have many great benefits, as with everything, they also have downsides and is not for everyone. It may not be suitable for you if one of the points mentioned here bothers you.
No server-side functionality
Since you don’t have a backend interface in place with a database, there’s no option for you to use complex features such as user login, various forms, or more complicated searching and filtering.
No initial administration interface
As you mostly serve static assets, there may not be a need for CMS. Instead, you publish your content through markdown files. If you have a large team with people who have no experience in coding, it might scare many that you have to work with Git and Markdown. If you still decide you need a CMS, your initial dev time will be increased and you lose the speed advantage of having no API calls.
No user-generated content
Having no database and user functionality also means you don’t have the option to have user-generated content on your site. If you need to have forums on your site that can be managed by your visitors, posts that can be written by your community, or anything user-related — which involves registration on your site — then a Static Site Generator might not be an ideal choice.
No real-time data
Since we are talking about static sites, you can’t have dynamically changing data such as “Trending stories” or “Best selling” sections. Unless you integrate your statically generated site with a third party API and heavily use JavaScript on the frontend. But Static Site Generators are not meant for e-commerce platforms or social networks anyway.
Hard scalability
Static sites are also hard to scale. Every time you add a new post, the whole site has to be built, increasing build time with each new file. If you only publish content every couple of days and you have no more than a couple of blog posts, then this is not a problem for you. But if you constantly push out new content and you have articles in the thousands, then you will need a CMS.
With that being said, let’s see how they actually work.

How Does Gatsby Work?
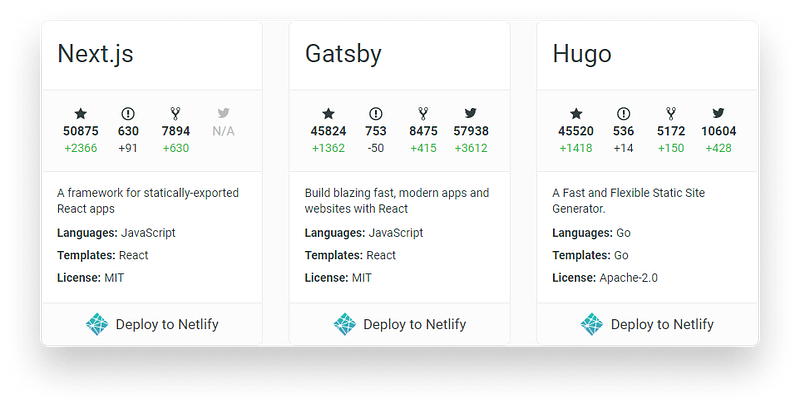
There are countless of Static Site Generators out there. You can have a view at StaticGen.com to get a good overview of the available generators out there. In this tutorial, I’ll be focusing my attention on Gatsby, coming in second on GitHub as one of the most popular Static Site Generators.
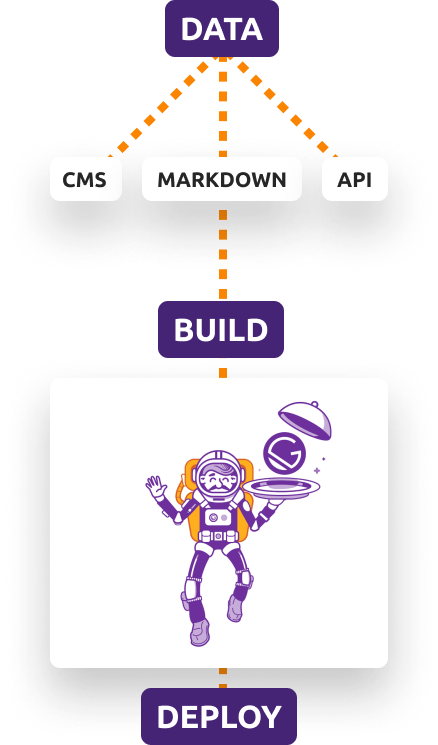
So how does it work? Gatsby uses modern web technologies — such as GraphQL and React — to build your website out of a number of data sources such as content coming from a headless CMS, Markdown files, or a third party API in the format of JSON or other forms of structured data. So even though — as mentioned in the beginning — most of the time you can go without any database or CMS in place, Gatsby still provides an option to make your site more dynamic.
Prerequisites
Before diving into setting up Gatsby, let’s see what you are going to need for this tutorial. First and foremost, you need to have a domain ready where you can host your site. I recommend using Bluehost for registering your own custom domain. They provide:
- Free SSL certificate with your registration
- It easily integrates with WordPress if you choose to use a CMS for your blog.
- Their support can be reached 24/7
- They provide a 30-day money-back guarantee
If you would like to go with a free service, I can recommend using Netlify, GitHub Pages, or Vercel.
This tutorial also assumes that you have basic knowledge in React as this is what Gatsby uses. It also makes heavy use of GraphQL, so it’s an added plus if you already have experience with it, but you will be able to understand the tutorial without any prior knowledge.
Lastly, Gatsby uses Webpack for bundling. While we will not use Webpack at all throughout this tutorial, it’s good to know what technologies are used by Gatsby.
Setting Up Gatsby
No more talking, let’s jump into coding. First, you want to create a new empty directory for your project. To bootstrap Gatsby, you can use the Gatsby CLI to create a new Gatsby project. Run the following command in your terminal:
npm i -g gatsby-cli
to install Gatsby globally. Then create a new Gatsby project by saying:
gatsby new ssg
This will create a new folder called ssg that will be populated with an initial Gatsby project. Once installed, start the server with npm run start and you should see your Gatsby astronaut live on localhost:8000.

The Structure of a Gatsby Project
Opening up your project structure, you will be greeted with the following structure:
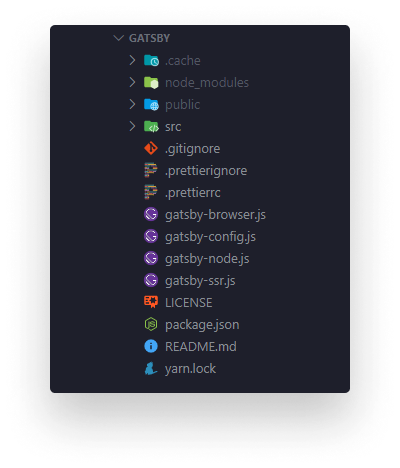
Let’s go through them real quick to see what each of them are doing.
.cache: Used for internal caching automatically created by Gatsbypublic: Also auto-generated by Gatsby. This folder contains the build output. This is the folder you want to deploy to your live site in your CI.src: This is where you will spend most of your time. This directory contains all of the code of your frontend. Yourcomponents,pagesor other assets such asimages.
If you would like to add other static assets to your site that should not be processed by Gatsby, you can create a static folder at your project root. This will tell Gatsby to only copy them to your public folder.
You’ll also find a couple of configuration files at the root folder:
gatsby-browser.js: Used for Gatsby Browser APIs to run code on various browser events, such asonRouteUpdateoronServiceWorkerInstalledgatsby-config.js: Used for configuring your Gatsby site. This is where you can specify metadata for your app, such as your title or meta description. You can also define here the list of plugins you’d like to use.gatsby-node.js: If you are using Node for Gatsby, this is where you can define the related Gatsby Node APIs.gatsby-ssr.js: Lastly, if you use server-side rendering, this is where you would hook into any of the SSR related APIs.
Setting Up Gatsby Plugins
To see how plugins — a core feature of Gatsby —work, let’s add SCSS support to the project. Run the following command to install the SCSS plugin:
npm i --save node-sass gatsby-plugin-sass
Inside your gatsby-config.js file, add gatsby-plugin-sass to the end of your plugins array and simply change layout.css to layout.scss inside your components folder. And you’re all done, you can now use SCSS in your project.
If you happen to run into an error saying:
Error: Cannot find module ‘react’
Try removing your node_modules folder and reinstall it with yarn: yarn install.
Adding New Posts With Markdown
Let’s create some posts with markdown to make the site contentful. First, you’re going to need to install a new plugin which is used for transforming markup files to HTML. Run npm i gatsby-transformer-remark and add it to your plugins array. You’ll also need to make use of gatsby-source-filesystem to pull in the markdown files.
plugins: [
    {
        resolve: `gatsby-source-filesystem`,
        options: {
            path: `${__dirname}/src/markdown`,
            name: `posts`,
        },
    },
    `gatsby-transformer-remark`,
]This assumes that your markdown files are places inside src/markdown, therefore, create a new folder called markdown inside your src folder, and also add a new post.md.
---
slug: "/intro-to-gatsby"
date: "2020-07-21"
title: "How to Make a Blog From Scratch Using Gatsby"
---

With the recent growth of [JAMStack](https://jamstack.wtf/), Static Site Generators -or SSG for short- are becoming more popular again.What you see at the top is a set of metadata called frontmatter. This is denoted with triple slashes and key-value pairs. It will be parsed by gatsby-transformer-remark. Later on, we will be able to pick up this information through GraphQL and use it inside React. The rest of the file will be parsed as an HTML.
If you need some guidance on the basic syntax of Markdown, you can find plenty of examples on Markdownguide.org.
Requesting the data from GraphQL
If you head over to your GraphiQL interface at localhost:8000/___graphql, you’ll notice you have a new node inside the Explorer called markdownRemark. This node contains all the information about the markdown files that are relevant to us.
Create the following query to request a post. Don’t forget to set the slug under “Query Variables”.
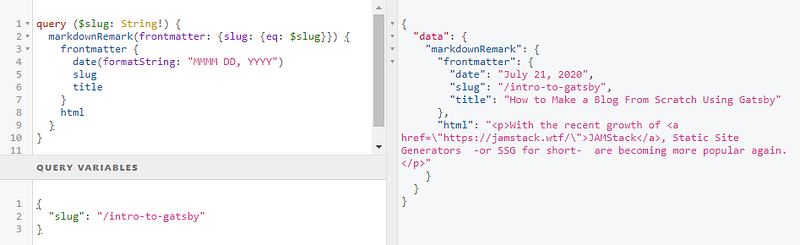
As you can see, the query returns a formatted version of the markdown file. You can request it using its slug. The HTML portion of the file has also been parsed. All we have to do now is inject this data into a component and create the pages based on the slug.
Create a React component for the post
To use this data, we’re going to need a template that will show it for us. Create a new folder called templates inside your src folder and add a new file called post.js. You can also copy the GraphQL query as it is needed inside the template. This component will display the data returned by the query.
import React from 'react'
import { graphql } from 'gatsby'

export default function Post({ data }) {
  const { frontmatter, html } = data.markdownRemark;

    return (
        <div className="post">
            <h1 className="post-title">{frontmatter.title}</h1>
            <h2 className="post-date">{frontmatter.date}</h2>
            <div className="post-content" dangerouslySetInnerHTML={{ __html: html }} />
        </div>
    )
}

export const query = graphql`
    query ($slug: String!) {
        markdownRemark(frontmatter: { slug: { eq: $slug } }) {
            frontmatter {
                date(formatString: "MMMM DD, YYYY")
                slug
                title
            }
            html
        }
    }
`;As you can see, the component will get a data prop that will get the value returned from the GraphQL query which is exported on line:16. So far, we can’t access this component inside the browser as it’s not inside the pages folder. We need to use Gatsby’s Node API to create a new page for every markdown file we have.
Create pages dynamically with Gatsby
For this task, we can use the createPages API. Head over to your gatsby-node.js file and hook into the API by exporting it.
exports.createPages = async ({ actions, graphql }) => {
    const { createPage } = actions;
    const postComponent = require.resolve(`./src/templates/post.js`);
    const result = await graphql(`
        {
            allMarkdownRemark(
                sort: { order: DESC, fields: [frontmatter___date] }
                limit: 1000
            ) {
                edges {
                    node {
                        frontmatter {
                            slug
                        }
                    }
                }
            }
        }
    `);

    result.data.allMarkdownRemark.edges.forEach(({ node }) => {
        createPage({
            path: node.frontmatter.slug,
            component: postComponent,
            // If you need addition data inside your templates you can pass it via the context prop
            context: {
                slug: node.frontmatter.slug
            },
        });
    });
};First, export the createPage function from actions. This will be used for creating the individual pages. Next, you’ll also need the component which can be used for creating the pages, and lastly, we want to query the markdown files. This GraphQL query will limit the number of results to 1000 and sort it based on the publish date of the post.
From line:21, we can then loop through the result and create a page for each markdown file. Here you can pass the slug to be used as a path and the component that should be used for the template. If you need to pass extra data, you can also specify a context property.

Unfortunately, Gatsby won’t be able to pick up the changes right away, so you’ll need to restart your webserver for the effect to take place. If you go to localhost:8000/intro-to-gatsby, you will now able to see the markdown page you’ve just created.
Now you can create as many posts with markdown files as you’d like.
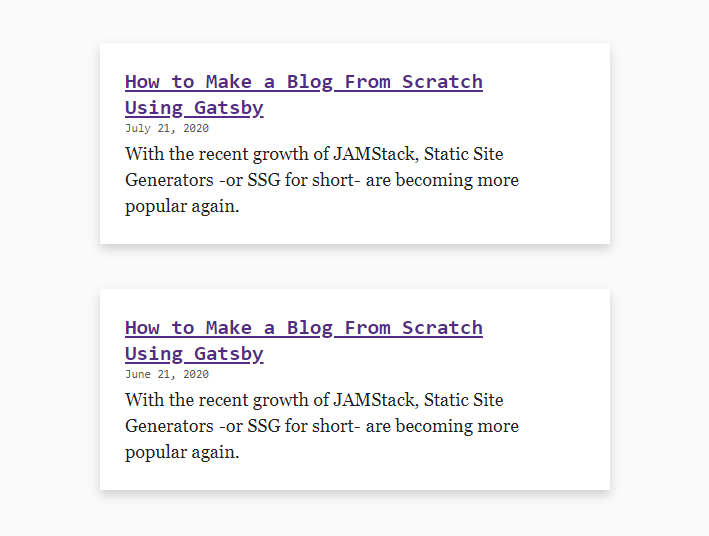
Displaying the Posts on the Homepage
All that’s left to do is to display the list of posts on the front page of your site. You can easily do this by changing the index.js file inside your pages folder.
First, you want to create a query that helps you collect all available markdown posts. The Explorer tab in GraphiQL provides a great way to create queries with a couple of clicks.
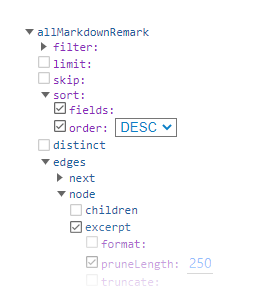
I have created the following query which gets all the posts in a descending order based on their publish date. We’re going to also make use of the id and an excerpt which is automatically created from the first 250 characters of the post.
export const query = graphql`
    query {
        allMarkdownRemark(sort: { order: DESC, fields: [frontmatter___date] }) {
            edges {
                node {
                    frontmatter {
                        date(formatString: "MMMM DD, YYYY")
                        slug
                        title
                    }
                    id
                    excerpt(pruneLength: 250)
                }
            }
        }
    }
`;Just as for the post template, you need to export this query to be able to use it inside the component, which we are going to create now. Above the exported query, change the layout of your IndexPage to the following:
const IndexPage = ({
    data: {
      allMarkdownRemark: { edges }
    }
}) => {
    const Posts = edges.map(edge => {
        const post = edge.node;

        return (
            <li key={post.id}>
                <a href={post.frontmatter.slug}>
                    <span className="post-title">{post.frontmatter.title}</span>
                    <span className="post-date">{post.frontmatter.date}</span>
                    <p>{post.excerpt}</p>
                </a>
            </li>
        );
    });

    return <ul>{Posts}</ul>;
};We are only interested in the edges node so we destruct it right away. We can loop through them with map and create a new list item for each post.
With the help of some CSS, you should be able to see your posts on your front page.
Summary
Now that you have your blog ready, all you need to do is deploy it. You can use free services such as Netlify, GitHub Pages, or Vercel or go the traditional way and use a paid service with a custom domain. As mentioned in the beginning I can recommend going with Bluehost, because of the benefits mentioned inside the prerequisites section.
Overall, Gatsby provides a great way to create your blog with modern web technologies and make it fast and lightweight. It has more than 2000 plugins for you ready to be used, so chances are, you’ll find one for your problem.
If you still thinking about whether to use Gatsby for your project because of the way content is created — as mentioned in the beginning — you can use Gatsby with a headless CMS. It integrates nicely with WordPress, Prismic, and a couple of other CMS.
Go ahead and give it a try. Have you used Gatsby before? What are your insights? Let us know in the comments! Thank you for taking the time to read this article, happy blogging!

Rocket Launch Your Career
Speed up your learning progress with our mentorship program. Join as a mentee to unlock the full potential of Webtips and get a personalized learning experience by experts to master the following frontend technologies:
Courses


Recommended
How to Make an Effective Exit-Intent Popup in JavaScript

What is the DOM, Actually?
