How to Add Custom JSON Endpoints to Your WordPress
WordPress is one of the most used CMS in the online space. It comes with various options to tailor it to your own needs and make it suitable for your site. It even provides an option to use it only as a backend, completely separated from the frontend.
When you want to use WordPress as a headless CMS, you need to make use of its rest API. You can enhance certain endpoints with additional data if needed but this option is often limited and configuring it can be cumbersome. Most propbably it will also include data you don’t actually need, which only makes your requests larger and heavier than it needs to be.
This is where registering a custom endpoint can be the way to go. It allows you to only get back the necessary data needed, and nothing more. Let’s take a look and see how you can register a new route in the first place.

Registering a New Route
The very first step is to register a new rest route for your API. This can be done by adding a new register_rest_route action to the rest_api_init event into your functions.php:
add_action('rest_api_init', function() {
    register_rest_route('custom', '/article', array(
        'methods' => 'GET',
        'callback' => 'getArticle'
    ));
});The register_rest_route function takes in three parameters:
- namespace: A unique URL segment after your core endpoint.
- route: This is the URL for the route you are adding.
- arguments: This is where you can customize how your route will be handled. Which HTTP method can trigger it, and which function to call as a callback.
In the example above, we’ve created a new endpoint with the name of /article. This can be reached through a GET request and responds with the getArticle function.
Creating The Callback Function
This function will be called, every time you make a GET request to /wp-json/custom/article. The return value of the function will be returned as a response. So as a next step, create a new function with the name you passed to callback:
function getArticle($data) {
    $post = get_posts(array(
        'name' => $data->get_param('slug'),
        'post_status' => 'any'
    ));

    return $post;
}This function, will return a post with a given slug. The $data that the function receives will contain the passed parameters and their values. You can retrieve parameters using $data->get_param, passing the GET parameter that needs to be retrieved.
For example, to get a post by slug, you can use the get_posts function where you filter by the name and pass the value of the slug param, taken from the request. Make sure you return something from the function, as this will be your actual response.
Creating custom responses
To create custom responses, you can wrap the return value of $post into another function call which generates a custom object for you:
function getArticleData($post) {
    $post = $post[0];

    // Create a new object that you fill with the required values
    $data = new stdClass();

    $data->title    = $post->post_title;
    $data->content  = $post->post_content;

    // Return the data at the end of your function
    return $data;
}

// Wrap the returned variable into a function call
return getArticleData($post);This has the added benefit that you only return the data to the frontend that is necessary, and nothing more. This way, you can also control your namings and adhere to naming conventions in your code, or extend your response with custom data.
Retrieving data from POST requests
This approach will only work for GET requests. How do you pass and handle data with POST? To take a look, register a new route with a POST method:
// Make sure it is defined inside the `rest_api_init` event
register_rest_route('custom', '/article', array(
    'methods' => 'POST',
    'callback' => 'postArticle'
));As you can see, you can attach multiple functions to the same route, given that they belong to different HTTP methods. In order to achieve the same effect you have in your GET request, you need to use the get_body_params method to get the body passed to the request:
function postArticle($data) {
    $body = $data->get_body_params();

    $slug = $body['slug'];

    $post = get_posts(array(
        'name' => $slug,
        'post_status' => 'any'
    ));

    return getArticleData($post);
}
Testing the New Route
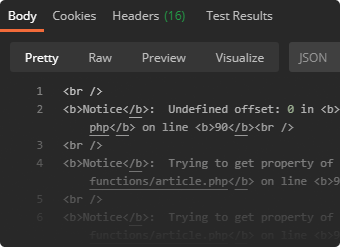
The last step is to verify the changes and test the new route. For this, I recommend using Postman. Open Postman and create a new GET request to the newly created route. Make sure you pass the slug of your article as a query param:
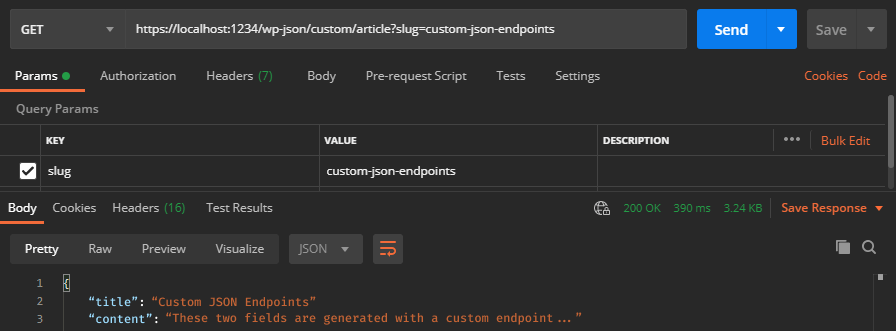
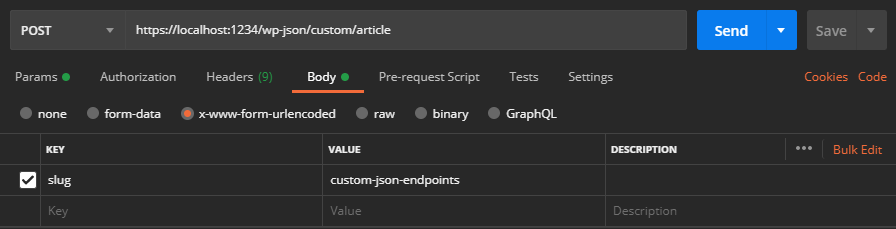
As you can see, it should return the data returned from the function. Now change the request type to POST and switch to the body tab. Add a new key-value pair for the slug and verify that the same data is returned.
Always make sure you are handling unexpected cases, such as an invalid slug, or a malicious request.
And with that, you can create as many custom rest endpoints for your headless WordPress as you want.
Do you have additional tips and tricks when handling custom endpoints in WordPress? Let us know in the comments below! Thank you for reading through, happy coding!

Rocket Launch Your Career
Speed up your learning progress with our mentorship program. Join as a mentee to unlock the full potential of Webtips and get a personalized learning experience by experts to master the following frontend technologies:
Courses


Recommended
How to Easily Make Donut Charts With CSS Only
All You Need to Know About React Hooks