How to Make A Snake Game in JavaScript With Checkboxes
I always liked the idea of experimenting with classic games and recreating them in the browser. They always offer new challenges and it’s interesting to see what can be achieved inside the browser. This time, I had an idea about recreating the snake game out of checkboxes that are chasing a radio button: the apple.
It is fascinating to see what the logic is behind it and how this can be translated into JavaScript. Since animations also make things look nicer, I finished the whole project with a nice CSS transformation when the game is over. Here is the end result and with that said, let’s see how you can create the same game too.

Setting Up the Project
The very first thing of course is to create the HTML file:
<!DOCTYPE html>
<html lang="en">
<head>
<meta charset="UTF-8" />
<meta name="viewport" content="width=device-width, initial-scale=1.0" />
<meta http-equiv="X-UA-Compatible" content="ie=edge" />
<title>🐍 Checksnake</title>
<link rel="stylesheet" href="styles.css" />
</head>
<body>
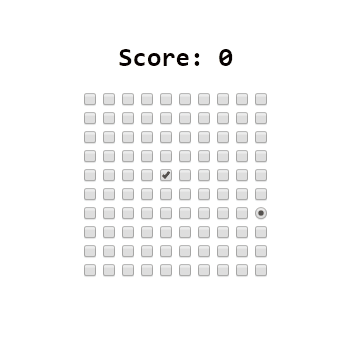
<div class="snake">
<h1>Score: <span class="score">0</span></h1>
<div class="world"></div>
</div>
<script src="js/config.js"></script>
<script src="js/world.js"></script>
<script src="js/snake.js"></script>
<script src="js/game.js"></script>
</body>
</html>
I broke down the whole project into four different files:
config.jsfor defining constants that will be used throughout the game.world.jsfor generating the grid of checkboxes.snake.jsthat will handle game logic.- And
game.js, its only purpose is to bring the snake and the apple into the world.
I also added some minor styles for aligning the world into the center of the screen:
html, body {
    font-family: monospace;
}

.snake {
    position: absolute;
    top: 50%;
    left: 50%;
    transform: translate(-50%, -50%);
}

input {
    margin: 3px;
}

h1 {
    text-align: center;
}Defining Configurations
I made a separate configuration file so we can tweak around some of the numbers that make up the game, without having to touch the logic. Let’s take a look at what is inside:
const speed = 6;
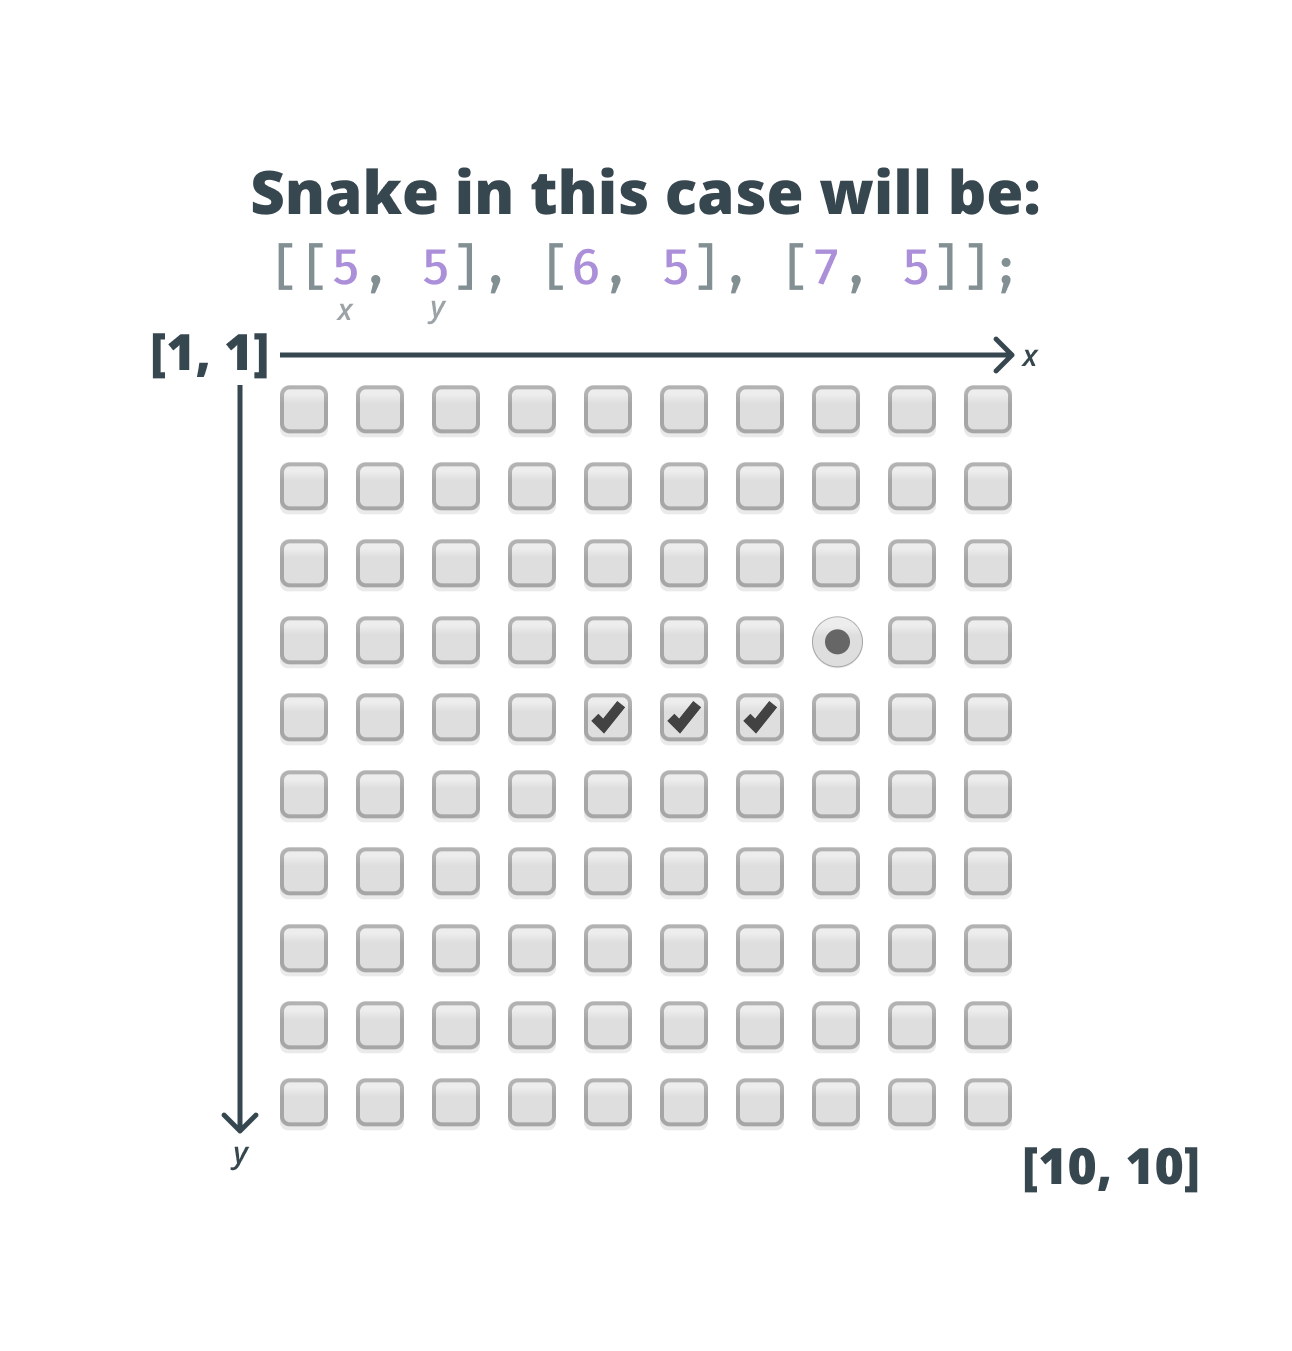
const worldSize = 10;
const startPoint = [5, 5];
const snake = [startPoint];
const key = {
arrowUp: 38,
arrowDown: 40,
arrowLeft: 37,
arrowRight: 39
};
let movingDirection;
let moveInterval;Here, we can define the variables that are playing a key part in making up the game, such as:
- The
speed, responsible for the speed of the snake. I experimented with various settings and felt that updating the checkboxes roughly around every 100ms was a good pace. - The size of the world. This means we want to generate a 10×10 grid.
- The starting point of the snake. We can go with a middle placement.
- The
snakeitself. This will be a multidimensional array, holding reference for every part of the snake. - The key code for the arrows which will be used to control the snake.
- And two
lets; one is for storing the current moving direction and the other will be used as a pointer to asetInterval, which will update the position of the snake.

Generating the World
To get things started, let's first generate some checkboxes on the screen. This is where we can use the worldSize variable.
const generateWorld = () => {
    for (let rowIndex = 0; rowIndex < worldSize; rowIndex++) {
        const row = document.createElement('div');

        row.classList.add('row');

        for (let columnIndex = 0; columnIndex < worldSize; columnIndex++) {
            const input = document.createElement('input');

            input.type = 'checkbox';

            row.appendChild(input);
        }

        document.querySelector('.world').appendChild(row);
    }
}

generateWorld(worldSize);We can create two loops inside each other. One for the rows and one for the columns. Inside each, create a div for each row containing exactly 10 checkboxes, the value of worldSize. You’ll end up with a 10x10 grid. After this, we can start working on the core game logic.
Adding Helper Functions
But before doing that, let's create some helper functions that come in handy later on.
const rows = document.querySelectorAll('.row');

const getItemAt = (x, y) => rows[y - 1].children[x - 1];
const checkItemAt = (x, y) => getItemAt(x, y).checked = true;
const unCheckItemAt = (x, y) => getItemAt(x, y).checked = false;

const placeAppleAt = (x, y) => {
    getItemAt(x, y).type = 'radio';
    checkItemAt(x, y);
}

const removeAppleAt = (x, y) => {
    getItemAt(x, y).type = 'checkbox';
    unCheckItemAt(x, y);
}Like getting a checkbox by (x, y) position, making it checked/unchecked, or placing an apple in the world, which will be represented by a radio button.
Getting the position of the apple
We also need a function for getting the position of the apple, since we want to know when the snake picks up one.
const getApplePosition = () => {
    const position = [1, 1];

    rows.forEach((row, rowIndex) => {
        Array.from(row.children).forEach((input, inputIndex) => {
            if (input.type === 'radio') {
                position[0] = inputIndex + 1;
                position[1] = rowIndex + 1;
            }
        });
    });

    return position;
}To know that, we can simply loop through each row and column and check if the type of the input is a radio. Note that we also need to convert row.children into an array since you can’t call forEach on an HTMLCollection. When the snake retrieves the apple, we want to display it in another random position.
Get a random position
For this, create a separate function called getRandomPosition:
const getRandomPosition = () => {
    const availablePositions = [];

    rows.forEach((row, rowIndex) => {
        Array.from(row.children).forEach((input, inputIndex) => {
            if (input.type === 'checkbox' && input.checked === false) {
                availablePositions.push([inputIndex + 1, rowIndex + 1]);
            }
        });
    });

    const index = Math.floor(Math.random() * (availablePositions.length) - 1) + 1;

    return availablePositions[index];
}It gets all the available positions in the world by looping through each row and column and checks if the current item is an unchecked checkbox.
We don’t want to add the position of the apple into the availablePositions array so we need to check specifically if it’s a checkbox. If the position is free, we push it into the array and choose a random index from it to return a random position.
Increasing score
And of course, every player wants the reward. Once the snake collects an apple we should reward the player with a score. I’ve put the scoring into a separate function:
const increaseScore = () => {
    const score = document.querySelector('.score');

    currentScore = parseInt(score.innerText, 10);
    score.innerText = currentScore + 1;
}
Handling User Input
With all this in place, the next step is to handle user input. We want to make the snake move with arrow keys. The configuration file holds all key codes for this.
Attached a keydown event listener on the document and switch between the key codes to set the direction either to up, down, left, or right.
const handleInput = () => {
    document.addEventListener('keydown', e => {
        switch(e.keyCode) {
            case key.arrowUp:    movingDirection = movingDirection === 'down' ? 'down' : 'up'; break;
            case key.arrowDown:  movingDirection = movingDirection === 'up' ? 'up' : 'down'; break;
            case key.arrowLeft:  movingDirection = movingDirection === 'right' ? 'right' : 'left'; break;
            case key.arrowRight: movingDirection = movingDirection === 'left' ? 'left' : 'right'; break;
        }

        if (moveInterval === undefined) {
            moveInterval = setInterval(() => {
                move(movingDirection || 'left');
            }, 1000 / speed);
        }
    });
}We also need to check for the current direction. If the snake already moves upwards and the player presses the down key, we don’t want to switch directions as that would mean the snake can collide with itself simply by moving around.
And here we set the moveInterval to a setInterval calling the move function which will actually make the snake move. But before taking a look into how the function handles the movement, let's quickly set up the game.js file:
const startGame = () => {
    handleInput();
    checkItemAt(...startPoint);
    placeAppleAt(...getRandomPosition());
}

startGame();We start at the startPoint which is defined in the config file. Remember that since the variable is an array, and the checkItemAt function expects two parameters (x, y), we need to use spread. And of course, we also want to place the apple in a random position each time the game begins.
Adding Movement
So, finally, the core logic of the game that checks the appropriate checkboxes. To fully understand how the implementation works, let’s first see what the logic is behind checking the checkboxes.
Here is the flow we want to follow:
- We need to know the position of the apple, the head, and the very last segment of the snake.
- Depending on the
movingDirection, we want to increase or decrease the x or y position of the head. - We also want to check whether we have an apple in the next position. Because in that case, we need to increase the length of the snake as well as increasing the score and placing the apple somewhere else.
- Last but not least, we need to check whether the next position on which the head will be is already checked. If it’s checked, it means the snake is about to hit itself so it’s game over.
The reason we only care about the position of the head and the very last element, but not the intermediate checkboxes is the following:

We only need to get the new position of the head and place it at the very beginning of the array. This is what array.unshift does.
Then we simply get rid of the last segment with array.pop. So now, every coordinate in the array is updated with just two lines.
const move = direction => {
    const applePosition = getApplePosition();
    const head = [...snake[0]];
    const tail = [...snake[snake.length - 1]];

    const updateSnake = () => {
        snake.unshift(head);
        snake.pop();

        snake.forEach(snakePart => checkItemAt(...snakePart));
    }
}We can define a variable for each position and create a function for updating the position of the snake.
Here, we simply loop the snake array and check each checkbox at the given position. Then comes the part where we update the position of the head:
switch (direction) {
    case 'up':    head[1] = head[1] === 1 ? worldSize : head[1] - 1; break;
    case 'down':  head[1] = head[1] === worldSize ? 1 : head[1] + 1; break;
    case 'left':  head[0] = head[0] === 1 ? worldSize : head[0] - 1; break;
    case 'right': head[0] = head[0] === worldSize ? 1 : head[0] + 1; break;
}Since we want the snake to wrap around the world and not die if it hits the edges, we need to check whether it reaches the end of the world. If it does, we simply move it to the other end, either pos1 or pos10, depending on the direction.
if (head[0] === applePosition[0] && head[1] === applePosition[1]) {
    snake.push(tail);

    placeAppleAt(...getRandomPosition());
    removeAppleAt(...applePosition);

    increaseScore();

    updateSnake();
} else {
    updateSnake();
    unCheckItemAt(...tail);
}Lastly, we also need to check if the position of the head matches the position of the apple. That means we need to add a new segment to the snake as well as place the apple somewhere else.
In that case, since the length of the snake increases, we don’t need to remove the very last item from the array. Otherwise, we do.
Game Over
Now, if the snake hits itself and nothing happens, then there’s no challenge. So by adding the following if statement to the move function, we can clear the map, write out Game Over…, and play a nice animation.
if (getItemAt(...head).type === 'checkbox' && getItemAt(...head).checked) {
    document.querySelector('h1').innerText = 'Game Over...';
    document.querySelectorAll('input').forEach(input => input.disabled = true);

    playWave(head);

    clearInterval(moveInterval);
}We simply need to check if the next position of the head is a checkbox and if that position is already checked.
I’ve also added a playWave function that first animates the head and then the rest of the inputs. The animation is simple: scale the input to 200% then scale it back to its original size:
@keyframes wave {
    0%   { transform: scale(1); }
    50%  { transform: scale(2); }
    100% { transform: scale(1); }
}

input.wave {
    animation: wave 0.4s cubic-bezier(.17, .67, .83, .67);
}Whenever an input gets the wave class, it will be animated.

The trick here is to delay the animation for each row. We want to get each input starting from (1, 1) all the way to (10, 10) in order. Then we can loop through them and delay the animation by their index:
const playWave = head => {
    const checkboxes = [];

    for (let x = 1; x <= worldSize; x++) {
        for (let y = 1; y <= worldSize; y++) {
            checkboxes.push(getItemAt(x, y));
        }
    }

    getItemAt(...head).className = 'wave';

    checkboxes.forEach((checkbox, index) => {
        setTimeout(() => {
            checkbox.className = 'wave';
            checkbox.checked = false;
        }, 10 * index);
    });
}And now the game is ready to be played.
Conclusion
Experimenting with the creation of games is a great way to tackle logic problems that you rarely come across as a front-end developer. If you would like to get the full source code in one, you can do so in the GitHub repo.
Did you have some fun recreating a famous game that required you to think outside the box? Let us know in the comments down below. Thank you for taking the time to read this article, happy coding!


Rocket Launch Your Career
Speed up your learning progress with our mentorship program. Join as a mentee to unlock the full potential of Webtips and get a personalized learning experience by experts to master the following frontend technologies:
Courses


Recommended
How to Modify JSON Responses With AnyProxy
How to Improve Page Speed by Optimizing Content