How to Easily Validate Forms in React
Form validation is the process of checking user input to ensure that it meets certain criteria before being submitted. With its help, we can ensure that data entered into a form is complete and accurate before it is submitted to the server.
This not only saves time and effort in processing (while also improving security in the process) but by being aware of invalid inputs, we can also enhance the user experience by providing instant feedback.
In this tutorial, we are going to take a look at how to implement form validation in React in an easy and meaningful way, step by step.

Setting Up the Project with Vite
We are going to set up the project using Vite, a popular choice and powerful tool for bootstrapping front-end applications. To get started, run the following command in your terminal:
npm create vite@latest react-form-valicationDuring scaffolding, you may be asked to install the create-vite package to use the create vite command.
When prompted, select React for the template. Vite also works with Vue, Svelte, and Vanilla JavaScript, just to name a few. This will bootstrap a new Vite project in a directory called react-form-validation.
Once installed, run npm i to install dependencies, then run npm run dev to start the dev server. Now that we are up and ready, we can start adding form elements that we can validate.
Required Properties for Form Elements
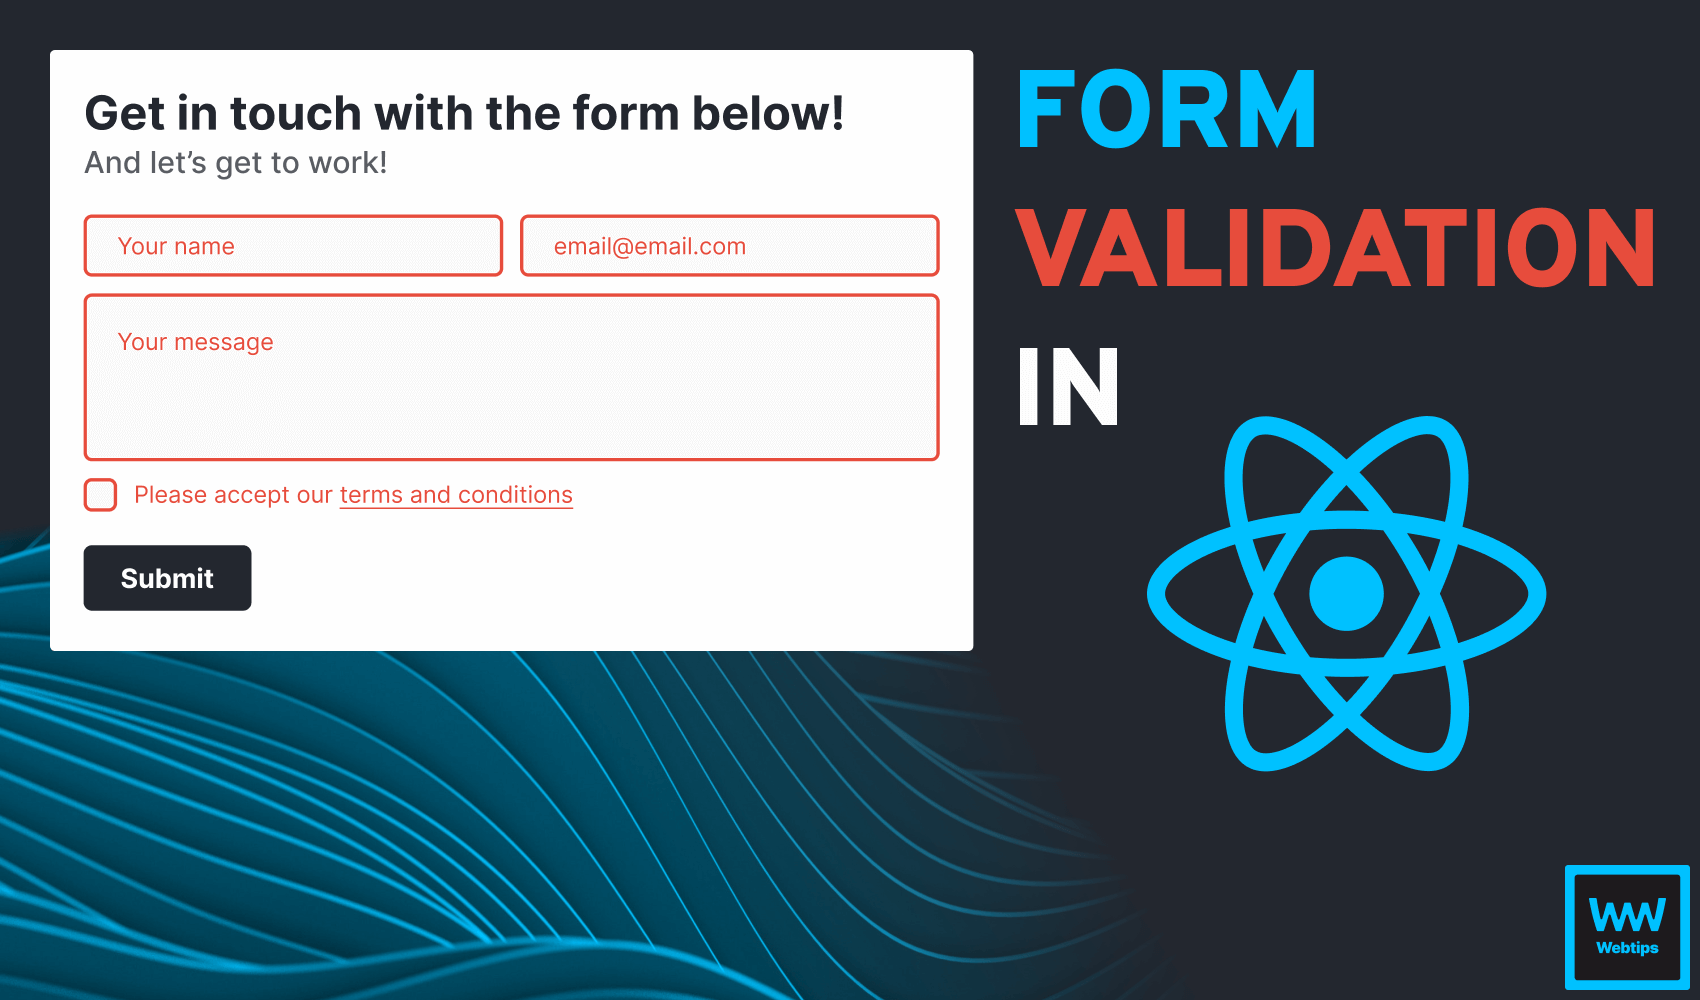
To validate form inputs, we need to first take a look at what properties we need for each input field that we want to validate. For this tutorial, we are going to use the following JSX for the App component:
const App = () => {
    return (
        <form>
            <h1>Get in touch with the form below!</h1>
            <h2>And let’s get to work!</h2>
            <div>
                <input
                    placeholder="Your name"
                    type="text"
                    name="name"
                    onChange={update}
                    required
                />
                <input
                    placeholder="[email protected]"
                    type="email"
                    name="email"
                    onChange={update}
                    required
                />
            </div>
            <textarea
                name="message"
                placeholder="Your message"
                onChange={update}
                required
            />
            <label>
                <input
                    type="checkbox"
                    name="termsAndConditions"
                    onChange={update}
                    required
                />
                Please accept our <a href="#">terms and conditions</a>
            </label>
            <button type="submit">Submit</button>
        </form>
    )
}

export default AppTo make the HTML semantic (and we want to do form validation on forms) we need to wrap everything into a form element. We are going to have different types of inputs to demonstrate different types of validation. There are three important properties that we need for easy form validation. They are:
name: Thenameproperty will be used during state updates. This helps us to create a genericupdatefunction.onChange: We need an event handler for handling input changes. EachonChangereferences anupdatemethod that we are going to implement shortly.required: We want to mark each input as a required field using therequiredattribute. This will also enable the default built-in form validation of the browser.

Updating Form State with Hooks
Each input references an update method. But before looking into how to implement it, let's first define the state of the form. Add the following useState hook into the component:
import { useState } from 'react'

const App = () => {
    const [state, setState] = useState({
        name: '',
        email: '',
        message: '',
        termsAndConditions: false
    })

...It is important to match the property names in the state object to the name attributes in the JSX. This way, we can create an update method that is suited for all inputs. Let's see how the update method can update our state:
const update = event => {
    const target = event.currentTarget

    setState({
        ...state,
        [target.name]: target.type === 'checkbox'
            ? target.checked
            : target.value
    })
}Notice that state in React is considered read-only so we need to replace the object rather than mutating it.
By using bracket notation, we can dynamically reference the proper state by using the name attribute of the input ([target.name]), and assign a value using target.checked for checkboxes or target.value for all other input types. Now the state of each input will be updated on each keystroke and reflected in the state object.
The Declarative Way to Validate Form Inputs
Now that we have a state, we can implement the validation of form inputs. For this, we can use a simple validation object, where each property returns either true (valid) or false (invalid) for a given input based on some criteria:
const validationRules = {
    name: !!state.name && state.name.match(/^ *$/) === null,
    email: isValidEmail(state.email),
    message: !!state.message
        && state.message.length < 250
        && state.message.match(/^ *$/) === null,
    termsAndConditions: state.termsAndConditions
}Notice that property names, again, match the names in the state object (and also the name attributes). We can place any type of condition here using logical operators, or even function calls. The important thing is we always want either a true (valid) or false (invalid) value to be returned.
For example, the name input field must not be empty, and it must not contain only whitespaces. The isValidEmail function also returns a boolean. To validate emails, you can use the following regex:
export const isValidEmail = email => {
    const regex = /^(([^<>()\[\]\\.,;:\s@"]+(\.[^<>()\[\]\\.,;:\s@"]+)*)|(".+"))@((\[[0-9]{1,3}\.[0-9]{1,3}\.[0-9]{1,3}\.[0-9]{1,3}\])|(([a-zA-Z\-0-9]+\.)+[a-zA-Z]{2,}))$/

    return regex.test(String(email).toLowerCase())
}If we have optional fields and we don't want any validation to happen, we can simply pass true for a property. This tells React that the field is always valid.
// In this case, the name input will not be validated (will be treated as valid)
const validationRules = {
    name: true
}Handling form submission
We can use the validation object upon form submission to either accept or reject the form. To handle this, we need to add an onSubmit event listener to our form:
const submit = event => {
    event.preventDefault()

    const isValidForm = Object
        .values(validationRules)
        .every(key => key)

    if (isValidForm) {
        console.log('✅ Submitting form with state:', state)
    }
}

return (
    <form onSubmit={submit}>
...This function will be called when we click on the submit button. Note that we need to call event.preventDefault to prevent the default browser action from taking place. Here we can use the validationRules object to validate the form. If every key is true inside the object, then all fields are valid.
const validationRules = {
    name: true,
    email: true
}

Object.values(validationRules)
<- [true, true]

[true, true].every(key => key)
<- trueShowing Form Errors
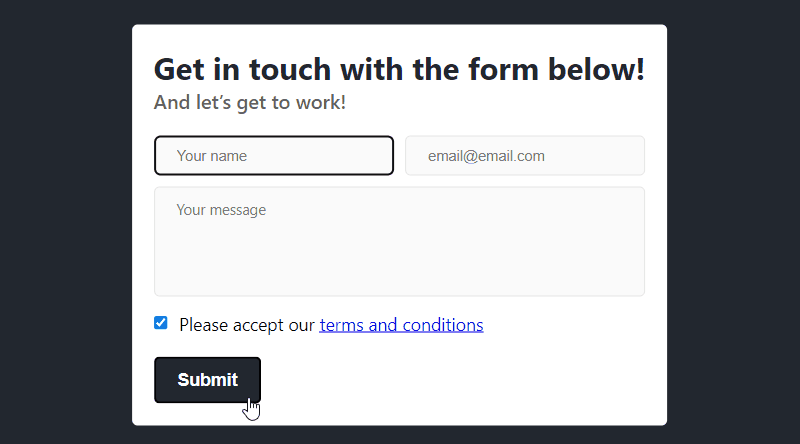
There is only one last thing to do, and that is to add feedback to users about errors. For this, we can create an error class to highlight invalid inputs. To conditionally add this class, we can pass a validate function with the name of the input to the className attribute:
<input
    type="text"
    name="name"
    placeholder="Your name"
    onChange={update}
    required
    className={validate('name')}
/>This function can check the state of the input in our state object, as well as the validity inside the validationRules object. Since property keys share the same name, we can dynamically reference them using bracket notation:
const validate = field => {
    return state[field] && !validationRules[field]
        ? 'error'
        : undefined
}If state[field] is true, and validationRules[field] is false (meaning the input is not empty, and it is invalid), we can add an error class to the input. To give more context to users about the error, we can also add a callout after the submit button that depends on an error state:
const [showError, setShowError] = useState(false)

const submit = (event: React.FormEvent) => {
    event.preventDefault()

    const isValidForm: boolean = Object
        .values(validationRules)
        .every(key => key)

    if (isValidForm) {
        setShowError(false)
        console.log('✅ Submitting form with state:', state)
    } else {
        setShowError(true)
    }
}

return (
    <form onSubmit={submit}>
        ...
        <button type="submit">Submit</button>
        {showError && (
            <span>Please fix the highlighted fields to proceed.</span>
        )}
    </form>
)We need to toggle the state during form submission. If the user tries to submit an invalid form, showError will be set to true on line:14, and the message will be shown. This leaves us with the following functionality:
Conclusion
In conclusion, validating forms in React doesn't have to be hard. With the help of a validation object, it can be a straightforward process, where each property clearly describes the criteria for each field.
Have you worked with form validation before? Let us know your insights in the comment section below! If you would like to learn more about React, check out our guided roadmap which takes you through everything you need to know about React. Thank you for reading through, happy coding! 👨💻

Rocket Launch Your Career
Speed up your learning progress with our mentorship program. Join as a mentee to unlock the full potential of Webtips and get a personalized learning experience by experts to master the following frontend technologies:
Courses


Recommended
How to Make a Responsive, Animated Navbar in React

How to Toggle Visibility in React