
How to Add Extra Functionality to Your Modules With Babel
Babel, the JavaScript compiler has gone a long way since its initial release back in 2014. Babel — originally called 6to5 (which turned ES6+ code into ES5) — now has a striving community with many plugins created for you to get the most out of your code.
While Babel is mostly used to transpile code down to a lower version of JavaScript to make your code compatible with a wide range of browsers, it can be used for more than that. Since it works in three stages: parsing, transforming, and printing, you also have access to an AST.
What is an AST?
An abstract syntax tree, or AST for short, is a tree representation of your source code. For example, for a simple console.log like the one below, you would get a complex tree back with every possible metadata about your code.
console.log('👋')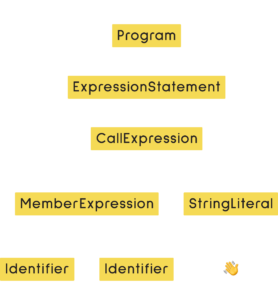
This is what will help us create a plugin that can wrap our code with additional functionality, so we can keep our codebase simpler, without including extra wrappers for every file.
Imagine that we have a site with multiple routes, and we want to execute different codes for different routes, based on the file name. Let’s say for the sake of demonstration, we will also need to only execute the code after a custom event has been fired, just to make sure our app is ready. Eventually, we want to use Babel to turn this:
import moduleA from 'moduleA'
import moduleB from 'moduleB'

console.log('I\'m only firing on the home page');into to this:
import moduleA from 'moduleA'
import moduleB from 'moduleB'

if (document.location.pathname === '/home') {
    document.addEventListener('app:ready', () => {
        console.log('I\'m only firing on the home page');
    });
}
How Babel Plugins Work
So how do Babel plugins work? First, you will need to create a new file for your plugin that exports a function. This function can take babel as an argument, so you can access its API.
module.exports = babel => {
    // Your plugin's body
}To make this plugin called during compile, you need to specify it in your .babelrc config file:
{
    "plugins": [
        "./path/to/your/plugin.js"
    ]
}Exploring AST
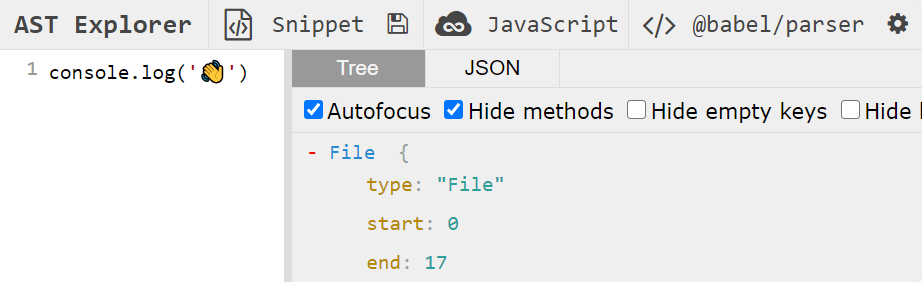
Now it would be pretty insane to remember how your code is built up, and what is its AST representation. Luckily for us, there is an awesome online tool called AST Explorer, that is made for this very purpose.
You can not only explore JavaScript with AST Explorer, but also other languages, including web technologies such as HTML, or CSS. You also have the option to explore code with different parsers, such as Flow or TypeScript.

Building the Plugin With a Visitor
For this plugin to work, we’re going to need to use a visitor. A visitor is used for traversing through the code. In a visitor, you are visiting nodes where you can do all sorts of transformation based on their metadata. Nodes in an AST are objects with similar structures. Each node has a type. For example, the following are all different nodes with different types:
const fun = () => {} -> "VariableDeclarator"
function fun () {}   -> "FunctionDeclaration"
'🌲' === '🌲'        -> "BinaryExpression"
console.log('🌳')    -> "CallExpression"
To use a visitor in a Babel plugin, all you have to do is return an object from your module that has a visitor node:
Based on the type of the node, you can add properties to this object, that will be called for every type found in the tree.
module.exports = babel => {
    return {
        visitor: {
            VariableDeclarator: { ... }
        }
    };
}Since we are not interested in a single type, but the whole file, we want the plugin to run for the whole code. If you go back to AST Explorer, you will notice that the topmost type of your file is called a Program, so you need to pass this to visitor:
module.exports = babel => {
    return {
        visitor: {
	    Program: {
		enter: () => console.log('entered to node');
                exit:  () => console.log('exited from node');
	    }
	}
    };
}When you create a visitor, you have two ways to visit a node:
- You can define an
enterfunction that will be called when a type is encountered and the visitor enters into it - You can define an
exitfunction that will be called when the visitor exits a node
Also, if you don’t care about the exit function, you can simply write:
visitor: {
    Program() { ... }
}

// Which is equivalent to
visitor: {
    Program {
        enter: () => { ... }
    }
}This function can take two arguments: a path and a parent, both representing links between different nodes. For example, the path in our case references the Program type, while the parent references its parent, that is the file itself. We’re going to need to use both. Let’s say we only want the plugin to target a subfolder in our codebase. This can be done with a simple if statement:
module.exports = babel => {
    return {
        visitor: {
	    Program(path, parent) {
                if (parent.filename.includes('src\\routes')) {
                    // This plugin will only run for files in the routes folder.
                }
	    }
        }
    };
}Inside this if, we can get the name of the file using the path to the file, and we can get Babel to parse a string into code using babel.parse, and replace our existing file with it, getting a half working solution:
module.exports = babel => {
    return {
        visitor: {
	    Program(path, parent) {
                if (parent.filename.includes('src\\routes')) {
                    const filePath = parent.filename.split('\\');
                    const fileName = filePath[filePath.length - 1].split('.')[0];
                    const code = `
                        if (document.location.pathname === '/${fileName}') {
                            document.addEventListener('app:ready', () => {
                                ${parent.file.code}
                            });
                        }
                    `;

                    // Replace the `Program` with the `code` variable
                    path.replaceWith(babel.parse(code).program);
                }
	    }
        }
    };
}Only a half working solution, because if you were to test this code by adding a file into your src/routes folder, you will notice Babel will throw the following Error:
Maximum call stack size exceeded
Preventing infinite loops
This happens because using replaceWith generates a new Program which makes Babel visit it again because of the change, and when you call replaceWith again, the cycle continues, resulting in an infinite loop. To battle this, simply wrap your if into another if to check if the file has already been transformed:
module.exports = babel => {
    return {
        visitor: {
	    Program(path, parent) {
                if (parent.filename.includes('src\\tracking')) {
                    if (!this.wrapped) {
                        const filePath = parent.filename.split('\\');
                        const fileName = filePath[filePath.length - 1].split('.')[0];
                        const code = `
                            if (document.location.pathname === '/${fileName}') {
                                document.addEventListener('app:ready', () => {
                                    ${parent.file.code}
                                });
                            }
                        `;

                        path.replaceWith(babel.parse(code).program);

                        this.wrapped = true;
                    }
                }
	    }
        }
    };
}This is now working as expected, but there’s one problem still. You can’t use import statements, because you will get another error this time, saying:
unknown: 'import' and 'export' may only appear at the top level
It’s clear that this is happening because we wrap the whole code into an if statement, but imports should be at the top of your file.
Keeping imports at the top
To keep imports at the top, we can separate the nodes based on types. All nodes that has a type of ImportDeclaration should go to the top, while everything else should go between the if.
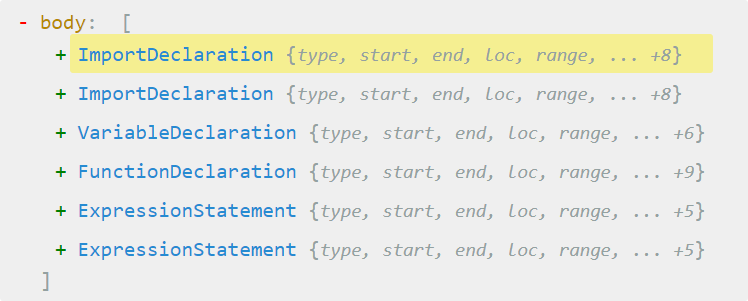
Again, if you go back to AST Explorer, you can see that the body of our program is an array of different types. We can loop through this and check for import statements to separate them from the rest of the code:
const imports = path.node.body.filter(node => node.type === 'ImportDeclaration');
const expressions = path.node.body.filter(node => node.type !== 'ImportDeclaration');To also turn them into strings, so we can place them into the code and let Babel parse it back, we can use parent.file.code which returns the whole file as a string. But we only need the individual nodes as strings.
If you look at the image above, you will note that each type has a start and end property. This defines where the node starts and where it ends. We can use these to strip parent.file.code and only get back the relevant part:
const imports = path.node.body
    .filter(node => node.type === 'ImportDeclaration')
    .map(statement => parent.file.code.slice(statement.start, statement.end));

const expressions = path.node.body
    .filter(node => node.type !== 'ImportDeclaration')
    .map(statement => parent.file.code.slice(statement.start, statement.end));

const filePath = parent.filename.split('\\');
const fileName = filePath[filePath.length - 1].split('.')[0];

const code = `
    ${imports.join('\n')}

    if (document.location.pathname === '/${fileName}') {
        document.addEventListener('app:ready', () => {
            ${expressions.join('\n')}
        });
    }
`;

path.replaceWith(babel.parse(code).program);This way, we can keep the import statements at the top of our files, and put the rest into the if statement. Note that with this solution, you are adding an extra step for Babel. You are converting each node to a string and then make Babel parse it back. With a more complex solution, you can work on nodes directly and completely avoid the parse step on line:22.
Conclusion
Babel became a powerful tool over the years. It not only lets you transpile your code down to make it work across multiple browsers but also lets you build powerful plugins that can enhance your code, as well as the productivity of developers. It can help you get rid of repetitive tasks, and let you focus on building things.
If you would like to learn more on how to build plugins in Babel, I highly recommend checking out The Babel Plugin Handbook on GitHub, which is a great resource for diving deeper into the world of AST.
Have you already built plugins with Babel before? Show us your work in the comments section below! Thank you for reading through, happy building! 🏗️


Rocket Launch Your Career
Speed up your learning progress with our mentorship program. Join as a mentee to unlock the full potential of Webtips and get a personalized learning experience by experts to master the following frontend technologies:
Courses


Recommended

Building Scalable APIs With NestJS and MongoDB

How to Automate Your Code Refactoring
