How to Allow Only One Checkbox to Be Checked in HTML
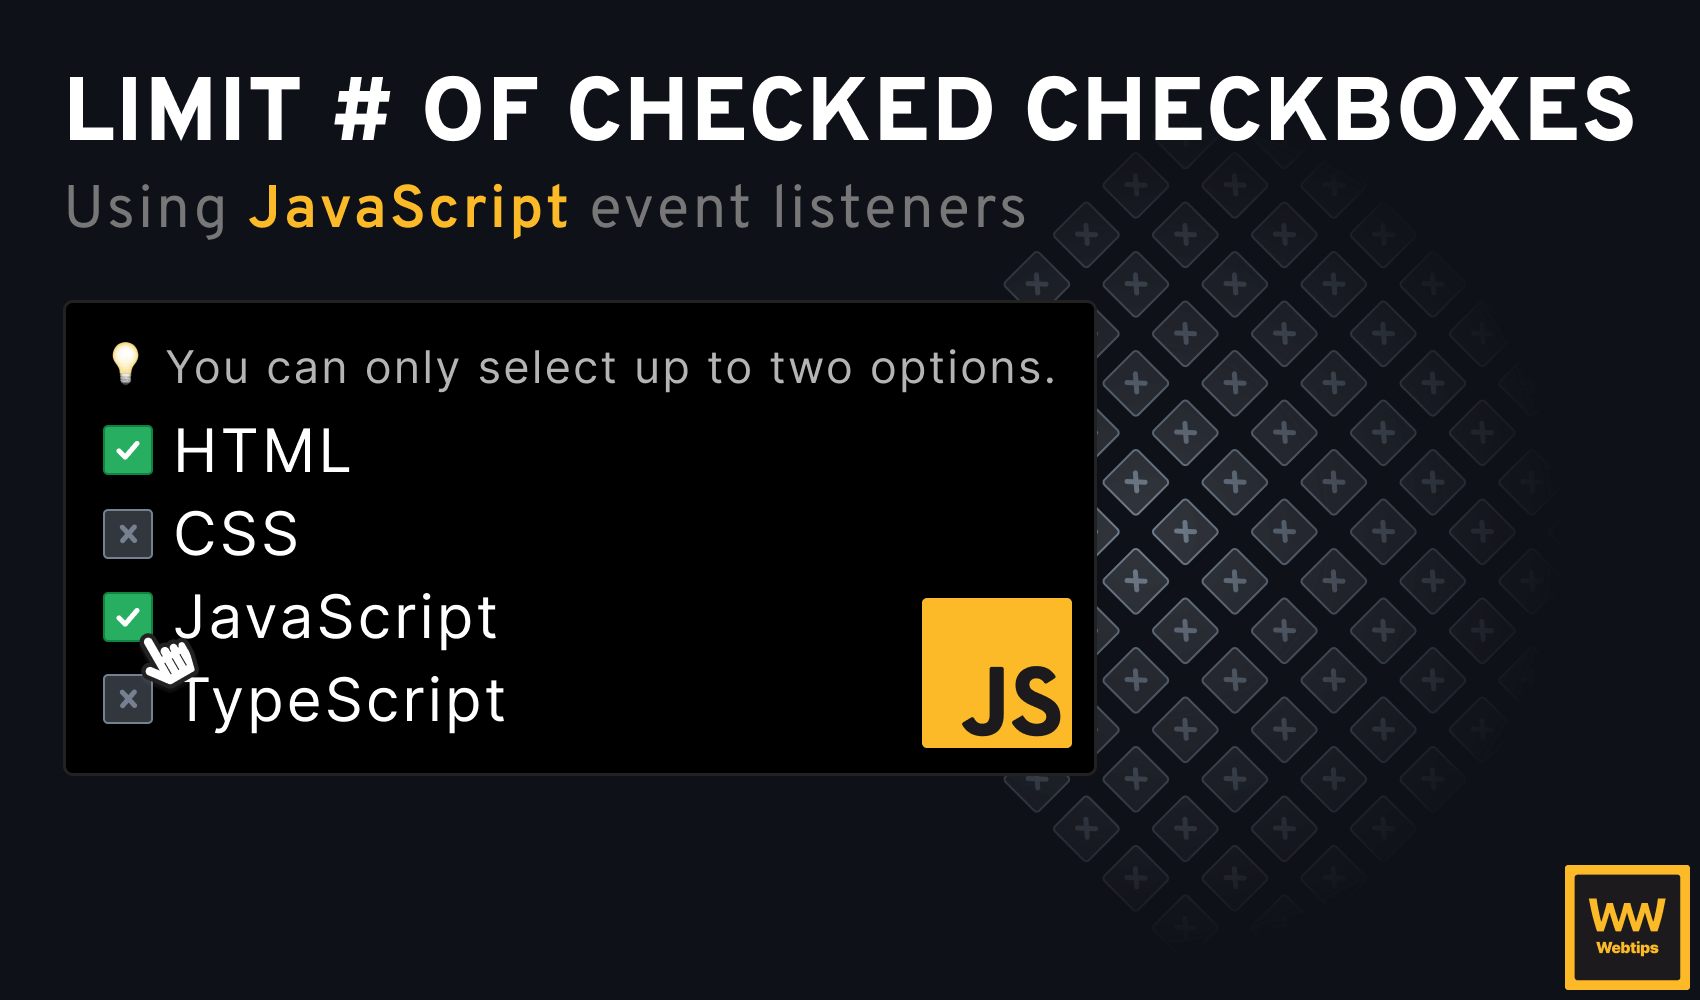
When working with multiple checkboxes, a common use case is to limit the number of selectable options, preventing users from selecting more options than allowed. For example, you may have the following group of checkboxes where you only want a maximum of two options to be selected:
In this tutorial, we will take a look at how this can be achieved in HTML with the use of event listeners in JavaScript.
If you need to allow only one checkbox to be selected, use a radio group instead.

Creating the HTML Markup
First, we need to create the input group in HTML. To do this, create the following layout in your HTML file:
<span>You can only select up to two options.</span>
<div>
    <label for="html">
        <input type="checkbox" value="html" id="html" />
        HTML
    </label>
    <label for="javascript">
        <input type="checkbox" value="javascript" id="javascript" />
        JavaScript
    </label>
</div>To separate the input group from the rest of the layout, wrap it inside a div, which we will style shortly. To make the inputs accessible, wrap them inside a label. We can match a label with an input using the for attribute, which references the element's id.
Make sure you caption the group to make it clear that users can only select a limited number of options.
To display the inputs below each other, we can set the display of the wrapping div to flex, and set the flex-direction to column:
div {
    display: flex;
    flex-direction: column;
}Allow Only a Limited Number of Checkboxes to be Checked
To get everything working, we need to attach a click event listener to the checkboxes in JavaScript. To avoid creating a separate listener for each checkbox, we can use event delegation:
const maxChecks = 2
let selectedCount = 0

document.querySelector('div').addEventListener('click', event => {
  if (event.target.type === 'checkbox') {
    selectedCount = event.target.checked
      ? selectedCount + 1
      : selectedCount - 1
  }

  if (selectedCount >= maxChecks) {
    [...document.querySelectorAll('input:not(:checked)')].forEach(input => input.disabled = true)
  } else {
    [...document.querySelectorAll('input')].forEach(input => input.disabled = false)
  }
})In the example above, we set the maximum number of available options to two using the maxChecks variable. We also need to keep track of the number of selected checkboxes. This will be tracked in the selectedCount variable. Inside the event listener, we need to implement the following logic:
- Line 4: We attach the event listener to the
divcontainer so that we can delegate it to the checkboxes. - Line 5: To determine if a checkbox was clicked, we can check if
event.target.typeischeckbox. - Lines 6-8: In case a checkbox was clicked, we need to either increase or decrease the
selectedCountvariable. This is done using a ternary operator. If the checkbox is checked (event.target.checkedwill betrue), then we increase the count by one; otherwise, we decrease it. - Line 11: If the
selectedCountreachesmaxChecks, we need to select all checkboxes that are unchecked and disable them using thedisabledproperty. We can select them using the:not(:checked)pseudo-class. - Line 14: In case we haven't reached the maximum allowed checkboxes, we re-enable every input by setting
input.disabledtofalse. Note that sincequerySelectorAllreturns a NodeList, we need to use the spread operator to convert it into a regular array so that we can useforEach.

Semantically Correct Way For Single Selects
In case you need users to select only one option from many, the semantically correct way to achieve this is by using a radio group:
<div>
    <label for="html">
        <!-- Use the `checked` property if you want one of the options to be preselected -->
        <input type="radio" value="html" id="html" name="topic" checked />
        HTML
    </label>
    <label for="javascript">
        <input type="radio" value="javascript" id="javascript" name="topic" />
        JavaScript
    </label>
</div>Radio buttons can be grouped together, restricting users to select only one option. In the example below, you can experiment with how the code above will be presented to the end user.
The right column also includes a clear button that can be used to clear previous answers in case you want the fields to be optional. This way, you can remove accidental selections with the use of a button. The following JavaScript code is executed on click:
document.querySelector('button').addEventListener('click', () => {
    [...document.querySelectorAll('input[type="radio"]')].forEach(input => input.checked = false)
})Conclusion
In conclusion, always use a radio group when you need to restrict the number of options to only one. Use checkboxes only when you need to enable users to select multiple options, even if you need to limit the number of selections to a maximum. You can try out the functionality with the editor below.
 index.js
 styles.css
 index.html
Is there anything you think this tutorial is missing? Let us know in the comments below! If you would like to learn more about JavaScript, make sure you check out our roadmap below. Thank you for reading, happy coding! 👨💻

Rocket Launch Your Career
Speed up your learning progress with our mentorship program. Join as a mentee to unlock the full potential of Webtips and get a personalized learning experience by experts to master the following frontend technologies:
Courses


Recommended
How to Display Key-Value Pairs in React in a Table
How to Rerender Component on Resize in React