How to Quickly Add Line Numbers to HTML Textarea
There are many places on the internet where you can come across text editors with line numbers. Code examples like on this page, online code editors such as Codepen or Codesandbox, and the like. In this tutorial, we are going to take a look at how you can add line numbers to any HTML textarea yourself using as few DOM nodes as possible, and only 10 lines of JavaScript code.
With this approach, you can not only replicate line numbering perfectly, but it’s also much slimmer compared to a full-fledged library that supports many other features out of the box that you might not need.

Create the HTML
Let’s start off by creating the HTML markup for the textarea. For this, we are going to need, no surprise, a textarea. But also a container for the line numbers, and a wrapper for the whole editor so we can lay it out accordingly. This leaves us with the following:
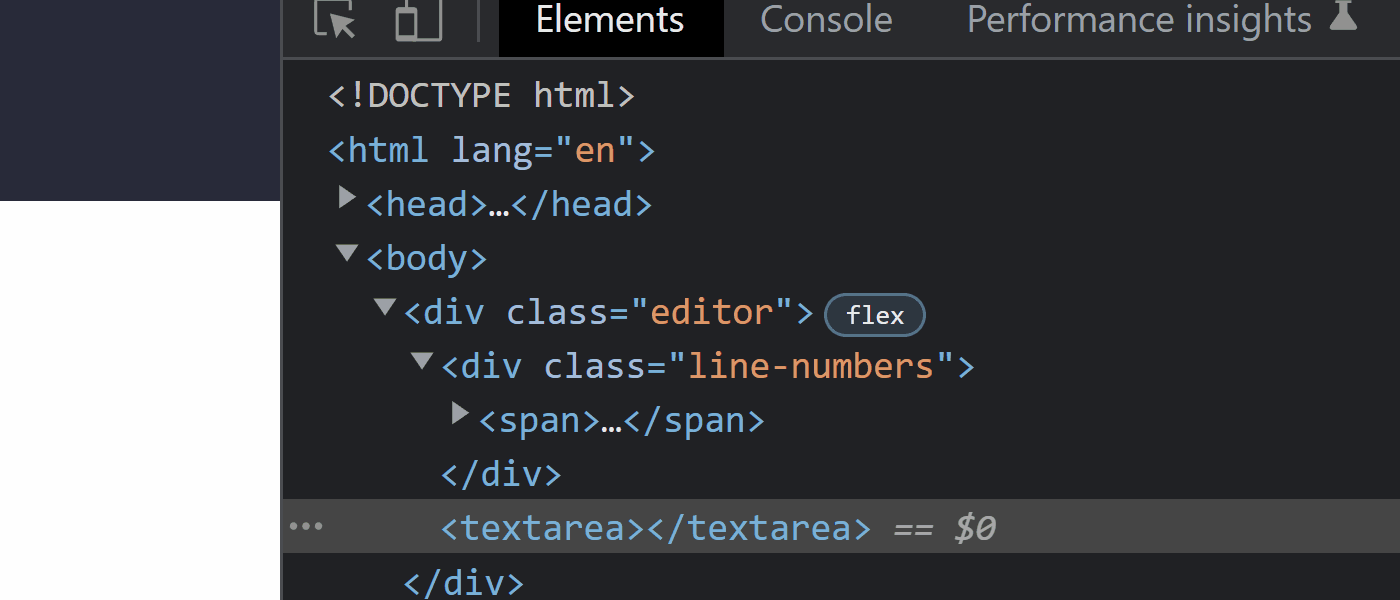
<div class="editor">
    <div class="line-numbers">
        <span></span>
    </div>
    <textarea></textarea>
</div>We are going to store the line numbers in a div, and each line will be represented by an empty span. We will add the actual numbers through CSS so that we can automatically number them as needed.
Add the Event Listener
Let’s first implement the functionality, and then we will take a look at how to style the textarea and the line numbers properly so that they are aligned. For this, we are going to need a keyup event listener attached to the textarea. The entire logic fits into 10 lines of code:
const textarea = document.querySelector('textarea')
const lineNumbers = document.querySelector('.line-numbers')

textarea.addEventListener('keyup', event => {
  const numberOfLines = event.target.value.split('\n').length

  lineNumbers.innerHTML = Array(numberOfLines)
    .fill('<span></span>')
    .join('')
})First, we need to query the DOM to grab both the textarea and the container for the line numbers. Then we added a keyup event listener to the textarea, so that every time someone types into it, it can update the line numbers accordingly.
All we are doing here is splitting up the content based on new line characters (\n). Then we create an array from the number of new lines, add an empty span inside it, then join everything back together into a single string. The HTML of the lineNumbers DOM element is then replaced with this string.
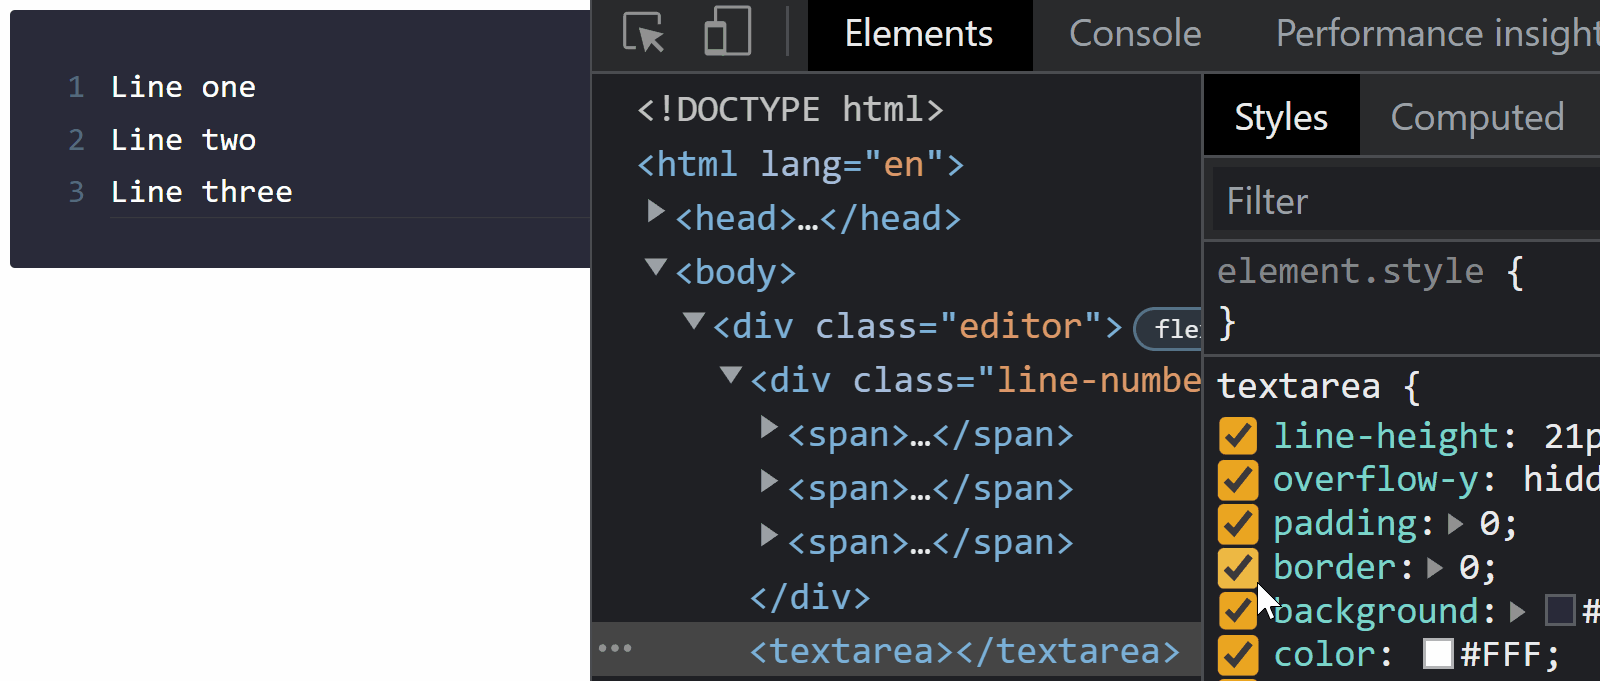
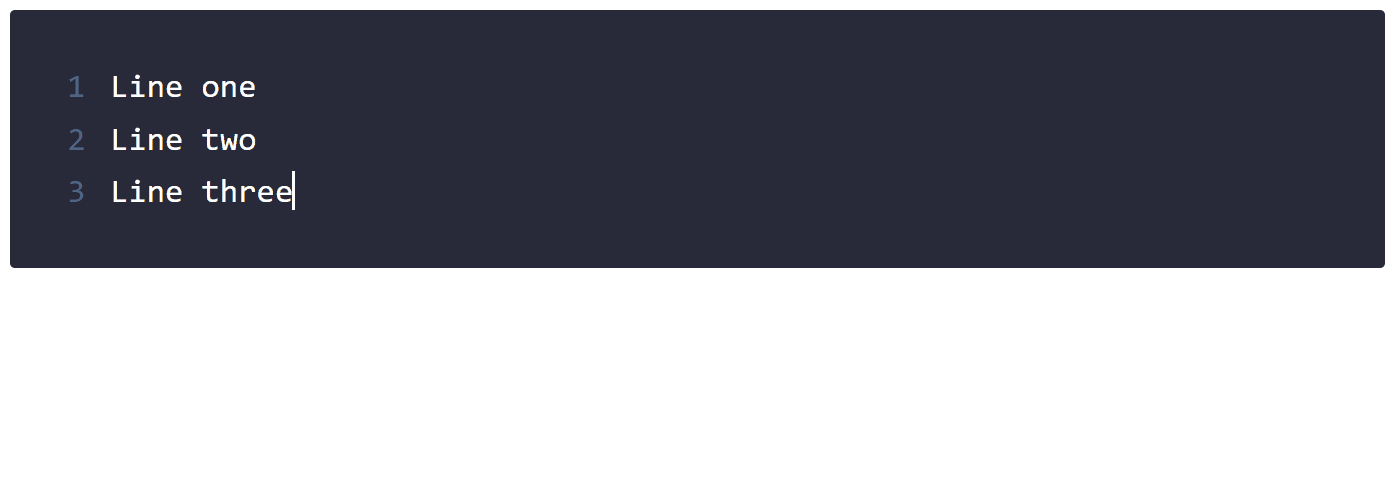
If we now start typing into the textarea, we can see that every time we hit enter to create a new line, a new empty span is added to the line numbers. However, there are no numbers appearing at the moment, so let’s jump into CSS to solve this.

Style the Textarea
Now let’s have a look at the styling, as we are going to use CSS to add the line numbers themselves. First and foremost, we want the entire editor to be displayed as a flex so that they are (the line numbers and the textarea) positioned next to each other:
.editor {
  display: inline-flex;
  gap: 10px;
  font-family: monospace;
  line-height: 21px;
  background: #282a3a;
  border-radius: 2px;
  padding: 20px 10px;
}

textarea {
  line-height: 21px;
  overflow-y: hidden;
  padding: 0;
  border: 0;
  background: #282a3a;
  color: #FFF;
  min-width: 500px;
  outline: none;
  resize: none;
}
We also want to give consistent typography to both the line numbers and the textarea itself, so that the text will align right next to the line numbers. Make sure you also remove any padding and border from the textarea, as this can again shift the text making it misaligned with the line numbers. Lastly, we want to remove the resize option and the scrollbar with resize and overflow-y properties respectively.
Now let’s have a look at how to actually add the line numbers through CSS. Add the following rules to your stylesheet:
.line-numbers {
  width: 20px;
  text-align: right;
}

.line-numbers span {
  counter-increment: linenumber;
}

.line-numbers span::before {
  content: counter(linenumber);
  display: block;
  color: #506882;
}
We can use the built-in counter function in CSS in combination with counter-increment to add the line numbers. The counter function expects an arbitrary name that we define for counter-increment. This is going to add the content inside a ::before pseudo-element.
Make sure you also define the display as block in order to wrap each span into a new line.
One other thing to note is to align the text to the right. When everything is added, we get the following behavior when we start adding new lines to the textarea:
Add Scroll Support
Currently, the editor grows as we add new lines. This might be fine for smaller editors but could be unideal for more complex cases. Luckily, we can easily fix this by adding a couple of extra CSS rules. First, we want to make the height of the editor fixed by adding the following rules:
This will ensure that the editor's height doesn't get bigger than 200px. Make sure you also set overflow: auto to avoid the line numbers and the textarea from showing up outside of the container.
We also need to set .line-numbers and the textarea's height to an arbitrary big number, otherwise, the scroll will not be synchronized between them below 200px.
.line-numbers,
textarea {
    height: 9999px;
}Add Tab Support
To wrap things up, let’s also add tab support. Right now, if you were to hit tab inside the textarea, it will bring the focus to the next focusable element as that is the default behavior inside the browser. To prevent this, we need to add a new event listener to the textarea. This time, we need a keydown event listener:
textarea.addEventListener('keydown', event => {
  if (event.key === 'Tab') {
    const start = textarea.selectionStart
    const end = textarea.selectionEnd

    textarea.value = textarea.value.substring(0, start) + '\t' + textarea.value.substring(end)
    textarea.focus()

    event.preventDefault()
  }
})First, we need to check if the input is from a Tab key. We can do this using event.key. Then we need to grab the selection because we want tabs to work inside the text as well. For this, we can use selectionStart and selectionEnd. We can use these to reconstruct the value of the textarea, including an extra tab (\t).
Don’t forget to also prevent the default action of the browser’s behavior by calling event.preventDefault. Otherwise, tabbing inside the textarea will focus on the next focusable element.
Conclusion
In conclusion, adding line numbers to any textarea is relatively simple and can be easily done with a couple of lines of code. If you only need to add line numbers and nothing else, it might be worth implementing it on your own rather than pulling in an entire library for doing so.
If you would like to grab the full source code in one piece, you can reach it below. Thank you for reading through, happy coding!
<!DOCTYPE html>
<html lang="en">
  <head>
    <meta charset="UTF-8">
    <meta http-equiv="X-UA-Compatible" content="IE=edge">
    <meta name="viewport" content="width=device-width, initial-scale=1.0">
    <title>📋 Line Numbers for Textarea</title>
    <style>
      .editor {
        display: inline-flex;
        gap: 10px;
        font-family: monospace;
        line-height: 21px;
        background: #282a3a;
        border-radius: 2px;
        padding: 20px 10px;
        height: 200px;
        overflow-y: auto;
      }

      .line-numbers {
        width: 20px;
        text-align: right;
        height: 9999px;
      }

      .line-numbers span {
        counter-increment:  linenumber;
      }

      .line-numbers span::before {
        content: counter(linenumber);
        display: block;
        color: #506882;
      }

      textarea {
        height: 9999px;
        line-height: 21px;
        overflow-y: hidden;
        padding: 0;
        border: 0;
        background: #282a3a;
        color: #FFF;
        min-width: 500px;
        outline: none;
        resize: none;
      }
    </style>
  </head>
  <body>
    <div class="editor">
      <div class="line-numbers">
        <span></span>
      </div>
      <textarea></textarea>
    </div>

    <script>
      const textarea = document.querySelector('textarea')
      const lineNumbers = document.querySelector('.line-numbers')

      textarea.addEventListener('keyup', event => {
        const numberOfLines = event.target.value.split('\n').length

        lineNumbers.innerHTML = Array(numberOfLines)
          .fill('<span></span>')
          .join('')
      })

      textarea.addEventListener('keydown', event => {
        if (event.key === 'Tab') {
          const start = textarea.selectionStart
          const end = textarea.selectionEnd

          textarea.value = textarea.value.substring(0, start) + '\t' + textarea.value.substring(end)
          textarea.focus()

          event.preventDefault()
        }
      })
    </script>
  </body>
</html>
Rocket Launch Your Career
Speed up your learning progress with our mentorship program. Join as a mentee to unlock the full potential of Webtips and get a personalized learning experience by experts to master the following frontend technologies:
Courses


Recommended
How to Open Any File in Javascript with Progressbar
How to Build a Pagination Component in Vanilla JavaScript